
Instructions / Assembly
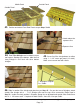

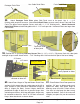


49. Attach Filler Trim (8 - 5/8” x 2 1/2” x 36”) to each corner side wall (2 per corner). Align Filler
Trim so it sits flush with top of Skirting. Attach with 4 - 1 1/2” finishing nails per trim.
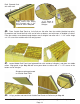
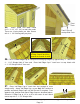
48. Attach Bottom Bevel Skirting (1/2” x 4 1/2” x 34 3/4”-Bevel is thicker at butt and thinner at top of
board) around the base of the shed. Skirting will hide floor framing. Gaps on side will be covered by
Wide Trim pieces later. Start with front and rear skirting pieces first and attach with 4 - 1 1/2” finishing
nails per piece.
Toll Free 1-888-658-1658 www.outdoorlivingtoday.com sales@outdoorlivingtoday.com
Page 21
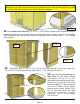
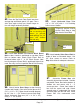
50. Align and attach both Narrow and
Wide Trims to each corner. Starting
with a Narrow Trim (1/2” x 2 1/2” x 79”),
align tight underneath Soffit and Rafter.
Narrow Trim will cap Wide Trim when
attached in Step 51. Note that Narrow
Trim will sit slightly below Bottom
Skirting when correctly ttached. Do a
dry run with both Narrow and Wide
Trims prior to attaching to confirm
positioning. Use 8 - 1 1/2” finishing
nails to secure.
side of shed
Narrow Trim
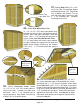
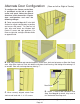
Expert Advice: When installing trim, sort pieces according to color and pieces that are most
pleasing to the eye. Start with least visible side of shed and use the least desirable pieces first. Install
trim to most visible side of shed as your skill installing trim improves.
side skirting
Thicker at Butt
Gap between
Filler Trim.
Trim to top
of wall.
Flush to bottom
of siding.