
Instructions / Assembly


Narrow Trim
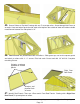
60. Attach Narrow Rear Wall Trim
(1 - 1/2” x 2 1/2” x 77 1/2”), where rear wall
panels come together and leave a seam,
with 8 - 1 1/2” finishing nails. Align Trim at
bottom with the corner trims.
Toll Free 1-888-658-1658 www.outdoorlivingtoday.com sales@outdoorlivingtoday.com
Page 24
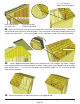
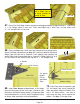
Square Cut Facia
Angled Facia
Square cut Facia
positioned between
Angled Facia
Square Cut Facia
Angled Facia
61. Position Front and Rear Facia (angle cut on ends) and Side Facia (square cut on ends) in
corner. Line Fascia up so square cut Facia is positioned between angled cut facia. Attach angled facia
to plywood end with 6 - 1 1/2” finishing nails per piece. Gap where facia boards come together at peak
will be covered in Step 63. Do a dry run using Fascia to help you correctly position before attaching.
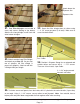
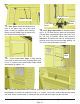
Pentagon
Facia Plate
63. Attach Pentagon Facia Plate where
Front and Rear Facia meet at the peak. Use
4 - 1 1/2” finishing nails per piece to secure.
62. Attach Side Facia to roof rafter ends. There
are 2 Facia pieces per side. Secure with 6 - 1 1/2”
finishing nails per piece.