
Instructions / Assembly


3D
6” wide
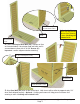
19. To finish side, place and attach 3D Shingle (6” wide x 7” long) in line with 3rd and final row of
shingles. Shingle 3D will partially cover Shingle 3C. Secure with 2 - 7/8” Shingle Nails (M) 2”- 3”
from top. (Nails will be covered by Ridge Cap - 4N). Complete attachment of shingles on opposite
roof panel side following Steps 17 - 18.
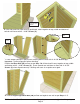
17. Position and attach 3A Shingle (5” wide) on Roof Panel with 3 - 7/8” Shingle Nails (M).
See above for details.
3A
Align 3A Shingle tight
against roof shingle
.
3A
3B
Secure with 3 - 7/8”
Shingle Nails
Flush with other
Roof shingles.
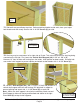
18. Place and attach 3B Shingle (6” wide) directly on top of Shingle 3A. Shingle 3B will slide under 2nd
row shingle. Secure with 3 - 7/8” Shingle Nails (M) at least 9” from butt. Place and attach a
3C Shingle (5” wide x 15” long) in line with second row of shingles. Secure with 3 - 7/8” Shingle Nails
(M) at least 9” from Butt.
Thick End
5” wide
6” wide
3B
Thick End
3C
5” wide
Secure with 3 - 7/8”
Shingle Nails
2nd Row Shingle
Toll Free 1-888-658-1658 www.outdoorlivingtoday.com sales@outdoorlivingtoday.com
Page 10