
Use and Care Manual


Toll Free 1-888-658-1658 www.outdoorlivingtoday.com sales@outdoorlivingtoday.com
Page 14
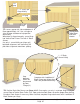
29. Locate 16” long x 5 1/2 and 2 3/4” wide Shingles (V, W). Starting with a 5 1/2” wide Shingle on the
left side, align first Shingle on front left corner to overhang the Front Door Header Trim and Front / Side
Corner Trim by 1 1/2”.
1 1/2”
1 1/2”
31. With 1st row of Shingles spaced correctly from side to side and overhanging the Front Door Header
Trim by 1 1/2”, secure each Shingle with 2 - 7/8” nails. Place 2nd row of shingles directly on top of first
row except use a 5 1/2” wide shingle on the right side and a 2 3/4” wide shingle on the left . Secure both
outside Shingles with 2 - 7/8” Shingle Nails 8” from their butt.
1/8” to 3/8”
gap between
Shingles.
Nail 2 1/4” from front edge
Important-
Butt (thick) end of
shingle will be facing
towards front
Butt End
2 1/4”
5 1/2”
2 3/4” wide x
16” long Shingle
30. When first 5 1/2” wide x 16” long Shingle is correctly aligned, nail down to Plywood Roof with 2 - 7/8”
shingle nails 2 1/4” from front edge. Position and secure a 2 3/4” wide x 16” long shingle on opposite corner.
Drill pilot holes first when nailing 2 3/4” wide Shingle to roof. Space remaining 5 1/2” wide x 16” long shingles
between both outside shingles leaving an 1/8” to 3/8” gap between each Shingle.
2 3/4” wide
5 1/2” wide
8”
3 Extra 5 1/2”
wide Shingles
and 2 - 2 3/4”
are included in
kit.