
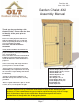
Use and Care Manual
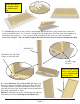
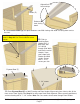
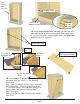

1. Flip Floor (A) over on a level surface. Locate Legs (B) and position in each corner tight to floor and
framing and attach with 2- 2 1/2” screws. Complete all Leg attachments. Flip Floor over and complete Leg
attachments by screwing 1 - 2 1/2” screws through Floor Boards into each Leg. Level Floor before
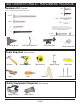
proceeding to Step 2. You can find the Square Drive Bit for the screws in with the Hardware Kit Bag.
Front
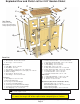
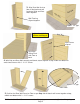
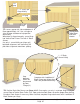
2. Locate Side Walls (C) and Rear Walls (D). Make sure
walls are in correct orientation (Siding cut flush with Wall
Framing at bottom). Position Side Wall on Floor so it sits
flush with front and side. Have helper hold Side Wall while
Rear Wall is positioned on Floor.
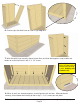
Optional - Caulking wall seams will help prevent moisture
from entering at seam. Caulking not Included in Kit.
Front
Rear
Side Wall (C)
Side Wall Flush with Floor
Frame at Front and Side
At Rear, a gap
will exist.
Caulking
Optional - Caulking
seams will help prevent
moisture from entering
at seam. Caulking not
included in kit.
Toll Free 1-888-658-1658 www.outdoorlivingtoday.com sales@outdoorlivingtoday.com
Page 4
You can find the
Square Drive Bit for
the screws in with
the Hardware Kit
Bag.