
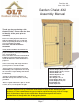
Use and Care Manual

Toll Free 1-888-658-1658 www.outdoorlivingtoday.com sales@outdoorlivingtoday.com
Page 5
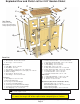
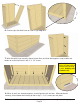
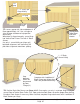
4. With Side and Rear Wall correctly positioned, attach together at top, middle and bottom of
vertical wall frames with 3 - 2 1/2” screws.
5. Position 2nd Rear Wall Panel on Floor as per Step 3 & 4. Attach wall frames together at top,
middle and bottom with 3 - 2 1/2” screws.
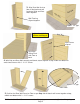
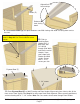
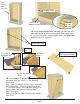
Side Wall
Rear Wall
3. Align Rear Wall flush to
floor at the back and wall
framing of Side and Rear
Walls together.
Rear Wall
Siding Flush
with Floor at
back.
Wall Framing
aligned together.
approx. 1/2” gap
Rear Wall
Wall Frames
aligned
Do Not Attach Walls
To Floor until Step 8.
Rear Wall
approx. 1/2” gap