
Use and Care Manual
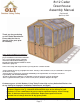

Toll Free 1-888-658-1658 www.outdoorlivingtoday.com sales@outdoorlivingtoday.com
Page 7
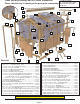
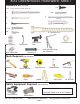
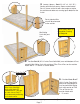
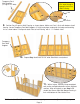
4. Locate 4 pieces - Part C (3 1/2” x 3 1/2”x 76” ).
Starting with front left corner, choose and orientate
Post as shown to the left with short angle cut top to
the outside and dado cuts running top to bottom to the
inside.
Wall siding
flush with post
trim
Posts attached filler
trim will be orientated
to the outside.
5. Position Part D (25 1/2” wide Front Solid Wall) even with bottom of Post
and with Wall Siding flush with outside of Filler Trim of Post on the outside.
Attach with 3 - 3” screws as shown above.
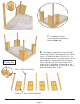
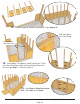
Part E or F
6. Position Parts E or F
(20 1/4” wide Front Solid
Wall) even with bottom of
Post and with Wall Siding
flush with outside of Filler
Trim of Post on the
outside. Attach with
3 - 3” screws.
Important:
There are 4 Side Wall
Panels with Vents (E)
included with kit. They are
the same size as Part F.
We recommend positioning
one in each corner.
Important:
Do not attach Walls to
Foundation Framing
until Step 19.