
Use and Care Manual

Toll Free 1-888-658-1658 www.outdoorlivingtoday.com sales@outdoorlivingtoday.com
Page 9
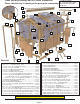
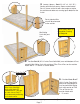
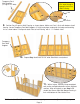
9. Position Post R against Wall Framing as shown above. Make sure Post is flush with bottom of wall
framing. Locate Temporary Post/Wall Supports (3” high) and place underneath 2x4 edge and touching
2x3 as shown above. Clamp and attach Post to wall framing with 3 - 3”. Do both sides.
Temporary Post/
Wall Supports
(3” high x 2.5” wide)
Flush
Important:
Use a wood clamp to
temporarily hold Post
to Wall Framing.
2x4
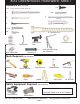
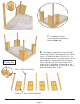
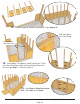
10. Repeat Step 9 until four 20 1/4” wide Side Walls are attached.
Temporary
Post/ Wall
Support.
11. With a helper, carefully lift up completed
wall section and place between corner wall/post
sections. Align and attach as per Step 9. Be
mindful that corner Side Wall bottom framing is
flush with bottom of Side Vertical Post.