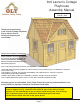
9x9 Lauren’s Cottage Playhouse Assembly Manual Revision #8 Feb 9th, 2015 Thank you for purchasing a 9x9 Lauren’s Cottage Playhouse. Please take the time to identify all the parts prior to assembly. Safety Points and Other Considerations Our products are built for use based on proper installation and normal residential use, on level ground. Please follow the instruction manual when building your Cabana and retain the manual for future maintenance purposes.
Thank you for purchasing our 9x9 Lauren’s Cottage Playhouse. Please take the time to identify all the parts prior to assembly. A. Floor Section 2 4 2 1 1 2 2 1 1 5 5 - D.
LAUREN’S COTTAGE HARDWARE PACKAGE Hardware Kit (Provided) Note: screws and nails shown actual size.
A. Floor Section Plywood Floor (2) 45 1/2” x 88” Exploded view of all parts necessary to complete Floor Section. Identify all parts prior to starting. Note, Floor Footprint is 110” wide x 105” deep.
3. Lay out Floor Joist Frames as illustrated at left. The Footprint for the floor when attached together will be 110” wide x 105” deep. t n Fro 4. Attach each large and small floor joist frames together with 6 - 2.5” screws per section. 110” 105” nt o Fr 5. Complete all large and small frame attachments. Screw each completed section together with 8 - 2.5” screws. 6. When completed, your floor footprint should be 110” wide x 105” deep. 7. Attach Floor Runners to completed floor frame.
Concrete Slab Foundation 10. With Floor Runners attached, carefully flip 9. Complete all Floor Runners. Foundations Note: The floor will be flipped over and floor runners will sit on your foundation. It is important to note that having a level foundation is critical. Choosing a foundation will vary between regions. Typical foundations can be concrete pads or patio stones positioned underneath the floor runners. the floor over and place on your foundation. Caution- you will need 2 people to assist you.
B. Wall Section Exploded view of all parts necessary to complete the Wall Section. Identify all parts prior to starting. Gable Walls (4) Front and Rear Top Plates (6) Side Top Plates (4) 2 outside are angle cut on edge Door Header Window Wall Panel (4) Solid Wall Panel (7) Narrow Wall Panel Window Insert (4) Door Jamb 13. Lay out all the wall panels and become familiar with their location.
Bottom Wall Plate 14. If Bottom Plate on some Solid Walls is not attached, start by carefully laying panel face down. Position and attach Wall Plate to bottom of wall studs of each wall panel with 3 - 2 1/2” screws. Position so plates are flush with framing. Note, some Bottom Wall Plates may already attached to some Solid Walls. 15. Starting at Rear Corner, position a Solid Wall Panel on top of plywood floor. The Wall Panel bottom framing will sit flush with plywood. Wall siding will overhang the floor.
Rea 17. Position rear solid wall into place on plywood floor. Butt both vertical wall studs of side and rear walls together and attach with 3 - 2.5” screws. Screw at the bottom, middle and top of stud to secure properly. lid W all Si de So lid W al l r So Optional - Caulking seams will help prevent moisture from entering at seam. Caulking not included in kit. Do Not Attach Walls To Floor Until Step 26. 18.
19. Start positioning and securing wall panels around your floor. Attach wall studs together as per Step 17. Wall panel will sit flush with plywood at front of shed. Front 20. Complete all side and rear wall attachments. Attach as per Step 17. 21. Place both Window Wall Panels in front and attach. 22. Position and attach Narrow Wall Panel to left side wall stud with 3 - 2.5” screws as per Step 17. Note, Narrow Wall is 58 1/2” high (1.5” shorter than wide walls). Toll Free 1-888-658-1658 www.
23. Locate Window Inserts and Window Trim Packages. Before installing, run a bead of caulking around window opening perimeter. Position window in cavity and secure with 8 - 1 1/4” screws. Position Window Trim around window doing a dry run first and attach with 4 - 1 1/2” finishing nails per piece. Trim Sizes = 1x 24 1/16” = top / 3 x 23” = Sides & Bottom. Jamb sits flush with outside of siding. 24.Locate Vertical Door Jamb and position flush against right wall panel stud.
26. When all walls are attached Optional - Caulking seams will help prevent moisture from entering at seam. Caulking not included in kit. together, check alignment with the floor. Bottom wall framing should sit flush with outside of floor joists and plywood floor. Confirm doorway opening is 23 1/2” wide. When positioned correctly, fasten bottom wall plates to floor using 4 - 2.5” screws per wall panel. Bottom Wall Plate Ca ulk ing Angle screws into perimeter Floor Joists.
Sid eT op Pla te 28a. When Side Top Plates are correctly positioned, secure with 4 - 2 1/2” screws per piece. Side Top Plates Front Top Plates (4) 29. There are 4 Front Top Plates. Two Front Corner 10” long (45 degree angle cut on edge) and 2 Front 45” square cut pieces. Position as per Step 28. Use 2 - 2 1/2” screws for Corner Pieces and 4 screws per middle piece. Complete remaining Side Top Plates. Notched at top 30. . Locate Gable 1/2 Walls for both sides of the shed.
Gable Framing 31. Lift up a completed gable section and place on top of Side Wall Top Plate. The gable framing should sit flush with the inside of the top plate. straight edge 32. The gable should be centered sideways (left to right) on the top plate. Hint: use a straight edge to check the angle of the gable framing and top plate. Both angles should line up. Adjust gable accordingly. When positioned correctly, attach to walls and top plate with 8 - 2” screws.
C. Rafter and Roof Section Exploded view of all parts necessary to complete the Roof Section. Identify all parts prior to starting.
Ridge Board 35. Locate 9 Rafters, 2 Soffits and completed Ridge Board. Lay out on level ground as shown to right. Note, completed rafter section will flipped over in Step 38. Double up Rafters Soffits 36. Attach completed Ridge Board to ends of both outside rafters with 2 - 2” screws per end. Measure and position interior Rafters as illustrated below. When positioned correctly, attach Ridge Board to remaining rafters with 2 -2” screws /rafter end. 111.5” Metal Connector Palte to inside 15.25” 16.
38. Position Rear Rafter Section on end gable. (Make sure Soffit is facing down). Soffit e Ridg d Boar r fte Ra Gable Notch 39. Slide Rafter Section up on gable framing until bottom of Ridge Board slips into gable notch. Soffit should sit flush against wall panel. Rafter should rest on gable framing Tack together Soffit should sit flush against wall panel. 40. When Rafter Section is positioned correctly on gable framing on both sides, tack in place to hold position with 2” screws..
Ridge Board Overhand facing up. 41. Locate all Front Roof Rafter Sections as illustrated above. Place so Ridge Board overhang is facing up. There is a Left, Middle and Right Rafter Section. Place on a flat level surface. 42. Position Outside and Middle Rafter Sections together so Ridge Boards and connecting rafters are flush with each other. Attach together with 6 - 2 1/2” screws. Ridge Board Connecting Rafters 43.
44. Carefully flip completed Front Rafter Section over and position on gable framing. 45. Position Front Rafter Section on gable wall framing. When correctly aligned, ridge board will slide into gable notch at top. Outside rafter will sit on gable framing. Ridge Board Gable Notch 46. 47. Ridge Board will sit in Gable Notch when Front Rafter Section is correctly aligned. Toll Free 1-888-658-1658 At the peak, align Ridge Boards so they are flush together and secure them with 12 - 1 1/4” screws.
48. With both Rafter Ridge Boards connected. Completely secure Gable framing to both outside rafters with 12 - 2” screws per gable side. 49. ffit So To further secure Rear Rafter Section, screw rafters down to rear walls near ends using 1 - 3” screw per rafter. Screw down into rafter on an angle so screw goes through Top Plate and Wall Plate. Pilot hole Rafters wiht a 1/8” drill bit prior to attaching rafters with 3” screws. Important: Drill 1/8” pilot holes into Rafter and counter sink hole 1/2” deep.
51. Lift up Dormer Gable and place equally from side to side on Front Top Wall Plate. Bottom Dormer Gable framing should sit flush with top plate from the inside. From the outside, Dormer Gable Siding will slightly overhang wall siding. 52. When correctly positioned, secure Dormer Gable frame to Top Plate will 8 - 2” screws. 2 Triangular Corner Gable Trims are included to trim out gap where Doormer Siding and Rafter meet. Use 2 - 1 1/4 finishing nails to secure each piece. Left Dormer Rafter 53.
Dormer Rafter Ridge Board Dormer Gable Notch 54. Place Dormer Rafter Ridge Board in Gable Notch and rafter on Dormer Gable framing. On opposite end, angle cut rafter will sit on Front Middle Rafter end. 55. Place Right Dormer Rafter on Dormer Gable framing. Position Dormer Rafter Ridge Board in Gable Notch as per left side. Level Dormer Ridge Boards 56. At the peak, align Ridge Boards so they are flush together and secure them with 8 - 1 1/4” screws.
57. With ridge boards positioned correctly, attach at angle end of Ridge Board into Front Middle Rafter with 2 - 2 1/2” screws. From the bottom, further secure by toe-nailing 2 - 2 1/2” screw on angle from Front Middle Rafter into Ridge Boards. (Drill 1/8” pilot hole to prevent splitting) 58. Secure Dormer Rafters to Dormer Gable Framing with 10 - 2” screws. (5 per side). At bottom end of Dormer Rafter, further secure rafter to Top Wall Plate with 1 - 4” screw. Complete both sides. 59.
60. Locate both Rolls of Flex Flashing and lay out in dormer valley. Position so it covers valley rafters near Dormer Gable and secure with 2 - finishing nails. At top, slightly fold over Dormer Ridge Boards and trim excess flashing if required. Attach with 2 - finishing nails. Complete both sides. Plywood flush with end of rafters. 61. Locate Outside Rear Roof Panel. Outside panels will have shingles overhanging plywood roof sheathing on outside and plywood flush to inside.
Important: Drill 1/8” pilot holes in each Rafter (3 per Rafter) and counter sink holes 1/2” deep Note, from outside, push roof panel down when securing. 63. From the inside, further secure Roof Panel to rafter using 3 - 2.5” screws. Screw from rafter into plywood sheathing. Drill pilot holes in Rafter first. Middle Rear Roof Panel 64. Locate Middle Rear Roof Panel. This panel has plywood flush with shingles on both sides. 65. Place Middle Rear Panel on Rafters and position as per Step 61 - 62.
67. From the outside, screw down through bottom row of shingles into rafter with 1 - 2.5” screw. Secure from inside as per Step 63. 68. Carefully lift and place Front Left Roof Panel on front rafters. Attach with 1 - 2.5” screw to temporarily secure roof. 69. Position Roof Panel so plywood roof sheathing is flush with end of rafter. Make sure Front and Rear Roof Panels are overhanging Side Gables equally. Screw Roof Panel approx. 38” up (where Filler Shingle will cover) into rafter with 1 - 2.5” screw.
Important: Drill 1/8” pilot holes into Rafter and counter sink hole 1/2” deep. 72. Screw down through bottom angle cut row of shingles on both sides into rafters with 2 - 2.5” screws. Further secure panel from inside with 1 - 2.5” screw from mid rafter into roof sheathing. 73. Lift and place Right Side Front Roof Panel on rafters. Position on rafters as per Step 69. Important: Drill 1/8” pilot holes into Rafter and counter sink holes 1/2” deep. 74. Secure Roof to Rafters as per Steps 69-70.
75. Roof Filler Shingles are included to cover seams where Roof Panels come together. Starting at the bottom rear side of playhouse, slide the first 16” long shingle in until flush with other bottom shingles. DO NOT ATTACH UNTIL STEP 76. Attach above the exposure line. Exposure Line 77. Slide in another filler shingle and attach as 76. Screw first Filler Shingle down to rafters per Step 76. On your last row of shingles, the filler shingle is 7” long.
Roof overhanging Dormer Gable Valley 80. Position Dormer Roof Panel so diagonal end sits snug in roof valley. Roof shingles will overhang Dormer Gable. Panel should not be placed past center of Dormer Ridge Board. When correctly positioned, attach Roof panel to Ridge Board 2” down from top with 3 - 2.5” screws. Important: Drill 1/8” pilot holes into Rafter and counter sink holes 1/2” deep. 81. From the inside, further secure Dormer Roof Panel to Dormer Rafter using 2 - 2.5” screws.
83. Attach Dormer Roof Panel to Dormer Rafter from the inside as per Step 81. 84. To further secure Roof Panels, position 2 Simpson Strong ties on outside Dormer Rafters and plywood roof sheathing. Secure each with 4 - 1 1/4” screws. There are 4 Ties for Dormer Gable. 85. To fully secure Outside Roof Panels to Gable, position 3 Simpson Strong ties on outside Rafters and plywood roof sheathing. Secure each with 4 - 1 1/4” screws. There are 6 Ties per Gable side. Toll Free 1-888-658-1658 www.
D. Miscellaneous Section Ridge Caps Valley Trim Peak Facia Plate Peak Facia Plate Side Facia Shutters Dormer Facia Front Corner Facia Rear Facia Narrow and Long Horizontal Door Trim Top Door Window Box Thumb Latch Narrow Trim Bottom Door Bottom Skirting Bottom Skirting Wide Corner Trim Filler Trim Narrow Corner Trim 86. Attach Front Corner Soffits (8 3/8” long) to outside rafters. Use 4 - 1 1/2” finishing nails per side. Toll Free 1-888-658-1658 www.outdoorlivingtoday.
87. Attach Bottom Skirting around the base of the playhouse. Skirting will hide floor framing. The side skirting pieces will meet together in the center. Gaps on outside will be covered by Wide Trim pieces later. Start with front and right side skirting pieces first and attach with 4 - 1 1/2” finishing nails per piece. g irtin sk side 3 pieces of Bottom Skirting for front and rear. 1 1/4” screws Fron t Skir ting 88. Attach Filler Trims (nailing strips) to each corner front wall.
e im Tr id W l al W t on Fr 90. Position Trim flush with Bottom Skirting. At the top, trim will sit tight to bottom of Soffit. (Soffit not shown). When correctly aligned, attach with 6 - 1 1/2” finishing nails per piece. 91. Attach Side and Rear Wall Narrow Trim (2 1/2” wide) where wall panels come together and leave a seam. Position trim equally on wall seam and flush at bottom of Bottom Skirting. Use 6 - 1 1/2” finishing nails per piece to secure.
Horizontal Trim Front Trim Doorway Trim 93. Position Doorway Narrow Trims (2 1/2” wide) over door seam. Use Horizontal Door Trim to assist with trim placement. Attach each Narrow Trim with 6 - 1 1/4” finishing nails. Attach Front Narrow Trim where seam of narrow wall and window wall come together. Attach both Horizontal Door Trim and Horizontal Narrow Wall Trim with 4 and 2 - 1 1/2” finishing nails to complete. Side Facia Place Corner and Rear Facia on Rafter ends to do a dry run. 94.
97. Complete positioning and attachments of both Rear Facia pieces. To cover seam where Facia’s meet, attach a Facia Detail Plate with 4 - 1 1/2” finishing nails. Front Corner Facia. 98. Locate both Dormer and Front Corner Facia pieces. Position and secure Dormer Facia to the end of the Dormer Roof plywood roof sheathing. Use Front Corner Facia to assist you in setting up both Facia pieces. When correctly aligned, attach Dormer Facia with 5 - 1 1/4” screws. 99.
Valley Trim 100. Attach Peak Plate to Dormer Facia as per 101. Position Valley Trim where Front and Step 95. Dormer Roof Panels meet. Attach with 3- 2 1/2” screws per piece. Complete both sided. Shingle Ridge Cap 2nd Ridge Cap 9” 102. Place First Roof Ridge Cap on roof peak overhanging shingles by approximately 1”. Attach with 2 - 1 1/4” shingle nails. Place 2nd Cap recessed 1” from 1st Cap and attach 9” from end with 2 - shingle nails.
104. At center, place Ridge caps and attach with 4 - shingle nails. 105. Complete Ridge Caps for Dormer Roof as per Steps 102-103. 106. Attach Dormer Window Shutters with 2 - 1 1/4” screws per shutter. 107. Assemble Flower Box Kit with Assembly Instructions included. Position completed Flower Box below bottom of window trim and secure with 2 - 2” screws per box. Screw from inside of box into the center wall stud. Attach second screw 2” underneath first screw and once again into the wall stud.
E. Loft Section Top of Wall Framing Flush with wall stud. Rear 58 1/2” to Floor Front 108. Locate both Loft Floor Support Posts (58 1/2” long). Position flush on wall stud. Attach with 4 - 2 1/2” screws per Post. Top of Wall Framing 60” to Floor 110. Locate Front Support Joists (Notched for 109. Complete attachments of both Loft Floor Supports as per Step 108. Doorway) and attach 60” from floor to top of plate with 8 - 2 1/2” screws 111. Complete attachments of both Front 112.
I Bolt 2x6 Rear Floor Support Joist C-Clip and Turnbuckle 113. Locate Rear Support Joists (Pre-drilled holes in 1 end) and Loft Chains with C-Clip and Turnbuckle already attached. Slide I Bolt through hole and tighten with bolt to Joist. Attach C-Clip to I Bolt and pull Chain through hole in Loft Floor. 114. Attach Rear Support Joist to outside framing of Loft Floor with 2 1/2” screws. Complete both outside Loft Floors now. 115.
116. Make sure Loft Floor is sitting on Front Support Joist and Loft Post. I Hook 117. Locate I-Hook and screw into Roof Rafter above Loft Floor. Position Chain on I Hook. Position 2nd Outside Loft Floor on Front Support Joists and Loft Post as per Step 116. 118. With 2nd Outside Loft correctly in place, screw I-Hook into Roof Rafter above and position Chain on I Hook as per Step 117. Toll Free 1-888-658-1658 www.outdoorlivingtoday.com Page 40 sales@outdoorlivingtoday.
119. Locate Middle Loft Floor (No Hole Drilled in Floor) and position between Outside Loft Floor Sections. Use Level and adjust Loft Floor by adjusting Chain Turnbuckle. 120. With Loft Floor correctly aligned and positioned, attach all framings together with several 2 1/2” screws. Attach Rear Floor Joists to Middle Loft Floor Section with 4 additional 2 1/2” screws. 121. Lift and place Safety Railing on Loft Floor. Decide what side you prefer Ladder placement and position Railing accordingly.
123. On the Ladder side, attach Railing Post to Rafter with 2- 2 1/2” screws. If a gap exists between Rafter and Railing Post, use shim first to fill in the gap and then secure to Post to Rafter. Completed Safety Railing 124. Locate Ladder and position inside the playhouse in loft opening. 125. Using 2 - 4” screws, attach the top of the Ladder to Loft Floor. Attach bottom of Ladder to main Floor with 2 - 2 1/2” screws. Be sure to pilot holes the Ladder before securing any screws.
We hope your experience constructing our building has been both positive and rewarding. We value your feedback and would like to hear back from you on how well we are doing in the following areas: 1. Customer Service 2. On Time Shipping 3. Motor Freight Delivery 4. Quality of Materials 5. Assembly Manual 6. Overall Satisfaction. Please call, write or email us at: Outdoor Living Today United States Address P.O.