
Installation Guide


Toll Free 1-888-658-1658 www.outdoorlivingtoday.com sales@outdoorlivingtoday.com
Page 4
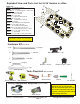
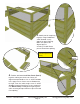
You can find the
Square Drive Bit
for the screws in
with the Hardware
Kit Bag.
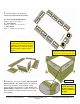
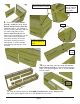
1. Orientate Panels as illustrated
(screens positioned to the inside).
10 - Side and Rear Wall Panels
(Part A - 46” w x 33 1/2” h).
2 - Front Panels
(Part B - 30 5/8” w x 33 1/2” h)
1 - Door Panel
(Part C - 30 5/8” w x 33 1/2” h)
Door Panel
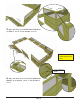
2. Starting in rear corner, position Rear and Side
Panels (Part A) - 46” wide together so framing is
flush at top and sides. When aligned, attach
frames together at top with 1 - 2 1/2” Screw. Use
Wood Clamp to hold frames together. Pre-drill rear
frame first with 1/8” diameter bit to prevent wood
from splitting.
2 1/2” Screw
Front
C
B
A - Rear
B
A - Rear
A - Side
A - Side
A - Side
A - Rear
A - Side
A - Rear
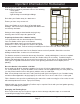
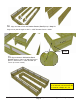
Before positioning panels, lay out
footprint and level ground perimeter.
If possible, dig a small trench and
backfill with 1 or 2 inches of sand.
Sand will make it easier to level
panels.
Frames even.
A - Side
A - Side
A - Side
A - Side
A - Side
A - Side
Note: There is no difference between
Parts B and C until later in the assembly
manual when one will be used as a Door.