
Instructions / Assembly


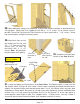


25. Position the Front
Top Plates on top of Door
Header and front wall
panel. There are 2 plates
(72” and 19” long). Front
top plates are straight cut
on the ends. Once again,
the plate will be flush with
inside of top wall framing.
Attach with 6 - 2” screws
(4 screws in long and 2 in
short plate).
24. Attach the 4 Side Top Plates (2 per side).
The side top plates are angle cut down the length.
Once again, position top plate on wall plate so it is
flush with inside of wall plate. Side plate should
also be flush with rear wall plate. Secure with 4 - 2”
screws per piece.
26. Complete all side
top plate attachments as
described above.
Flush
Toll Free 1-888-658-1658 www.outdoorlivingtoday.com sales@outdoorlivingtoday.com
Page 12
Caution: Prior to
completing Step 29,
side top plates will be
protruding out from
the shed. Please use
caution in the work
area.