
Instructions / Assembly


Toll Free 1-888-658-1658 www.outdoorlivingtoday.com sales@outdoorlivingtoday.com
Page 13
Top Plate Front Extension
A.
B.
C.
Handrail
equally
spaced on
Wall Trim
Support and
Porch Post.
Attach with
3 - 2” screws.
Hand
Rail
D.
Front Porch
Wall Trim
Supports with
Filler Strip
attached.
Hand Rail
Section
4x4
Porch
Post
Exploded
View of
Porch Rail
Section
Corner
Bracket
Bracket centered
on post
4x4
Porch
Post
4”
3 - 2”
screws
2 1/2” Filler
Strip on rear
of Wall Trim
Support.
2 1/2”
Plate Centered
on 4 1/2” trim.
2 - 2”
screws
Front
Important:
Drill Pilot
Holes to
prevent wood
from splitting!
Porch
Post
2 - 2”
screws
Rear View
2 1/2”
2 - 2”
screws
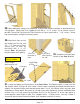
27. Complete the 2 Porch Rail Sections,
following steps A through D.
A. Attach 1x 4 Top Plate Front Extension
(34 1/2”L) to 4x4 Porch Post with 2 - 2” screws.
Make sure support is flush with post.
B. Attach 1 x 4 1/2” Wall Trim/ Supports to
Front Extension using 2 - 2” screws. Make sure
Front Extension is Flush to back of wall trim and
centered 1/2” on each side.
C. Attach both Corner Brackets with 3 - 2”
screws from Front Extensions into Brackets.
Attach Brackets to Porch posts. Drill Pilot hole in
bracket first.
D. Attach Hand Rail to complete your Porch
Rail Section. Hand rail should start 4” from
bottom of Post and be centered on Post.
Handrail should sit approx. 1” in from outside of
Wall trim. Use 3 - 2” screws to attach.