
Instructions / Assembly
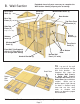
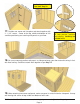

16. Starting at Rear Corner, position a Wall Panel on top of plywood floor. Depending on your
preference, you may use a solid or window wall panel in this position. If using a solid wall, make sure
panel is facing up. The side wall panels will sit flush at the end of the plywood floor with the front and
rear panels sandwiched between them. Note: Siding will overhang the floor by approximately 1/2”.
Important: Make sure
all walls are aligned in
their upright position. If
not ,water may leak into
your playhouse. Unsure
if panel is facing up or
down? check siding on
window wall panel to
match alignment.
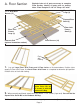
Outside 2x3 Plate of wall panel
is flush with outside of floor
frame when properly aligned.
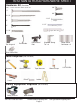
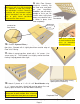
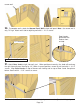
15. Locate Window Inserts. Place Window Insert into wall opening tight to wall siding. On the
inside, shim Window Insert evenly in cavity. Kits include one additional shingle for shimming of the
window. When properly positioned, secure Window Insert to wall framing cavity with 4 - 2” screws.
Toll Free 1-888-658-1658 www.outdoorlivingtoday.com sales@outdoorlivingtoday.com
Page 8
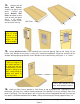
Wall Plate
14. Starting with All
Solid Wall Panels,
carefully lay panel face
down. Position and
attach Bottom Wall
Plates to bottom of wall
studs of each wall panel
with 3 - 2 1/2” screws.
Position so Wall Plates
are flush with framing.
Note: You may
prefer to install
Windows in the
Miscellaneous
Section at the
end of assembly.
Side Panel