
Owner's Manual


RR2160
MkII Owner’s Manual
Outlaw Audio RR2160 MkII Stereo RetroReceiver
13
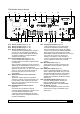
External Loop Connections
Using shielded RCA-to-RCA cables, connect the
external processor’s analog audio outputs to the
RR2160
MkII’s L & R analog audio inputs. Next,
connect the external processor’s analog audio
inputs to the RR2160
MkII’s analog audio outputs.
Remember these two points.
• You must push the front panel External Loop
button (F16) or the LOOP button of the
Source/Input selector buttons on the remote
(C3) to route the audio signal to and from the
ex
ternal processor. The button’s blue LED will
light when the external loop is active.
• The external processor loop is a “fixed level”
loop. The loop output is not affected by the
RR2160
MkII’s Master Volume Control.
Preamplifier Outputs/Main Amplifier Inputs
The RR2160
MkII is shipped with U-shaped jumpers
that connect the preamplifier and power amplifier
sections of the receiver. For most systems no
change is needed here, as you will use both
sections of the RR2160
MkII. However, if you wish to
use an optional, ex
ternal amplifier, remove the
jumper plugs and connect the left and right output
jacks on the RR2160
MkII to the matching inputs on
your amplifier. Save the jumper plugs for use
should you later wish to return to normal
operation.
These jacks also provide a means to insert an
equalizer or other device controller in the audio
signal path when you wish to have that device
ALWAYS be used. A good example of this is the
external equalizer/controller used with certain
brands of speakers.
To connect an ext
ernal processor so that it is
always in the audio path, remove the two U
shaped jumpers. As noted above, you will want to
put them someplace safe in case you need them
later. You may want to store them with this
manual or bag and tape them to the rear or
underside of the RR2160
MkII.
Connect the RR2160
MkII’s L & R Preamp audio
outputs (R23) to the inputs of the external
processor. Next, connect the outputs of the
external processor to the RR2160
MkII’s Main amp
audio inputs (R24).
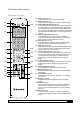
Loudspeaker Connectio
ns
The connections between the RR2160
MkII and your
loudspeakers are critical to good sound. Although
there’s a lot of debate about the “best” speaker
wire and the “best” connectors, our advice is to
use what you feel is appropriate. However, we do
feel that there is one vital guideline: If the run from
your RR 2160 to a speaker is less than 40 feet,
use speaker wire with a conductor diameter that’s
identified as “16 gauge” or lower. For longer runs,
use a minimum of 14 gauge wiring.
If you’
re confused by the “gauge,” you’re not
alone. The standard in wire measurements is
called AWG, or American Wire Gauge. The AWG
number refers to the diameter of one conductor
only (speaker wire has two conductors) and
smaller gauge numbers mean larger conductors.
Here’s a short list of gauge numbers and their
corresponding diameters:
12 gauge .0808"
14 gauge .0641"
16 gauge .0508"
18 gauge .0402"
22 gauge .0254"
You can see that “hardware store” 22 or 24 gauge
wire is very thin. We don’t
recommend it for any
serious audio application. Even 18 gauge “zip
cord” (also called “lamp cord”) is not that
substantial. Our minimum recommendation is
16 gauge, and 14 gauge is better. 12 gauge is
excellent but is comparatively hard to work with (it
usually doesn’t bend easily and terminations –
lugs or banana plugs – are problematic.) The
advantage of large diameter wire is that, all else
being equal, it has less resistance to current flow
than thin wire. Wherever possible, the same
length o
f speaker wire should be used for both
speakers, even if one is positioned closer to the
RR2160
MkII than the other.