
Owner's Manual


RR2160
MkII Owner’s Manual
Outlaw Audio RR2160
MkII Stereo RetroReceiver
8
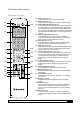
F16 External Loop (Page 12)
Press to add a product connected to the rear
panel External Processor Loop connections
(R21) to the signal path. (Remember to turn that
external unit on!) The button’s blue LED will light
when you’ve chosen this optional signal path.
Note: When the signal is routed through the
External Processor Loop and there is no unit
connected to the jacks, no signal will appear at
either the loudspeaker or headphone outputs.
F17 USB Input (Pages 12, 22)
Connect the output of a
compatible USB storage
device (32GB maximum) to this jack for playback
of audio files.
F18 Source Selector (Page 22)
Press to select the input source (FM, AM, analog
audio, digital audio, USB, phono) that you want
to listen to.
F19 Record (Pages 12, 24)
Press to cycle through the available inputs that
can be used as a recording source. The REC out
signal source is always active and is set by this
function button.
F20 Mute On/Off (Page 22)
Press to mute the speaker outputs. The button’s
blue LE
D will be on when Mute is engaged.
F21 Master Volume control (Page 22)
Turn to the right (clockwise) to increase volume
and to the left (counterclockwise) to decrease
levels.
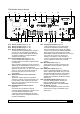
RR2160
MkII Rear Panel
R2 Serial Number
Write this number in the space provided on page
4 for future reference.
R3 USB Input / Upgrade (Pages 12, 22, 28)
Connect the USB output of a compatible MP3
audio player, flash drive, or external hard drive
(32BGB/3.0 speed max) to this jack for playback
of au
dio files. This port is also used for software
upgrades, when available (see page 28).
R4 Ethernet (Page 12)
Connect the RR2160
MkII to a network for
Internet Radio and remote-app access.
R5 PC USB Input (Pages 12, 22)
Connect the RR2160
MkII to a computer
and select the PC USB input to allow the
RR2160
MkII to act as an external sound card.
R7 Coaxial / Optical Digital Inputs (Pages 12, 22)
Connect coaxial or optical digital output from any
audio source such as a CD player, DVD player,
or Blu-ray Disc player.
R1 WiFi Antenna (Page 12)
When hardwiring an Ethernet cable is not possible
this antenna is used to receive a WiFi signal.
R6 FM/HD A
ntenna (Page 11)
Connect the supplied FM antenna or an optional
external FM antenna to this connector.
R8 Accessory Power USB (Page 18).
Use these USB ports to provide 5V power to
accessories such as phones or tablets.
Do not connect a data source to these ports.
R9 Trigger Outputs (Page 18)
These 3.5mm mono mini-jacks provide a
continuous 12VDC signal that may be used to
control optional external amplifiers from Outlaw
and other brands, as well as other compatible
accessories.
R10 IR Input/Output (Pag
e 18)
When your RR2160
MkII is hidden behind doors that
prevent the remote control from “seeing” the front
panel IR sensor, you may connect an optional,
external IR sensor to this 3.5mm mini-plug. To
send the IR signal to another product in a “daisy
change” configuration, connect the IR Out jack to
another product with a compatible IR system.
R11 Master Power Switch (Page 22)
When the power cord has been plugged into an
AC output, put this switch in the On position to
connect the rece
iver to AC. When this switch is
on, the front panel On/Standby pushbutton (F10)
is used to turn the receiver “on” or place it in the
“standby” mode.
R12 Right Speaker Binding Posts (Page 15)
Use these binding posts to connect your primary
(Speakers A) and secondary (Speakers B)
loudspeakers to the RR2160
MkII.
R13 Phono cartridge sensitivity selector switch
(Page 12)
This switch adjusts the phono pre-amp to work
with either moving magnet (MM) or moving coil
(MC) phono cartridges. Set it to correspond with
t
he type of cartridge you’re using.
R14 Phono inputs (Page 12)
Plug your turntable’s output cables into these
jacks.
Note: Do not connect with a phono pre-amp
output. A turntable with a pre-amp should be
connected to one of the Analog inputs.
R15 Ground connector (Page 12)
Connect the ground wire from your turntable to
this screw connector.