
Operation Manual


The Outpost Log System
84
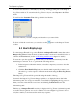
To create a filter, click the Add Filter button in the information panel. This command is
also available in Outpost Log Viewer’s menu under Actions > Add Filter and in the
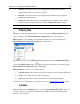
shortcut menus of each log in the console tree. You will see the Filter dialog with a listing
of the columns in that log:
To specify a filtering rule, select each column of data you want to see. In the description
field, the beginning of the rule appears, such as: “Where the Start Time is
Undefined”.
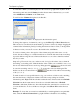
To continue the rule, click
Undefined. You will see a dialog in which you can specify
various limitations for the selected column:
Use this dialog window to meet your needs and click OK. The rule will be completed
according to the choice you have made. For example: “Where the Start Time is last 5
minutes.”
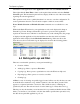
You can specify as many rules as you like, then enter the filter name and click OK. The
new filter will appear in the console tree.
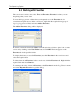
You can also edit an existing filter by clicking the Edit Filter button in the information
panel and editing all the settings of the filter as described above.