
Installation Guide


PAGE 14
INSTALLATION OPTION#2: FOR INSTALLATION TO A 3/8” SHUT-OFF VALVE
OPTION D’INSTALLATION N° 2 : POUR L’INSTALLATION SUR UNE VANNE D’ARRÊT DE 3/8”
OPCIÓN DE INSTALACIÓN #2: PARA LA INSTALACIÓN A UNA VÁLVULA DE CIERRE DE 3/8”
8
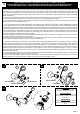
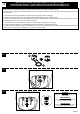
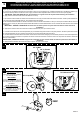
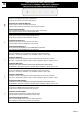
8.1- Change the pre-installed O-ring on the Check Valve (N) to the Large Size O-ring (R).
8.2- Remove the pre-installed Water Supply Hose (D) from the toilet by loosening and unscrewing the nut.
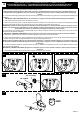
8.3- Insert the Check Valve (N) into toilet water inlet as shown. It is critical to ensure the arrow of the Check Valve (N) points upward or else
water will not ow.
8.1- Remplacer le joint torique préinstallé sur le clapet de retenue (N) par le Grand O-Ring (R).
8.2- Retirez leTuyau exible type 3/4”-G (Pre-installé) des toilettes en desserrant et en dévissant l’écrou.
8.3- Insérez la vanne anti-retour (N) dans l’entrée d’eau de la toilette comme indiqué. Il est essentiel de s’assurer que la èche de la vanne
anti-retour (N) pointe vers le haut, sinon l’eau ne s’écoulera pas.
8.1- Cambie la junta tórica preinstalada en la válvula de retención (N) por la Anillo tórica grande (R).
8.2- Retire la manguera exible 3/4”-G preinstalada (D) del inodoro aojando y destornillando la tuerca.
8.3- Inserte la Válvula de Retención (N) en la entrada de agua del inodoro como se muestra. Es fundamental asegurarse de que la echa de
la válvula de retención (N) apunte hacia arriba o de lo contrario el agua no uirá.
8.1
8.2
8.3
R
N
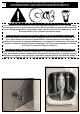
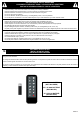
WARNING!
Ensure the arrow of the Check valve (N)
points upward.
AVERTISSEMENT!
Assurez-vous que la èche de la vanne anti-
retour (N) pointe vers le haut.
¡ADVERTENCIA!
Asegúrese de que la echa de la válvula de
retención (N) apunte hacia arriba.