
Instructions / Assembly

P. 17
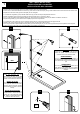
INLINE PANEL INSTALLATION
INSTALLATION DU PANNEAU INLINE
INSTALACIÓN DEL PANEL INLINE
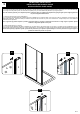
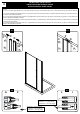
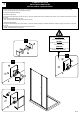
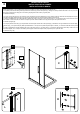
5.1. Insert the inline panel (L) into the wall track (I).
5.2-5.3. Insert the wall track gasket (K) between the wall track (I) and the inline panel (L) from the top towards the bottom. At this step, do not insert the full length,
only enough to hold the panel in place. You will insert it completely once you have nalized the placement of your glass panels.
Note: The wall track (I) allows you to adjust the position of the inline panel (L). Adjusting the depth and/or giving the glass panel a slight angle allows
for precise alignment with the door.
5.1. Insérez le panneau Inline (L) dans la glissière (I).
5.2-5.3. Insérez le joint d’étanchéité de la glissière (K) entre la glissière (I) et le panneau Inline (L) du haut vers le bas. À cette étape, n’insérez pas le joint
d’étanchéité entièrement, seulement assez pour maintenir le panneau de retour bien en place. Vous l’insérerez au complet lorsque vous aurez nalisé le
positionnement des panneaux.
Note: La glissière (I) permet d’ajuster la position du panneau Inline (L). Ajustez la profondeur ou/et donner un léger angle au panneau permet
d’obtenir un alignement parfait avec la porte.
5.1. Inserte el panel inline (L) en el riel (I).
5.2-5.3. Inserte el sello deslizante (K) entre el deslizador (I) y el panel inline (L) de arriba a abajo. En este punto, no inserte la junta completamente, solo lo
suciente para mantener el panel de retorno en su lugar de forma segura. Lo insertarás por completo cuando hayas nalizado el posicionamiento de los paneles.
Nota: El riel de pared (I) le permiten ajustar la posición del panel inline (L). Al ajustar la profundidad y/o al mover el panel hacia un ligero ángulo se
permite una alineación precisa con la puerta.
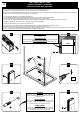
5
19 11/16”[500]
5.1
I
L
5.2
I
K
L
5.3
19 11/16”[500]
I
K
L