
Instructions / Assembly
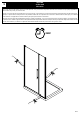


P. 24
L
Q
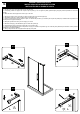
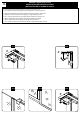
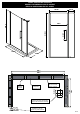
SUPPORT ARM INSTALLATION
INSTALLATION DE LA BARRE DE SOUTIEN
INSTALACIÓN DE LA BARRA DE APOYO
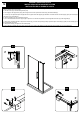
11.1. Completely remove the support arm (Q).
11.2-11.3. Drill a hole on the center marks with a ø5/16” (8mm) drill bit . If there are no studs located behind the support arm anchor (P), then insert the wall
anchors (AA) using a rubber mallet until the wall anchors are ush with the wall.
11.4. Reinstall the support arms (Q) onto the panels.
11.1. Complètement retirer le bras de support (Q).
11.2-11.3. Percez un trou à la marque du centre avec un foret ø5/16” (8mm). S’il n’y a pas de montant mural derrière l’ancrage (P), alors insérez les ancrages
muraux (AA) en utilisant un maillet en caoutchouc.
11.4. Ré-installer le bras de supports (Q) sur les panneaux
11.1. Retire completamente el brazo de soporte (Q).
11.2-11.3. Taladre un agujero en las marcas centrales con una broca de ø5/16” (8mm). Si no hay pernos prisioneros ubicados detrás del anclaje del brazo de
soporte (P), a continuación, inserte los anclajes de pared (AA) usando un mazo de goma hasta que los anclajes de la pared estén nivelados con la pared.
11.4. Vuelva a instalar el brazo de soporte (Q) en los paneles.
11
ø5/16”
8mm
11.1 11.2
11.3
11.4
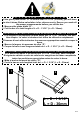
WARNING!
If there are no studs aligned to support bar anchors
behind the drywall, use the wall anchors to ensure the
screws won’t become loose.
AVERTISSEMENT!
s’il n’y a pas de goujons alignés pour soutenir les
ancrages de barre derrière la cloison sèche, utilisez les
ancrages muraux pour vous assurer que les vis ne se
desserreront pas.
¡ADVERTENCIA!
Si no hay postes alineados para apoyar la barra detrás
de las escarpias, utilice los anclajes de la pared para
asegurarse de que los tornillos no se aojarán .
AA
L
Q