BREEZE (B14) Purchase date: _________________________ OVE 2015-09-23 Product Tracking Reference: ________________________ Questions, problems, missing parts? Before returning to your retailer, call our customer service department at 1-866-839-2888, 9 a.m. - 5 p.m.
TABLE OF CONTENT PACKAGE CONTENT..........................................................................................................................................3 HARDWARE CONTENT......................................................................................................................................5 TOOLS REQUIRED.............................................................................................................................................6 SAFETY INFORMATION.............
PACKAGE CONTENT C H I J 10 K A M L A F B E D M N C D A B E A G D B 31 34 36 38 32” 815mm 34” 865mm 36” 915mm 38” 965mm 32 7/8” 35” 40 3/8” 44 1/2” 835mm 890mm 1025mm 1130mm C 5 1/8” 5 1/8” 5 1/8” 5 1/8” 130mm 130mm 130mm 130mm D 7 7/8” 6 7/8” 12 3/8” 11 3/4” 200mm 175mm 315mm 300mm 36 1/8” 39 1/4” 46 3/4” 51 7/8” E 918mm 996mm 1187mm 1318mm BREEZE 31/34/36/38 Dimensions variations A C 3 B D E ± 1/8 “ (3mm) C ± 1/4 “ (6mm)
PACKAGE CONTENT PART# DESCRIPTION QTY CODE A Wall jamb 2 99STR1043-AC B Fixed panel 1 99SG10018-AC C Aluminum rail 2 99STR1033-AC (31) 99STR1034-AC (34) 99STR1035-AC (36) 99STR1036-AC (38) D Short vertical water defector 1 99SRU0057-AC N Long vertical water defector 1 99SRU0058-AC E Door panel 1 99SG00021-AC F Magnetic door gasket 1 99SRU0059-AC G Door panel extrusion 1 99STR1037-AC H Fixed panel moulding 2 99SRU0060-AC I* Retaining clip 2 99SGC1030-AC J* Door ha
HARDWARE CONTENT AA BB CC Screw M4×45 Screw M3.5×25 Wall plug ø6×30 Qty.14 Qty.8 Qty.8 EE FF GG Screw M4×12 Screw M4×12 Door bumper Screw cap Qty.2 Qty.6 Qty.2 Qty.14 II JJ Washer Screw M3.5×25 Qty.14 KK Qty.9 HH LL Qty.18 MM Screw M4×13 Qty.6 Qty.
HARDWARE CONTENT Drill Silicone Rubber mallet Level Pencil Trowel 1x3 Battens Screwdriver 3/16” Drill bit 6 Measuring Tape Precision knife Allen key
SAFETY INFORMATION Please read and understand this entire manual before attempting to assemble, operate or install the product. • Handle the tempered glass with caution! Improperly handling the glass can cause it to break suddenly in small pieces (never in pointed fragments). • You will need at least two people to install this unit properly. WARNING • Distributor is not responsible for any damage to the unit or personal property caused by improper installation.
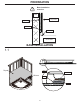
PREPARATION ! Base installation overview Studs Acrylic Wall Dry Wall Batten Flange Silicone Shower Base BASE INSTALLATION 1.
PREPARATION (OPTIONAL) Remove the layer film View from the top SILICONE WALL PREPARATION (OPTIONAL) 2.
WALL PREPARATION (OPTIONAL) 2.2 LL View from the top 9X SILICONE JJ KK 2.3 Have the walls leveled with the base in order to have a small and constant gap between those two.
WALL PREPARATION (OPTIONAL) 2.
WALL PREPARATION (OPTIONAL) 2.5 2.6 ADHESIVE if s é h d A 22X f hé si Ad sive he Ad NAIL A d h e s iv e Optional step 2.7 Helpful Hint Add silicone on top of acrylic wall. MM 6X WARNING! Make sure to apply pressure on the shower walls surface where glue has been applied.
FRAME ASSEMBLY 3.1 BB C 8X B G C FRAME ASSEMBLY (CONT.) 3.
FRAME ASSEMBLY (CONT.) 3.3 D GG 2X EE FRAME POSITIONING 4.
FRAME POSITIONING (CONT.) 4.2 FRAME POSITIONING (CONT.) 4.3 4.
FRAME POSITIONING (CONT.) 4.5 8X *Only for ceramic wall 4.
FRAME POSITIONING (CONT.) 4.7 8X 5.
DOOR INSTALLATION 5.
DOOR INSTALLATION (CONT.) 5.
CAULKING 24 H ATTENTION ! Silicone sealing must be only applied on the outside of the shower to prevent leaks.
CARE AND MAINTENANCE For the daily maintenance, use a wet cloth and a soft liquid cleaner. Never use abrasive cleaners containing some acetone, chlorine or strong bleach, scrapers, metallic brushes, nor other objects or the products which can graze or tarnish surfaces. Use a ratchet to strongly tighten any bolts used to support the fixed glass panels or doors panel (support bolts can withstand up to 250 lbf*in of torque). Check these bolts every 4 months and re-tighten them if necessary.
BREEZE (B14) Date d’achat: _________________________ Référence de suivi de produit: ________________________ Questions, problèmes, pièces manquantes? Avant de retourner cet article chez votre détaillant, appelez notre service à la clientèle au 1-866-839-2888, de 9 h à 17 h, heure de l’Est, du lundi au vendredi.
TABLE OF CONTENT Contenu de l’emballage....................................................................................................................................25 Contenu de la quincaillerie................................................................................................................................27 Outils nécessaires.............................................................................................................................................
Contenu de l’emballage C H I J 10 K A M L A F B D C E M N D A B E D B A G 31 34 36 38 32” 815mm 34” 865mm 36” 915mm 38” 965mm 32 7/8” 35” 40 3/8” 44 1/2” 835mm 890mm 1025mm 1130mm C 5 1/8” 5 1/8” 5 1/8” 5 1/8” 130mm 130mm 130mm 130mm D 7 7/8” 6 7/8” 12 3/8” 11 3/4” 200mm 175mm 315mm 300mm 36 1/8” 39 1/4” 46 3/4” 51 7/8” E 918mm 996mm 1187mm 1318mm BREEZE 31/34/36/38 Dimensions variations A C 24 B D E ± 1/8 “ (3mm) C ± 1/4 “ (6mm)
Contenu de l’emballage # Pièce Description Qty Code A Montant mural 2 99STR1043-AC B Panneau fixe 1 99SG10018-AC C Rail d’aluminium 2 99STR1033-AC (31) 99STR1034-AC (34) 99STR1035-AC (36) 99STR1036-AC (38) D Joint d’étanchéité (court) 1 99SRU0057-AC N Joint d’étanchéité (long) 1 99SRU0058-AC E Porte de douche 1 99SG00021-AC F Joint d’étanchéité magnétique de la porte 1 99SRU0059-AC G Extrusion pour la porte 1 99STR1037-AC H Joints pour panneau fixe 2 99SRU0060-AC I*
Contenu de la quincaillerie AA BB CC Vis M4×45 Vis M3.5×25 Ancrage mural ø6×30 Qty.14 Qty.8 Qty.8 EE FF GG Vis M4×12 Vis M4×12 Butée pour porte Capuchon pour vis Qty.2 Qty.6 Qty.2 Qty.14 II JJ Bague Vis M3.5×25 Qty.14 KK Qty.9 HH LL Qty.18 MM Vis M4×13 Qty.6 Qty.
Outils nécessaires Perceuse Silicone Maillet en caoutchouc Niveau Crayon Truelle Fourrures 1x3 Tournevis Forets 3/16” 27 Rubant à mesurer Exacto Clés Allen
INFORMATION SUR LA SÉCURITÉ S.v.p. lire et comprendre complètement le manuel avant de tenter d’assembler, d’installer et d’utiliser le produit. • Manipulez le verre trempé avec précaution sinon il pourrait se briser en petits morceaux (jamais en fragments pointus). • 2 personnes sont requises pour installer le produit correctement et sécuritairement. AVERTISSEMENT • Le distributeur n’est pas responsable pour les dommages sur le produit ou sur la personne causés par une installation inadéquate.
PRÉPARATION ! Survole de l’installation de la base Montant mural Mur d’acrylique Placoplâtre Fourrures Bride Silicone Base de douche INSTALLATION DE LA BASE 2.
PREPARATION (OPTIONNELLE) Retirer la pellicule de plastique Vue du haut SILICONE PREPARATION DU MUR (OPTIONNELLE) 4.
PREPARATION DU MUR (OPTIONNELLE) 4.2 LL Vue du haut 9X SILICONE JJ KK 4.3 S’assurer de bien mettre les murs à niveau afin d’obtenir un interstice constant tout au long de la jonction entre le mur et la base.
PREPARATION DU MUR (OPTIONNELLE) 4.
PREPARATION DU MUR (OPTIONNELLE) 4.5 4.6 Adhésif de construction if s é h d A 22X f hé si Ad sive he Ad NAIL A d h e s iv e Étape optionnelle 4.7 Important Appliquez du silicone au dessus des murs d’acrylique. MM 6X AVERTISSEMENT! S’assurer d’appliquer une bonne pression sur la surface des murs d’acrylique là où la colle a été appliquée.
ASSEMBLAGE DU CHÂSSIS 5.1 BB C 8X B G C ASSEMBLAGE DU CHÂSSIS (CONT.) 5.
ASSEMBLAGE DU CHÂSSIS (CONT.) 5.3 D GG 2X EE POSITIONNEMENT DU CHÂSSIS 6.
POSITIONNEMENT DU CHÂSSIS (CONT.) 6.2 POSITIONNEMENT DU CHÂSSIS (CONT.) 6.3 6.
POSITIONNEMENT DU CHÂSSIS (CONT.) 6.5 8X *Only for ceramic wall 6.
POSITIONNEMENT DU CHÂSSIS (CONT.) 6.7 8X 7.
INSTALLATION DE LA PORTE 7.
INSTALLATION DE LA PORTE (CONT.) 7.
CALFEUTRAGE 24 H ATTENTION! Le silicone doit être appliqué à l’extérieur de la douche seulement afin de prévenir les fuites.
TRAITEMENT ET ENTRETIEN Utilisez un chiffon mouillé et un nettoyant liquide doux pour l’entretien quotidien. N’utilisez jamais de nettoyants abrasifs contenant de l’acétone, du chlore ou du javellisant puissant, et évitez les grattoirs, les brosses métalliques et tout autre objet ou produit pouvant érafler ou ternir les surfaces. Utilisez la clé à rochet pour serrer fortement tous boulons faisant partie d’une pièce supportant les panneaux fixes de verre et les portes.
Save this manual for future reference Conservez ce manuel pour usage ultérieur HEAD OFFICE / SIÈGE SOCIAL 2800 Etienne Lenoir, Laval Quebec H7R 0A3 Canada Customer service / Service à la clientèle Tel.: 1-866-839-2888 Fax: 1-866-922-9990 customerservice@ovedecors.com 8:00 am - 5:00 pm E.S.T Monday - Friday 8 h à 17 h HNE, du lundi au vendredi KEEP THIS INFORMATION CONSERVEZ CES INFORMATIONS Purchase date Date d’achat Product Tracking Reference Suivi et référence du produit www.ovedecors.