LC2000 20" LCD Display USER MANUAL
About this Manual This manual is designed to assist you in setting up and using your LCD display. Information in this document has been carefully checked for accuracy; however, no guarantee is given to the correctness of the contents. The information in this document is subject to change without notice. This document contains proprietary information protected by copyright. All rights are reserved.
Important Safety Instructions • • • • • • • • • • • • • • • • To reduce the risk of fire or electric shock, do not expose this appliance to rain or moisture. Do not place your LCD display near water. Exposing the apparatus to rain, water, moisture or sunlight can severely damage it. Clean only with a dry cloth. Do not block ventilation openings. Increased temperature may cause fire or device failure. Install in accordance with the manufacturer's instructions.
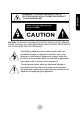
. CAUTION: TO REDUCE THE RISK OF ELECTRIC SHOCK, DO NOT REMOVE COVER (OR BACK). NO USER-SERVICEABLE PARTS INSIDE. REFER SERVICING TO QUALIFIED SERVICE PERSONNEL. The lightning flash with arrow head symbol, within an equilateral triangle, is intended to alert the user to the presence of uninsulated "dangerous voltage" within the product's enclosure that may be of sufficient magnitude to cons titute a risk of electric shock to persons.
Table of Contents Introduction Unpacking ....................................................................................................... 1 Getting to Know Your LCD Display Views .............................................................................................................. 2 Cables and Connectors .................................................................................... 2 Control Panel Keys ....................................................................................
Table of Contents Adjusting Geometric Settings ................................................................. 18 Miscellaneous Settings .................................................................................. 19 Setting the OSD Timer ............................................................................ 19 Setting the OSD Language ...................................................................... 19 Changing the PIP Size ...............................................................
Introduction Introduction Congratulations on your purchase of the 20-inch LCD display. Your LCD display is designed to be versatile, ergonomic, and easy to use. The display is capable of displaying most standard video signals, with VGA resolution supported up to 1024x768 with a native resolution of 640x480. A convenient control panel located on the top of the front panel and a handy remote control allow you to easily adjust display parameters, change channels, and adjust the volume.
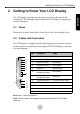
Getting to Know Your LCD Display Getting to Know Your LCD Display The LCD display is designed to provide easy access to all controls and connections. The following figures identify the LCD display’s components, controls, and ports. 2.1 Views Please refer to Quick Start Guide. (Front View, Side View and Rear View) 2.2 Cables and Connectors The LCD display is equipped with the following types of connectors that are used to connect to external devices including VCRs, DVD players, camcorders, and computers.
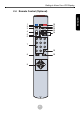
Getting to Know Your LCD Display The LCD display comes with the following cables: RCA video cable (Optional) RCA stereo audio cable for AV & S-Video (Optional) 3.5 mm stereo audio cable AC power cord 2.3 Control Panel Keys The control panel keys located at the top of the LCD display can be used to adjust all available settings. The remote control keys (see “Remote Control (Optional)” on page 4) have the same functionality.
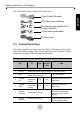
Getting to Know Your LCD Display 1 2 3 10 11 12 13 14 4 5 6 7 15 16 8 9 4 ENGLISH 2.
Getting to Know Your LCD Display Key Description 1 Mute Turns the volume off completely. 2 MTS Selector Multi-channel Television Sound for full stereo and bilingual broadcasts. 3 Sleep Automatically turns off the LCD display after a preset period of time (30, 60, or 90 minutes). 4 Video Exchanges the Main and PIP video screens (PIP appears on Main, Main appears in PIP). 5 Audio Exchanges the Main and PIP audio (listen to either the Main or PIP sources).
Getting to Know Your LCD Display • • Using the remote control in direct sunlight reduces the functional distance at which it can be used. Aim the remote control at the IR receiver on the LCD display and ensure there are no object in the line of sight. 2.4.2 Replacing the Remote Control Battery Refer to the following illustration for instructions on replacing the remote control battery (CR2025 3V). 1 Slide the battery tray out (A).
Getting to Know Your LCD Display 4ą 7ą When used on a desktop or other flat surface, you can tilt the LCD display back to achieve a more comfortable viewing angle. You can adjust the LCD display viewing angle from an upright position to a back-tilted angle of up to 7 degrees and a forward-tilted angle of 4 degrees. Warning: Forcing the LCD display past its maximum extension point will damage the unit.
Getting to Know Your LCD Display The LCD display comes with a pair of built-in stereo speakers located at the front of the unit. 2.8 Connecting the AC Power Adapter You must use the 100-240 VAC/60W power adapter that is included with the LCD display. Caution: • • • Make sure you have read and understood the safety notes before connecting the LCD display to the power adapter and electrical outlet. Do not use any other AC power adapter except the adapter that was included with your LCD display.
Adjusting Settings Adjusting Settings This chapter explains the LCD display’s On-Screen Display (OSD) menus. These are used to adjust settings related to picture and audio quality, as well as other features. Using the OSD you can adjust the contrast, brightness, OSD position, color temperature, stereo speaker volume, and other settings. The OSD Menus can be accessed using either the remote control or the display control panel located on the top of the LCD display. 3.
Adjusting Settings You can switch between input sources and display them on the main screen in sequence by repeatedly pressing either: • • the MAIN key on the remote control the SOURCE key on the LCD control panel The Main display mode rotates between: • • • • • TV AV S-Video YPbPr VGA 1 : TV 2 : OFF VGA YPbPr Main display mode indicator The OSD menus for each display mode allow you to set options that are specific to the selected video signal format.
Main PIP Select the PIP source by pressing the PIP key on the remote control. There is no equivalent key on the LCD control panel. Sub signal options vary according to the selected Main signal as shown in the following table.
Adjusting Settings 3.4 Adjusting the Display Setting TV AV S-Video YPbPr VGA Contrast √ √ √ √ √ Brightness √ √ √ √ √ Color √ √ √ √ − Hue √ √ √ √ − Sharpness √ √ √ √ − Focus − − − √ − Auto − − − − √ Color-Temp − − − − √ Red − − − − √ Green − − − − √ Blue − − − − √ White Balance − − − − √ NOTE: To return all DISPLAY settings to their factory defaults, select “Recall” from the menu and press the key.
Adjusting Settings 3.5 Television Settings (Optional) When connected to a television antenna or CATV cable, the LCD display can automatically scan for available channels. Before scanning, make sure you have selected the correct TV signal source: air (broadcast) or CATV (cable TV). TV CH SCAN CCD V-CHIP CATV / AIR CH ADD/DEL ENGLISH 3.5.1 Setting Channels OFF CATV [–] To scan for channels: 1 Press MENU to turn the OSD on. 2 Press VOL+ to switch to the TV menu. 3 Press PRG/CH to select CH-Scan.
Adjusting Settings The quick channel function lets you assign ten channels that can be accessed by the quick channel keys on the remote control. Quick Channel Block Press PRG/CH / in the QUICK CH block on the remote control to switch between assigned quick channels. Assigning Quick Channels 1 First choose a channel you want to add to the quick channels by using the normal PRG/CH / keys or by entering a channel number directly with the number keys on the remote control.
Adjusting Settings Closed captioning allows you to view subtitles on your LCD display display if your broadcast or cable TV provider supports this feature. 3.5.4 Using the V-Chip (North America only) The V-Chip function reads information encoded in rated programs and blocks programs from being viewed based on the rating selected by the parent. The LCD display allows you to use both “MPAA Ratings” and “TV Parental Guidelines” to manage the ratings that are blocked or unblocked on your TV.
Adjusting Settings Rating Description TV-Y ALL CHILDREN. This program is designed to be appropriate for all children. DIRECT TO OLDER CHILDREN. This program is designed for children age 7 and above. GENERAL AUDIENCE. Most parents would find this program suitable for all ages. PARENTAL GUIDANCE SUGGESTED. This program contains some material that parents may find unsuitable for younger children. PARENTS STRONGLY WARNED.
Adjusting Settings 3.6 VGA (PC) Settings The LCD display supports standard RGB VGA connections from a PC using the included 15-pin D-sub cable. Note: For optimum results, set your PC’s video resolution to 640x480 pixels. If the resolution is set higher than this, the picture may be unclear or not visible. 3.6.
Adjusting Settings There are four settings related to VGA signal and screen positioning that can be adjusted when the LCD display is in VGA mode: clock, phase, h-position, and vposition. Each of these can be adjusted on the “Geometric” page of the OSD menu system when the LCD display is in VGA display mode. AUTO GEOMETRIC CLOCK PHASE H-POSITION V-POSITION RESET 128 16 113 30 / Setting Description Clock Adjusts pixel alignment to help stabilize the VGA display.
Adjusting Settings To return all audio settings to their factory defaults, select “Recall” from the menu and press VOL+. 3.8 Miscellaneous Settings 3.8.1 Setting the OSD Timer You can change the length of time the OSD will remain on the screen after the last key has been pressed. Available options are: 5, 10, 15, 20, 25 or 30 seconds. 3.8.2 Setting the OSD Language You can change the language in which the OSD menus appear.
Troubleshooting Troubleshooting Q: Why doesn’t the LCD display turn on? A1: Check the AC power adapter to make sure it is securely connected to the DC-in power jack at the rear of the LCD display. Make sure the power cord is plugged into a functioning electrical outlet. Q: Why is the power LED on but the screen is blank? A1: Make sure the video cable is securely connected to both the LCD display and the device you have attached.
Specifications Specifications Pixel Pitch Max. Display Area Aspect Ratio Native Resolution Display Colors Contrast Ratio Brightness Response Time View Angle (CRŠ10) Horizontal Frequency Vertical Frequency Signal Input/Output Ports TV Systems Plug and Play Lock Power Consumption Power Source Speakers Dimensions Wall Mount Area Net Weight Operating Temperature 0.6375 mm (H) x 0.6375 mm (W) 408 mm (H) x 306 mm (V) (16.063 in. x 12.047 in.) 20.1-inches diagonally 4:3 VGA (640 x 480) 16.
6 Index A Adjusting settings available settings, 12 on-screen display menus, 9 AV main display mode, 10 picture-in-picture mode, 11 B Brightness definition of, 12 C Cables 15-pin D-sub VGA cable, 3 3.