Ovizio Imaging Systems ILine F Pro User Manual 1
Document Author Serge Jooris Status For Approval Doc ID I3TFG02-DOC-004 Distribution Name Company Action Jeremie Barbau Ovizio Review Document History Date Version Description 10/09/2014 0.0 Document Creation 22/03/2016 1.0 Update OsOne 5.0 21/03/2017 2.0 Update OsOne 5.9 26/04/2017 2.0.2 Updated legal statements 03/05/2017 2.0.3 Updated bag connection figures 08/06/2017 2.0.5 Added definition of aggregate rate 25/07/2017 2.0.6 Added dimensions in inches 12/09/2018 3.
Table Of Contents Table Of Contents .......................................................................................................................................... 3 General Notice ............................................................................................................................................... 7 Support ..........................................................................................................................................................
Monitor ........................................................................................................................................................30 Cell density, Viability and Diameter................................................................................................................. 30 Detailed views ................................................................................................................................................. 31 Live image .....................
User actions recorded in the audit trail ....................................................................................................... 79 Content of the audit trail ............................................................................................................................. 79 Audit trail location ....................................................................................................................................... 79 Users ..........................................
Specifications ................................................................................................................................................... 92 Material of construction .............................................................................................................................. 92 Operating parameters ................................................................................................................................. 92 Shelf-life ..........................
General Notice ©2019, Ovizio. All rights reserved. Every effort has been made to ensure that the contents of this manual are correct and up to date. The devices described in this document are protected by patents and other intellectual property rights. Ovizio and Ovizio Imaging Systems are protected brand names. All Rights Reserved. Reproduction, adaptation, or translation without prior written permission is prohibited, except as allowed under copyright laws.
Intended use The system is designed for the in-line monitoring of morphological cellular parameters via a closed loop disposable probe that can be sterilized. The system is referred hereafter as the iLine F Pro (cGMP). The iLine F Pro is not classified as a medical device and as such ISO-13485 requirements do not apply. The iLine F Pro is intended to be used standalone, with the delivered power supply unit.
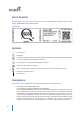
Serial Number The serial number of the device can be found on a sticker on the left side of the microscope when in front of you (eg. 20200313000 on the illustration below) iLine F Pro Symbols Direct Current CE Marking FCC Mark, stating the equipment is compliant with the regulations of the US Federal Communications Commission regarding electromagnetic interference Do not dispose. The equipment must be properly recycled. Safety warning. Read the user manual.
Safety Warnings General − − − − − − − The manual contains information and warnings, which have to be followed by the user to ensure safe installation, operation and to retain the equipment in safe condition. If the equipment is used in a manner not specified in this manual, the protection provided by the equipment may be impaired.
The use of the disposable bioconnect may lead to a higher oxygenation of the liquid due to oxygen diffusing through the tube walls into the liquid. Instructions for lifting and carrying Do not lift or carry the equipment by handling the integrated pump module. The device shall be held by its bottom plate only when being carried. Noise The system uses pinch valves in its normal operation. A regular clicking sound is normal.
Introduction 12
System overview Your online cell monitoring device is composed of two parts: − − The iLine F Pro The disposable probe called BioConnect. BioConnect pump Ovizio Reader IN Cell culture vessel OUT BioConnect cartridge Microscope Pump Motor System overview The BioConnect pumps cells in closed loop from the inside of the bioreactor. The pump creates a flow of cells through the fluidic system contained in the cartridge.
Anatomy of your iLine F Pro Package contents iLine F Pro 1 Power Adapter with Regional power plug Description Back Front Touch screen QR Code reader Cartridge holder Heat Sink BioConnect engine Power buAon Front USB USB Pinch valves Power HDMI Ethernet Power Adapter Front Power Button: The power button is used to startup and turn off the device. The power button flashes blue during the boot sequence and turn green when done. Press the button 2 seconds to turn the device off.
BioConnect engine: The BioConnect engine couples to the pump and creates the flow QR Code Reader: Reads the QR code label on the cartridge. This lets the system know the BioConnect version and serial number for traceability. Front USB plug: Can be used to copy data or proceed to software update during maintenance operations. Touch screen: Gives access to the user interface. Back USB plugs: For maintenance purposes.
Connect 16
Get Started Description BioConnect drawing 17
How to connect Make sure to attach the BioConnect correctly to your cell culture vessel, otherwise its sterility may be compromised. The way you connect the BioConnect to your cell culture vessel depends on your bioreactor type The BioConnect has been developed to be connected to all types of benchtop bioreactors, including disposables and rocking motion bioreactors.
Startup The first time you connect the adapter to the device it will startup automatically For optimal performance, always turn on the iLine F Pro 1h before starting a run. This allows the instrument to reach a stable internal temperature. Do not check the device calibration before the device reaches a stable internal temperature. 1. 2. 3.
2 A window pops up to Sign in as another user.
4 First connect the BioConnect pump to the iLine F Pro. For that, introduce the white plastic part (Upper Housing) into the microscope pump motor Microscope Pump Motor 5 Insert the cartridge tube into the pinch valves. Any of the cartridge tubes can be inserted into any of the pinch valves. Do NOT insert any other tube into the pinch valves than those directly connected to the cartridge.
6 Then insert the BioConnect cartridge into the iLine F Pro 7 The QR code placed on the BioConnect cartridge will be read to identify its serial number for traceability purposes.
8 After successful QR code identification, the iLine F Pro will connect to the BioConnect pump. You may hear a click sound when done.
10 Now the BioConnect connection is complete and you can startup a bioreactor monitoring session. Logout If you want to switch user that has a different role, quit OsOne or change the current user password, click on the user icon in the top right corner of the screen Press here to sign out.
Press here to restart OsOne 25
Measure 26
Get Started The online suspension bioreactor monitoring application automates the online measurements of cell viability and cell density of any type of suspension cell culture. You must login prior to be able to start a monitoring session. Login as operator user by default. Starting your monitoring session is as easy as pressing the blue Start button. A wizard will guide you through the required steps to initiate a monitoring session.
Start the monitoring wizard If it is the first time you are starting OsOne, start a new session. Give it a name and press Next. The system will start the priming step by pumping on the BioConnect line. Then, the system will automatically set the initial focus. To do so, the system will first stop the flow and wait for the cells to sediment. After cell sedimentation, the system will make the autofocus.
Before the recording of data, the system will also capture a so-called background image. This image will be used to compensate for permanent defects in the field of view. Right after this sequence of operations, the system will finally start monitoring.
Monitor Cell density, Viability and Diameter After launching a monitoring session, the Live image and the computed results (values and graphs) related to the investigated cell culture will be displayed on the Live screen. The computed results will be updated based on the cell line configuration (30 minutes - 2 hours). The main calculated parameters are the total cell density (TCD), viable cell density (VCD), cell viability (VIAB) and average cell diameter.
Detailed views Live image Click on the Live image to enlarge it. The following screen will be displayed.
Advanced results Click on the three dots next to the measurement figures to access advanced results Click here to see Advanced results 32
Pause Press the “Pause Monitoring” button in the lower right corner of the Measure tab to stop your monitoring session. The current monitoring session can then be resumed or a new monitoring session can be created. When a monitoring session is paused, it is also possible for the user to either flush the system, stop pumping or disconnect the BioConnect.
Continue In the event you paused a monitoring session and want to resume it, press the “Continue monitoring” button to resume your last monitoring session. How a data point is acquired The pump hooked to the BioConnect has different modes of pumping over time that follow different sequences of operations. For example, one sequence of operations is used during data point acquisition, another during flushing operations and so on.
− Computation of measurement based on the 25 images acquired during the previous step − Wait sequence if there is enough time before the acquisition of the next data point (depends on data point acquisition frequency) − Flush sequence to avoid clogging The following drawing describes a typical sequence of operations: The actual sequence of operations may differ depending on your cell line, for example with different sedimentation times.
Flush In the event your fluidic circuit is clogged and you get an alarm related to fluidic issues, you may flush the BioConnect by running the pump continuously with higher flow rate. This process will last 30 minutes by default. You can stop it anytime by pressing the Stop button. When completed the system displays a Flush success screen and you need to press the Finish button to get back to normal operations.
Pump Disconnection When your monitoring session has ended you will need to disconnect it from the iLine F Pro. Select the Pump Disconnection menu item to proceed.
You must wait a minute the time for the membrane to be fully in low position. You will hear a click sound when the engine is actually decoupled. Never try to remove the BioConnect pump before this operation has completed. If not complete the engine may still be hooked to the BioConnect. Applying force to remove the BioConnect pump may compromise the integrity of the BioConnect and lead to biological hazard.
Now you can disconnect the BioConnect pump from the Microscope pump motor 39
The BioConnect pump does not require special force. Applying abnormal force to remove the BioConnect pump may compromise the integrity of the BioConnect and lead to biological hazard.
Troubleshooting 41
Introduction Various events may occur during the setup of a bioreactor run or during the run itself such as bad quality images leading to measurement issues. In all cases the alarms or notifications are displayed with a banner on top of the live screen. The next sections describe each of them in detail. BioConnect Alarms Pump motor stalled Description: OsOne informs the user that the pump motor has stalled. Cause(s): • • • • • • • Pinched tubing during the setup in the lab.
Is it handled by OsOne? If this error occurs during a monitoring, a software component running in the background – called the “Restart tool” will: • • • Close OsOne Restart OsOne Restart the monitoring If the error is not automatically resolved after 3 consecutive tries of the “Restart tool”, monitoring is stopped.
Does it prevent from starting a monitoring? YES Does it interrupt the monitoring? YES Is it handled by OsOne? YES If this error occurs during a monitoring, the “Restart tool” will: • • • Close OsOne Restart OsOne Restart the monitoring If the error is not automatically resolved after 3 consecutive tries of the “Restart tool”, monitoring is stopped.
Type: ERROR Does it prevent from starting a monitoring? YES Does it interrupt the monitoring? YES Is it handled by OsOne? YES If this error occurs during a monitoring, the “Restart tool” will: • • • Close OsOne Restart OsOne Restart the monitoring If the error is not automatically resolved after 3 consecutive tries of the “Restart tool”, monitoring is stopped.
When? This alarm can be triggered anytime when OsOne uses the BioConnect Type: ERROR Does it prevent from starting a monitoring? YES Does it interrupt the monitoring? YES Is it handled by OsOne? YES If this error occurs during a monitoring, the “Restart tool” will: • • • Close OsOne Restart OsOne Restart the monitoring If the error is not automatically resolved after 3 consecutive tries of the “Restart tool”, monitoring is stopped.
Cause(s): OsOne lost the connection with the BioConnect cartridge during a monitoring and then stop it. When? This alarm can be triggered anytime during a monitoring. Type: ERROR Does it prevent from starting a monitoring? NO Does it interrupt the monitoring? YES Is it handled by OsOne? NO How to fix it? Insert the BioConnect cartridge back into the iLine F Pro and restart the monitoring. How to prevent it? By educating the OsOne users not to remove a BioConnect cartridge during a monitoring.
Type: WARNING Does it prevent from starting a monitoring? NO Does it interrupt the monitoring? NO Is it handled by OsOne? YES. OsOne will automatically reactivate the pumping 10 minutes after it has been deactivated. How to fix it? • • Click the link in the alarm to reactivate the pumping. Let OsOne automatically reactivate the pumping.
Insert BioConnect cartridge Description: OsOne informs the user that in order to Start/Continue a monitoring, the BioConnect cartridge should be inserted inside the microscope. Cause(s): OsOne detected that no BioConnect cartridge is inserted inside the microscope. When? This alarm can be triggered anytime Type: WARNING Does it prevent from starting a monitoring? YES Does it interrupt the monitoring? NO Is it handled by OsOne? N/A How to fix it? By inserting a BioConnect cartridge inside the microscope.
Calibration Alarms Calibration file missing Description: OsOne informs the user that the calibration file is missing. Cause(s): OsOne did not find a file named “CalibrationImage.h5” user>\AppData\Roaming\OsOne\Calibration” folder inside the “C:\Users\
Outdated calibration file Description: OsOne informs the user that the calibration image is outdated. Cause(s): The calibration image has been taken more than 30 days ago. When? This alarm is triggered at the start of OsOne when OsOne checks when the calibration image has been taken.
Error during calibration Description: OsOne informs the user that an error occurred while taking a new background image. Cause(s): • • A hardware error occurred while OsOne tried to capture a background image. The user inserted the BioConnect cartridge while OsOne was capturing a background image and a monitoring session is not active. When? This alarm is triggered while OsOne is capturing a background image (outside of a monitoring).
Measures Fluidic issue – Cells in background images Description: OsOne informs the user that a potential fluidic issue could have occurred during the monitoring. Cause(s): Objects have been detected in the background images. The presence of objects in the background images indicates that these objects are stuck in the flow cell because normally, the flush performed by OsOne during the acquisition of the background images should have made them disappear.
How to fix it? If the automatic flush wizard does not solve the issue, it is recommended to stop the monitoring and start a manual flush (duration = 30 minutes). How to prevent it? There is no way to prevent that kind of error. Fluidic issue – Blurry images Description: OsOne informs the user that a potential fluidic issue could have occurred during the monitoring.
How to fix it? • • If the cells move during acquisition, please check if the BioConnect tubes are properly inserted inside the pinch valves. If large aggregates are visible in the “Live” image, and if the automatic flush wizard does not make them disappear, it is recommended to stop the monitoring and start a manual flush (duration = 30 minutes).
ERROR Does it prevent from starting a monitoring? NO Does it interrupt the monitoring? YES Is it handled by OsOne? YES. If a fluidic issue occurs during the monitoring, OsOne will automatically (automatic flush wizard): • • • Stop the monitoring Start a flush sequence of 5 minutes Restart the monitoring. If this error occurs 5 times consecutively without being resolved, the above automatic actions won’t be performed anymore.
Type: ERROR Does it prevent from starting a monitoring? NO Does it interrupt the monitoring? NO Is it handled by OsOne? If OsOne detects out of focus cells in the images, it will try to correct the focus automatically without stopping the monitoring. If cells are still out of focus after this focus correction, OsOne will trigger the “Out of focus cells” alarm. How to fix it? It is recommended to stop the monitoring and restart it so that a long-range auto focus is performed by the monitoring wizard.
Does it prevent from starting a monitoring? YES Does it interrupt the monitoring? NO Is it handled by OsOne? YES. OsOne will automatically try to find cells 5 minutes later by performing a long range autofocus. (this operation is repeated until cells are detected) How to fix it? If cells are clearly visible on the Live image but OsOne keeps making the autofocus in order to find cells: • • • • Press the “Pause monitoring” button.
Hardware Camera error Description: OsOne informs the user that a Camera error has been detected. Cause(s): • • OsOne could not connect with the camera There was an error during the transfer of the images When? This alarm can be triggered anytime Type: ERROR Does it prevent from starting a monitoring? YES Does it interrupt the monitoring? YES Is it handled by OsOne? YES, if this error occurs during a monitoring.
Hardware failure Description: OsOne informs the user that it could not connect with one (or many) of the hardware components at the start of OsOne. Cause(s): OsOne could not connect with one (or many) of the hardware components at startup. When? This alarm is triggered at the start of OsOne Type: ERROR Does it prevent from starting a monitoring? YES Does it interrupt the monitoring? YES, if it happens during an automatic restart performed by the “Restart tool”.
Microscope initialization Description: OsOne informs the user that the microscope is being initialized. Cause(s): The microscope is initializing after powering the microscope on or restarting OsOne. When? This alarm is triggered after powering the microscope on or when restarting OsOne. Type: WARNING Does it prevent from starting a monitoring? YES Does it interrupt the monitoring? NO Is it handled by OsOne? N/A How to fix it? By waiting for the initialization process to be complete.
Storage Low disk space Description: OsOne informs the user that there is not enough free disk space to start a monitoring session. Cause(s): The free disk space (in Gb.) is lower than the “Notify when free disk space is less than” value set in the “Storage” configuration screen. When? This alarm is triggered when the user presses the “Start” monitoring button.
Limited monitoring duration Description: OsOne informs the user about the day(s)/hour(s) left before the computer will run out of disk space. Cause(s): The computer is almost out of free disk space. When? This alarm is triggered during the monitoring.
Monitoring stopped because of not enough free disk space Description: OsOne informs the user that the monitoring was stopped because the computer was running out of free disk space. Cause(s): The free disk space (in Gb.) during the monitoring is lower than the “Notify when free disk space is less than” value set in the “Storage” configuration screen. When? This alarm is triggered during the monitoring.
Remote copy error Description: OsOne informs the user that there was an error during the copy of the data (hdf5 files, csv results files) to the remote location. Cause(s): • • • A connection error between the computer and the remote location The remote location access is denied to OsOne Wrong remote location path. When? This alarm is triggered during the monitoring.
By verifying in the storage configuration under the “Secure Ftp copy” (if the “Enable copy to remote folder during monitoring” is checked) • • A valid SFTP URL has been specified OsOne can access this SFTP URL (by clicking the “Validate” button) How to prevent it? See above the “How to fix it?” section. Remote copy in progress Description: OsOne informs the user that monitoring data (hdf5 files, csv results files) are being copied to the remote location.
Does it prevent from starting a monitoring? NO Does it interrupt the monitoring? NO Is it handled by OsOne? N/A How to fix it? N/A 67
Configure 68
Monitoring session configuration This section gives a description of all the configuration options related to the online monitoring of suspension cells. You must pause your monitoring session to enable the configuration menu The available configuration options associated with a user depend on the permissions granted to the user role. The following section assumes that the user is logged in with Administrator rights.
Start the monitoring with manual focus The manual focus can be enabled when the system cannot automatically adjust the focus. Check the related checkbox in the monitoring options. Then, press Done and click on the Live image of the main screen. A focus slider will appear to manually adjust the focus before launching a monitoring session.
Frequency The frequency at which data points are acquired. Cell line The default cell line that will be selected when starting a monitoring session. Export only good measurements Property that defines if a measurement resulting from a fluidic issue is: • • Added in the OsOne graphs Exported to the remote location (if the remote copy is enabled). Sedimentation images recording Records images during sedimentation to help Ovizio support define the best sedimentation time.
Testing the web service You can test the web service by opening a browser on another computer or locally by entering the following URL in the address bar: http://[IP]:9000/swagger, where [IP] is the IP address of the iLine F Pro where the Server runs. You should then get a web page that allows you to test the various services.
See OsOne Server User Manual for a comprehensive description of all possible commands. Testing OPC UA Open an OPC UA client (for example https://github.com/FreeOpcUa/opcua-client-gui) and type in the following command opc.tcp://[IP]:51210/UA/OvizioServer Storage Configuration Disk space Use this setting to get an alarm when the available local storage space is lower than a given size.
Remote Copy The remote copy functionality allows you to copy all images captured during your session to a network shared folder. Enter the path of the remote copy folder and click on Validate. This will display a pop-up window asking you to enter your credentials to access that remote folder. For each data point, the following files will be copied: 1. The hologram hdf5 files 2. _
Secure FTP Copy The remote copy functionality allows you to copy all images captured during your session to a SFTP remote folder. Enter the SFTP URL and your SFTP credentials. Then, click on Validate to ensure that the SFTP information are valid. See above the “Remote Copy” section for a description of the data copied during the SFTP remote copy process. Automatic Clean up Delete all files that have been safely copied to the remote location.
Logs When the microscope and its software are in use, all the actions taken by the user and the software are stored into files called log files or audit trail. In case of problems with the microscope or its software these files give crucial information about the origin of the issues. In case of problems, we recommend changing the logging level to Trace and to try to reproduce the issue. Detailed information about the microscope behavior will be recorded and can subsequently be sent to support@ovizio.
User actions recorded in the audit trail Users actions recorded in the audit trail are the actions that can: • • • • modify, create or reset the OsOne configuration (e.g., modifying the password expiration value in the "Users" configuration screen) modify, create or delete OsOne records (record a capture) control the microscope (e.g., start an autofocus) involve an OsOne user (e.g.
• Restrict access to OsOne features only to authorized and authenticated users (created by users with the Administrator role) • Control what users can do in OsOne • Trace users, modifications, alteration, addition of data /settings in the audit trail • Guarantee of data integrity Why • To comply with Title CFR21 part 11 (US Regulation) that regulates Electronic Records and Electronic Signatures How • Users are created by Administrators • Users must provide valid credentials to access OsOne •
Once his own Administrator account is created, he uses it to create OsOne users and give them different permissions according to the needs (see below the Login and the Users section for more detailed explanations about how to accomplish these tasks). Remark: It could be possible to use OsOne only with the 3 built-in user accounts. However, in this case, multiple users may use the same account limiting the traceability of actions.
Deleting an existing user Press the “- “button to delete an existing user. Deleted users will still be visible inside the “Name” combo box. They are identified by the word “Disabled” next to their user name.
Security settings Password minimum length The “Password minimum length” setting defines the minimum length required for the password of an OsOne user. Password maximum length The “Password maximum length” setting defines the maximum length allowed for the password of an OsOne user. Log out after inactivity The "Log out after inactivity of(min.)" setting defines the duration after which an inactive user will be automatically logged out.
The table below describes the settings related to remote user management Item Meaning example LDAP Server Configuration Enable LDAP Authentication Check the box to allow the use of external user management Server Url The address of the LDAP Server Use SSL Indicate whether the server use Secure SSL or Secure authentication Users Name Domain Account attribute mapping 84 ldap.mycompany.
Login Format − Active Directory: %username% − OpenLDAP: uid=%username%,cn=users,dc=ldap,dc=mycompany,dc=com Group mapping 85 Administrator CN=ovizio-admin,CN=Groups,DC=ldap,DC=mycompany,DC=com Maintenance CN=oviziomaintenance,CN=Groups,DC=ldap,DC=mycompany,DC=com operator CN=ovizio-admin,CN=Groups,DC=ldap,DC=mycompany,DC=com
Remote Access 86
OsOne Files On MacOs in Finder > Go > smb:// On Windows in an explorer window \\\OsOne You will then get access to all OsOne folders − − − − − Cache Calibration Config Experiments Logs Remote access with VNC You can access the user interface remotely by using a VNC client that you can download here https://www.realvnc.
Maintenance and Servicing 88
Maintenance Cleaning The instrument can be cleaned with a soft cloth, wetted with IPA (iso propyl alcohol), if required The instrument does not contain user serviceable parts. Servicing can only be performed by a qualified technician (see chapter “Servicing”). A yearly maintenance is advised. Decontamination The instrument can be cleaned with a soft cloth, wetted with IPA (iso propyl alcohol), Spor-Klenz® (STERIS Life Sciences) or Vesta Syde SQ Disinfectant (STERIS Life Sciences) if required.
High intensity light source This instrument includes a high intensity red LED light source. There is no hazard for the operator’s eyes when the device housing is closed. Do not stare at the light source or at the light beam during maintenance when the housing is opened. Replaceable parts Battery The equipment is supplied with an onboard computer which contains a replaceable battery. The battery is only to be replaced by qualified personnel.
Specifications ILine F Pro Type iLine-F Holographic transmission microscope Light source Partially coherent monochromatic LED 630nm (Red) Sensor CMOS camera – 5MPixels - 8 bits Microscope objective Olympus LUCPLFLN20X Microscope Objective 20x Total Magnification 22.
Power Supply Brand/Model CUI Inc. SDI90-24-U Input Cable The system is delivered with a power input cable suitable for the country of delivery Input Voltage 100-240VAC ±10% ~50-60Hz ±5% Input Current 1.
Monitoring Duration From 4 to 30 days Total process volume From 0.3 to 10.0L total process volume1 Typical hold-up volume From 0.001 to 0.05 L Liquid hold-up duration < 5min Typical flow rate From 4 to 12 mL/min Shelf-life 6 months at storage temperature from 15 to 30 °C Recipient Interface To ensure a safe and sterile connection, the device features a PVC tubing (3,1x4,2mm IDxOD) for both inlet and outlet connection. The tubing is suitable for cut welding with most of standard welding equipment.