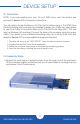
M E R C U R Y O N - T H E - G O P R O Assembly Manual & User Guide
TABLE OF CONTENTS INTRODUCTION................................................................................................1 1.1 Minimum System Requirements 1.1.1 Apple Mac Requirements 1.1.2 PC Requirements 1.1.3 Drive Compatibility 1.2 Package Contents 1.3 About This Manual 1.4 LED Indicator 1.5 Rear View 1.5.1 Rear Features DEVICE SETUP.................................................................................................. 3 2.1 Quick Start 2.2 Assembly Steps 2.
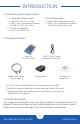
INTRODUCTION 1.1 Minimum System Requirements 1.1.1 Apple Mac Requirements 1.1.2 PC Requirements • FireWire 800: OS X 10.2 or later • USB 3.1 Gen 1 (backwards compatible to USB 2.0): OS X 10.6 or later • FireWire 800: Windows® XP or later • USB 3.1 Gen 1 (backwards compatible to USB 2.0): Windows XP or later 1.1.3 Drive Compatibility • Any 2.5 inch SATA drive 1.2 Package Contents Mercury On-The-Go Pro FireWire 800 (1394b) 9-9 pin cable** USB 3.
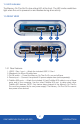
1.4 LED Indicator The Mercury On-The-Go Pro has a blue LED at the front. The LED emits a solid blue light when the unit is powered on and flashes during drive activity. 1.5 REAR VIEW 1 1 4 2 3 3 2 1.5.1 Rear Features 1. USB 3.1 Gen 1 port — Attach the included USB 3.1 Gen 1 2. (Standard-A to Micro-B) cable here. 3. On/Off switch — Power the Mercury On-The-Go Pro on and off here. 4. Power input — Connect the optional 5V power adapter here (sold separately). 5.
DEVICE SETUP 2.1 Quick Start NOTE: If you are installing your own 2.5 inch SATA drive, skip this section and proceed to Section 2.2 for assembly instructions. You will need to format the Mercury On-The-Go Pro before using it. The OWC Drive Guide formatting utility has been pre-installed to assist you. Follow the steps below to use Drive Guide to format the Mercury On-The-Go Pro for Mac (OS X 10.4 and later) or Windows (XP and later). Connect the drive to the computer using the proper cable.
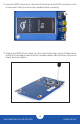
2. Insert the SATA connector on the back of the drive into the SATA connector on the circuit board. Verify the drive is fully seated before continuing. 3. Holding the SATA drive in place, turn the circuit board over. Using a Phillips driver and four of the larger screws from the included packet, affix the drive to the circuit board, as shown below.
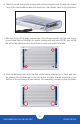
4. Align the front edge of the circuit board (i.e. the edge opposite the power switch) with the two grooves on the heat sink (below left). Once aligned, carefully slide the entire circuit board into the enclosure, until the board contacts the front cover (below right). 5. Take the plastic end-cap and align its cutouts with the ports on the circuit board (below left); make sure the end-cap is not upside down. Next insert the end-cap into the back of the enclosure.
6. There is a small screw hole on each side of the enclosure near the end-cap. Insert one of the two smaller screws into each hole, then fasten them to the enclosure. 7. Affix two more of the large screws from the included packet into the two empty screw holes that run through the plastic casing and heat sink. NOTE: you will be left with a few spare screws; store these in case you need them later. 8. Find the adhesive strip with the four rubber pads attached to it.
2.3 Usage notes • Connect only one interface (USB or FireWire) at a time. • The Mercury On-The-Go Pro is designed to receive all needed power through the USB or FireWire cable, therefore a separate power adapter is not necessary and not included. For rare circumstances in which external power may be necessary, an optional 5V power adapter is available at: www.owcdigital.com/otg-power • Some SSDs require the 5V power adapter to function properly when installed in the Mercury On-the-Go. Please see Section 3.
SUPPORT RESOURCES 3.1 Formatting For additional drive formatting options and information, go to: www.owcdigital.com/format 3.2 Unmounting drives To properly unmount any connected drives from the computer, you need to follow a few simple steps. OS X: There are several options, including: 1) drag the icon for the disk(s) to the trash can; and 2) right-click the disk icon on the Desktop, then click “Eject”. Windows: Go to the System Tray (located in the lower right corner of the screen).
3.5 Online Resources Data Migration For our recommended method of migrating the data from an old drive to a new one, visit: www.owcdigital.com/support/data-transfer FAQs Access our online collection of frequently asked questions for this and other products at: www.owcdigital.com/support/faq 3.6 Contacting Technical Support 8am - 8pm (CT) Monday - Friday 9am - 4pm (CT) Saturday (866) 692-7100 (North America) +1 (815) 338-4751 (International) Live chat is available during normal business hours at: www.
Changes: The material in this document is for information purposes only and subject to change without notice. While reasonable efforts have been made in the preparation of this document to assure its accuracy, OWC and its officers and employees assume no liability resulting from errors or omissions in this document, or from the use of the information contained herein.