M E R C U R Y E L I T E Assembly Manual & User Guide P R O
TABLE OF CONTENTS INTRODUCTION...........................................................................................1 1.1 MINIMUM SYSTEM REQUIREMENTS 1.1.1 Apple Mac Requirements 1.1.2 PC Requirements 1.1.3 Supported Hard Drives 1.2 PACKAGE CONTENTS 1.3 ABOUT THIS MANUAL 1.4 REAR VIEW 1.4.1 Connection 1.5 LED INDICATOR DEVICE SETUP.............................................................................................3 2.1 QUICK START 2.2 ASSEMBLY SUPPORT RESOURCES............................
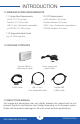
INTRODUCTION 1.1 MINIMUM SYSTEM REQUIREMENTS 1.1.1 Apple Mac Requirements 1.1.2 PC Requirements eSATA: OS X 10.3 or later FireWire: OS X 10.3 or later USB 3.1 Gen 1 (backwards compatible to USB 2.0): OS X 10.6 or later eSATA: Windows® XP or later FireWire: Windows XP or later USB 3.1 Gen 1 (backwards compatible to USB 2.0): Windows XP or later 1.1.3 Supported Hard Drives Any 3.5” SATA hard drive 1.
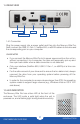
1.4 REAR VIEW Power Switch Power Input FW800 eSATA USB 3.0 1.4.1 Connection Plug the power supply into a power outlet and then into the Mercury Elite Pro. Next, connect the USB 3.1 Gen 1, FireWire 800, or eSATA cable into the drive and the corresponding port on your computer. USAGE NOTES • If you connect the Mercury Elite Pro to its power source and turn the unit on without connecting it to a computer, the drive will temporarily spin up and then spin back down when a data connection is not detected.
DEVICE SETUP 2.1 QUICK START To format this drive for Mac OS X (OS 10.4 and later) or Windows (XP and later), follow the steps below. If you installed your own drive, please use the formatting method you are most familiar with or check Section 3.1 for a link to OWC’s online formatting tips. 1. Plug in the power supply then connect the Mercury Elite Pro to your computer using the proper cable. If you prefer to use a different formatting utility, do so at this time and skip the rest of these instructions. 2.
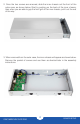
2. Once the two screws are removed, slide the inner chassis out the front of the outer case, as shown below. Start by pushing on the back of the inner chassis, then when you are able to grip the front grill of the inner chassis, pull it out the rest of the way. 3. When removed from the outer case, the inner chassis will appear as shown below. Remove the packet of screws and use them as directed later in the assembly instructions.
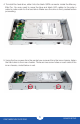
4. To install the hard drive, slide it into the black SATA connector inside the Mercury Elite Pro. You may need to move the blue and black LED cables to the side in order to make room for the hard drive. Make sure the drive is firmly seated before proceeding. 5. Using the four screws from the packet you removed from the inner chassis, fasten the hard drive to the inner chassis. There are two screw holes on each side of the inner chassis, circled below in red.
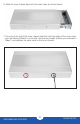
6. Slide the inner chassis back into the outer case, as shown below. 7. Once the front grill of the inner chassis sits flush with the edge of the outer case, turn the Mercury Elite Pro on its side. Use the two smaller screws you removed in Step 1, and refasten the outer case to the inner chassis.
SUPPORT RESOURCES 3.1 FORMATTING For formatting information, including instructions on how to format your OWC Mercury Elite Pro for Mac or Windows, go to: www.owcdigital.com/format 3.2 UNMOUNTING DRIVES To properly unmount any connected drive from your computer, try the options below. OS X: There are several methods to unmount disks with OS X systems. You can drag the icon for the disk you wish to unmount to the trash can, or right-click the disk icon on the desktop, then click “Eject”.
3.4 ABOUT DATA BACKUP To ensure that your files are protected and to prevent data loss, we strongly suggest that you keep two copies of your data: one copy on your OWC Mercury Elite Pro and a second copy on your internal drive or another storage medium, such as an optical backup, or on a second external storage unit.
Changes: The material in this document is for information purposes only and subject to change without notice. While reasonable efforts have been made in the preparation of this document to assure its accuracy, OWC and its officers and employees assume no liability resulting from errors or omissions in this document, or from the use of the information contained herein.
General Use Precautions: • To avoid damage, do not expose the device to temperatures outside the range of 5° C to 40° C (41° F to 104° F). • Always unplug the device from the electrical outlet if there is a risk of lightning or if it will be unused for an extended period of time. Otherwise, there is an increased risk of electrical shock, short-circuiting or fire. • Do not use the device near other electrical appliances such as televisions, radios or speakers.