M I N I S T A C K Assembly Manual & User Guide
CONTENTS INTRODUCTION 1.1 Minimum System Requirements.............................................1 1.1.1 Apple Mac Requirements 1.1.2 PC Requirements 1.1.3 Supported Drives 1.2 Package Contents..................................................................1 1.3 About This Manual..................................................................1 1.4 Front View...............................................................................3 1.5 Rear View..................................................
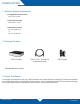
INTRODUCTION 1.1 Minimum System Requirements 1.1.1 Apple Mac Requirements • OS X 10.6 or later 1.1.2 PC Requirements • Windows 7 or later 1.1.3 Supported Drives • (1) 3.5” SATA drive or • (1) 2.5” SATA drive 1.2 Package Contents OWC miniStack USB 3.1 Gen 1 (Standard-A to Standard-B) cable Power Supply Not pictured: screw packet 1.3 About This Manual The images and descriptions may vary slightly between this manual and the unit shipped.
General Use Precautions To avoid damage, do not expose the device to temperatures outside: 41º — 107º F (operating) or -40º — 149º F (non-operating). Always unplug the device from the electrical outlet if there is a risk of lightning or if it will be unused for an extended period of time. Otherwise, there is an increased risk of electrical shock, short-circuiting or fire. Do not use the device near other electrical appliances such as televisions, radios or speakers.
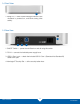
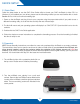
1.4 Front View 1 1. Power LED — emits a solid white light when the OWC miniStack is powered on, and blinks during drive activity. 1.5 Rear View 4 1 2 3 1. ON/OFF Switch — power the miniStack on and off using this switch. 2. DC IN — connect the included power supply here. 3. USB 3.1 Gen 1 port — attach the included USB 3.1 Gen 1 (Standard-A to Standard-B) cable to this port. 4. Kensington® Security Slot — affix a security tether here.
1.6 Usage Notes • If the computer enters sleep or hibernation mode, the LED will remain on but will not blink or pulse. • For the safe removal of your drive and to ensure that no data is lost, always eject or unmount the corresponding disk(s) from your operating system before powering off. You can use the methods described below to safely unmount your disk(s).
DEVICE SETUP 2.1 Quick Start Follow the steps below to use the OWC Drive Guide utility to format your OWC miniStack for Mac OS X or Windows. If you installed your own drives, please use the formatting method you are most familiar with or check Section 3.1 for a link to our online formatting tips. 1. Power on the miniStack and plug it into to your computer using the proper data cable. If you prefer to use a different formatting utility, do so at this time and skip the rest of these steps. 2.
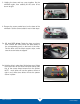
3. Holding the base and top cover together, flip the miniStack again, then carefully lift the cover off as shown at right. 4. Remove the screw packet found on the base of the miniStack. Set the screws aside for use in later steps. 5a. 3.5 inch SATA drives: Rotate the base as shown then connect the SATA power and data cables to the corresponding ports on the back of the drive. Set the drive onto the black support strips; make sure the screw holes are aligned. 6a.
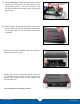
5b. 2.5 inch SATA drive: Rotate the base as shown then connect the SATA power and data cables to the corresponding ports on the back of the drive. Set the drive onto the black support strips, lining up the screw holes. 6b. Hold the drive in place then flip the base over. Where the screw holes on the drive overlap the screw holes on the base, affix four the fine thread screws from the packet. 7. Flip the base over then carefully align and re-seat the top cover as shown at right. 8.
SUPPORT RESOURCES 3.1 Formatting For additional formatting information, including instructions on how to format your OWC miniStack for Mac or Windows, go to: www.owcdigital.com/format 3.2 Troubleshooting Begin by verifying that the power cable is connected to the miniStack and to a power source. If the power cable is connected to a power strip, make sure that the power strip switch is in the ON position.
Changes: The material in this document is for information purposes only and subject to change without notice. While reasonable efforts have been made in the preparation of this document to assure its accuracy, OWC, its parent, affiliates, officers, employees, and agents assume no liability resulting from errors or omissions in this document, or from the use of the information contained herein.