
Quick Start Guide

2
OWC Thunderbolt 3 Dock
Introduction
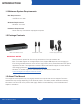
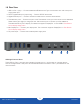
1.5 Front View
NOTE: There are two LEDs on the bottom of the OWC Thunderbolt 3 Dock near
the front, which are not pictured. Their functionality is described below.
1. Data LED (green) — This LED glows green when the dock has an active data connection to a computer
via the Thunderbolt cable. If the computer is powered o or in sleep mode, this LED will power o.
2. Power LED (blue) — This LED glows blue when the dock receives power. Unlike some Thunderbolt
devices, the Thunderbolt 3 Dock does not power o when disconnected from the computer or when
the computer sleeps. As long as the dock receives power, the blue power LED will remain on.
3. microSD card slot — Accepts microSD media cards.
4. SD card slot — Accepts SD type media cards.
5. Combo audio port (3.5 mm) — Accepts microphones, headphones, and headsets.
6. High-power USB 3.1 Gen 1 port — Connect compatible USB devices via Type-A connector.
1
7. USB 3.1 Gen 2 port (Type-C) — Connect compatible USB devices via Type-C connector.
1
3 4 5 6 7
2
USB High-Powered Ports
These USB 3.1 Gen 1 ports are each capable of providing up to 1.5A of power for charging devices
such as the Apple iPad. These ports are otherwise identical to the USB 3.1 Gen 1 ports located on the
rear of the dock.
1.4 OWC Dock Ejector
This application safely ejects all drives connected to the OWC Thunderbolt 3 Dock with a single click, adding
peace of mind to fast-paced mobile workows. To install this app, please follow the steps below.
1. Download the installer le: For Mac download.owcdigital.com/dockejector/mac or for Windows
download.owcdigital.com/dockejector/win
2. Launch the installer and follow the prompts. No restart is required.
3. Once the app is running an icon like the one shown below will appear in the macOS menubar, or,
System Tray on Windows.
To learn more about OWC Dock Ejector please visit: go.owcdigital.com/dockejector.