
User's Manual


04INTRODUCTION
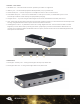
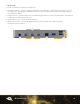
1.5 FRONT / TOP VIEWS
1. SD Media slot – insert SD media card here. Speeds up to UHS-II are supported.
2. USB 2.0 port – connect USB 2 peripherals like keyboards, mice, or printers here.
3. Combo audio port – connect microphone or headphones with a 3.5mm connector here.
4. Thunderbolt host port – connect to a Thunderbolt 3 or later port on a Mac, or Thunderbolt 4 port on a PC.
Provides up to 90W of Power Delivery for laptop battery charging.
5. ClingOn anchor – if you are using an OWC ClingOn to secure the Thunderbolt host cable, affix it here.
6. LED – OWC logo will glow white when there is power but no data connection, or when the device enters Sleep mode.
The logo will glow blue when there is power and an active data connection.
7. LED Brightness control – by default the LED is set to a high brightness level. You can switch the LED to a lower
brightness, or turn off the LED, by inserting the end of a paperclip to press the internal button. Minimal force is
required. If you unplug the OWC Thunderbolt Dock from power, the LED will be reset to the default brightness level
when power is reconnected.
1.6 SIDE VIEW
1. Kensington™ Security slot – if using a Kensington Security lock, attach here.
2. Kensington Nano slot – If using a Kensington Nano lock, attach here.
6
7