
Installation Instructions


6
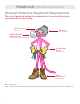
Installation for Above Foundation Exterior Walls
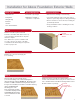
Step 5:
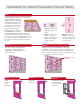
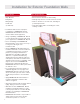
Fasten insulating sheathing to the wall frame
using 1" diameter cap nails at
a length sufficient to penetrate
the framing a minimum of ¾".
Cap nails must be spaced no
more than 6" on center on the
perimeter and 12" on center
mid-board at intermediate
framing members sheathed
with FOAMULAR
®
. As shown,
the FOAMULAR
®
board length extends below
the base of the wall by an amount sufficient to
cover the floor rim joist when the wall is erected.
Alternatively, cut pieces of FOAMULAR
®
can
be used to cover the rim joist after the wall is
erected.
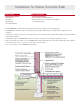
Nailing at square edge
and tongue and groove
joints:
Never set nails so that
washers overlap the
edges of the sheathing.
This prevents proper
joining of boards.
Always stagger the
nail pattern at the inter-
section of square edge
and tongue and groove
joints as shown.
Step 6:
Erect the wall and temporarily brace
it securely. Complete nailing the
FOAMULAR
®
Insulating Sheathing to
the floor rim joist.
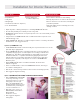
Step 7:
Seal all joints between FOAMULAR
®
boards using
HomeSealR
®
Foam Joint Tape. Smooth the joint tape onto
the surface using a J-Roller to eliminate air bubbles and
ensure a water and air tight seal. Using a serrated knife, cut
out openings for all windows and doors.
HomeSealR
®
Foam
Joint Tape
Step 8:
Install
bevelled
sill as
backdam.
Step 9:
Apply sill
flashing.
Step 10:
Install window plumb,
level and square
per manufacturer’s
instructions.