Oakridge Shingles Installation Instructions ® Instrucciones Para La Instalación De Tejas Oakridge® OAKRIDGE SHINGLES ®
Application Instructions Instrucciones de aplicación Before installing this product, check local building codes for their roofing requirements. Antes de colocar este producto, verifique los códigos locales de construcción para conocer los requisitos de su techo. These shingles are designed for new or re-roofing work over any properly built and supported wood roof deck having adequate nail holding capacity and a smooth surface. Check local building codes.
1 Specialty Eave Flashing: Where required by code. WeatherLock ® underlayment or equivalent eave and flashing membrane applied to a point at least 24" beyond interior wall line. See manufacturer’s installation instructions. See Fig. 1. Fig. 1 1 Specialty Eave Flashing Tapajuntas especial para aleros Tapajuntas especial para aleros: Donde lo requiera el código. Revestimiento WeatherLock,® o impermeabilizante equivalente para aleros y tapajuntas instalada hasta un punto de al menos Underlayment 24 pulg.
Shingle Fastening: Place fasteners 6 1⁄8" from bottom edge of each shingle and 1" from each end. Standard Pattern Use four fasteners. See Fig. 4. Fig. 4 4 Nail Pattern Esquema con 4 clavos Six Nail Pattern Use six fasteners. See Fig. 4A. Mansard or Steep Slope Fastening Pattern. Place fasteners 6 1⁄8" from bottom edge to secure both layers of the shingle. See Fig. 4B.
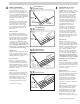
Shingle Application: These shingles are applied with a 61⁄2" offset, with 5 5⁄8" exposure, over prepared roof deck, starting at the bottom of the roof and working across and up. This will blend shingles from one bundle into the next and minimize any normal shade variation. Application with offsets of 4" or 8" are also acceptable. Caution must be exercised to assure that end joints are no closer than 2" from fastener in the shingle below and that side laps are no less than 4" in succeeding courses.
5 Shingle Application (cont.): Fourth Course: Remove 191⁄2" from the left end of this shingle and apply the remaining piece over and above the third course shingle and flush with edge of the third course with 55⁄8" exposure. See Fig. 5D. Fasten securely according to fastening instructions. See Fig. 4. Fig.
6 Valley Construction: Closed-Cut Valley See Fig. 6. A closed-cut valley can be used as an alternative to woven and open valley and is applied as follows: e urs a Co iler 6thexta h urse ra o S C hile 5thuinta urse ra Q Co hile 4thuarta urse era C Co hil 3rdrcera urse ilera Te d Co da h 2negun urse lera S t Co a hi 1s imer Pr Lay a 36" wide valley liner of selfadhered membrane underlayment or equivalent. A 36" wide minimum 50 lb. smooth surface roll roofing can also be used as a valley liner.
For more information on Owens Corning™ roofing products, or any of our wide range of building products and systems, it’s easy to reach us: 1- 800 - GET- PINK | www.roofing.owenscorning.com ® OWENS CORNING ROOFING AND ASPHALT, LLC ONE OWENS CORNING PARKWAY TOLEDO, OHIO, USA 43659 1- 800 - GET- PINK® www.roofing.owenscorning.com Pub. No.10003280-A. Printed in U.S.A. August 2011. THE PINK PANTHER™ & © 1964 –2011 Metro-Goldwyn-Mayer Studios Inc. All Rights Reserved.