
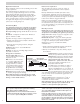
Installation Instructions


4
Course Application:
Vertical Racking Method. Apply shingles over
properly prepared roof deck, starting at bottom of roof
using the single-column, vertical-racking method. Owens
Corning Berkshire shingles must be applied with a 4
3
⁄4'' offset
and 8
3
⁄8'' exposure. Caution must be exercised to ensure that
end joints are no closer than 2'' from a fastener in the shingle
below. Refer to course application steps for speci c instructions.
Note: Owens Corning Berkshire
shingles ARE NOT to be installed
across and diagonally up the roof.
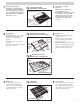
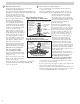
First Course:
Apply rst course starting with a full
shingle, even with the lower edge of
the starter course shingle, align the
right edge of the shingle with the 37
5
⁄8''
vertical line. Align the top edge of the
shingle with the 18
3
⁄8'' horizontal chalk
line. See Fig. 6.
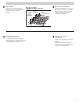
Second Course:
Align the right edge of the rst shingle
of the second course with the 32
7
⁄8''
vertical chalk line. Align bottom edge
of the shingle with the top of the
shingle cutouts in the rst course,
leaving 8
3
⁄8'' exposure. Fasten securely
and trim 4
3
⁄4'' excess overhang at rake,
leaving
3
⁄8'' overhang. See Fig. 6A.
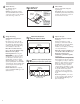
Succeeding Courses:
Alternate shingle courses. Odd-
numbered courses start with a full
shingle aligned with the 37
5
⁄8'' vertical
chalk line and the top edge aligned with
the horizontal chalk line, leaving 8
3
⁄8''
exposure. Even-numbered courses will
start with the right edge of the shingle
aligned with the 32
7
⁄8'' vertical chalk
line. Shingles are applied up the rake
in a single-column racking fashion.
See Fig. 6B.
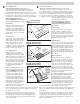
Fasten each full shingle in the odd-
numbered courses with four (4)
fasteners. DO NOT fasten the right
edge of the full shingles in the odd-
numbered courses at this time as
the shingle being installed adjacent
to the previous course will have to
be positioned beneath the right edge
of this full shingle. When the shingle
adjacent to the previous course has
been positioned, apply ve (5) fasteners
in that shingle (even-numbered
courses) and apply one fastener to the
unfastened end of the shingle above.
Fasten the shingles in the even-numbered (where the rst shingle
in the course is aligned with the 32
7
⁄8'' chalk line) courses using
ve (5) fasteners. See Fig. 6B.
Work up the roof starting at the eave edge one column at a
time following the above procedure. Butt full shingles against
the right edge of the shingles that have been applied in each
course, again working one column at a time until the courses
have been completed.
Colocación de hileras:
Método de escalonado vertical. Aplique las tejas sobre un
entablonado de techo correctamente preparado, comenzando en la
parte inferior del techo con una única columna mediante el método
de escalonado vertical. Las tejas Berkshire de Owens Corning deben
aplicarse con un desplazamiento de 4
3
⁄4 pulg. y un área expuesta de
8
3
⁄8 pulg. Es necesario tener cuidado para garantizar que las uniones
de extremo no queden a menos de 2 pulg. de un jador en la teja de
abajo. Vea las instrucciones especí cas en los
pasos de colocación de hileras.
Nota: Las tejas Berkshire de Owens
Corning NO DEBEN instalarse en
forma atravesada y diagonalmente
hacia arriba.
Primera hilera:
Aplique la primera hilera comenzando con
una teja completa, colocándola a ras del
borde inferior de la teja de la hilera inicial,
y alineando el borde derecho de la teja con
la línea vertical de 37
5
⁄8 pulg. Alinee el borde
superior de la teja con la línea horizontal de
tiza de 18
3
⁄8 pulg. Vea la Fig. 6.
Segunda hilera:
Alinee el borde derecho de la primera teja de
la segunda hilera con la línea de tiza vertical
de 32
7
⁄8 pulg. Alinee el borde inferior de la
teja con la parte superior de los recortes de
la teja de la primera hilera, dejando un área
expuesta de 8
3
⁄8 pulg. Fíjela rmemente y
recorte el exceso saliente de 4
3
⁄4 pulg. de la
viga inclinada, dejando una saliente de
3
⁄8 pulg.
Vea la Fig. 6A.
Hileras siguientes:
Alterne las hileras de tejas. Las hileras de
numeración impar comienzan con una teja
completa alineada en la línea de tiza vertical
de 37
5
⁄8 pulg. y el borde superior alineado
con la línea de tiza horizontal, dejando un
área expuesta de 8
3
⁄8 pulg. Las hileras pares
comienzan con el borde derecho de la teja
alineado con la línea de tiza vertical de 32
7
⁄8
pulg. Las tejas se aplican hacia arriba de la viga
inclinada, en una columna simple de modo
escalonado. Vea la Fig. 6B.
Fije cada teja completa de las hileras impares
con cuatro (4) jadores. NO je todavía
el borde derecho de las tejas completas
en las hileras impares, puesto que la teja
instalada adyacente a la hilera anterior deberá
colocarse debajo del borde derecho de esta
teja completa. Cuando la teja adyacente a la
hilera anterior haya sido colocada, aplique
cinco (5) jadores en ella (hileras pares) y
aplique un jador al extremo no sujeto de la teja de arriba.
Fije las tejas de las hileras pares (donde la primera teja de la hilera esté
alineada con la línea de tiza de 32
7
⁄8 pulg.) utilizando cinco (5) jadores.
Vea la Fig. 6B.
Continúe ascendiendo en el techo comenzando en el borde del alero,
una columna a la vez, y siguiendo el procedimiento anterior. Las tejas
completas deben hacer tope contra el borde derecho de las tejas
aplicadas en cada hilera, nuevamente trabajando una columna a la vez
hasta completar las hileras.
6 6
Second Course
Segunda hilera
Línea de tiza
vertical de
32
7
⁄
8
pulg.
Alinear con parte
superior de recorte
Rake edge
Align right edge
with vertical chalk
line and trim 4
3
⁄
4
"
from left edge
Borde de viga
inclinada
Alinear borde derecho
con línea de tiza vertical
y recortar 4
3
⁄
4
pulg. del
borde izquierdo
Hilera 2
Teja inicial
32
7
⁄
8
"
vertical
chalk line
Align with
top of cutouts
2nd Course
Starter shingle
Fig. 6A
Aplicación de tejas
Shingle Application
Succeeding Courses
Ridge vent
Metal drip edge
Hilera 1
Hilera 1
Hilera 2
Hilera 2
3rd course
3rd course
Hilera 1
Hilera 2
3rd course
Hilera inicial
Starter course
Hilera 3
Hilera 3
Hilera 3
Hilera 4
Hilera 4
Hilera 5
Hilera 5
Hilera 4
Hilera 5
1st course
1st course
2nd course
2nd course
1st course
2nd course
3rd course
3rd course
3rd course
4th course
4th course
5th course
5th course
4th course
5th course
32
7
⁄
8
"
37
5
⁄
8
"
Hileras siguientes
Respiradero
de arista
Borde de goteo metálico
In odd-numbered
courses, do not
apply last fastener
until shingle
adjacent to the
previous course
has been applied.
En hileras impares,
no aplicar el último
fijador sino hasta
colocar la teja
adyacente a la hilera
anterior
Fig. 6B
Aplicación de tejas
Shingle Application
First Course
Línea de tiza horizontal
Rake edge
Primera hilera
Borde de viga
inclinada
Hilera 1
32
7
⁄
8
"
37
5
⁄
8
"
Horizontal chalk line
16
3
⁄
4
"
18
3
⁄
8
"
1st Course
Fig. 6
Aplicación de tejas
Shingle Application