FOAMULAR Installation Guidelines ®
FOAMULAR Installation Guidelines ® The intent of this document is to provide guidance on the installation of Owens Corning FOAMULAR Insulation in residential and light frame commercial construction. This document, the reference documents cited herein and any/all information found on product packaging, literature, and videos collectively constitute the “manufacturer’s installation instructions” referenced in the ICC family of model codes – specifically the Intl. Energy Conservation Code (IECC), Intl.
FOAMULAR Installation Guidelines ® Additional Considerations • This product is not required to be installed by someone trained or certified by the manufacturer. • As is, this product undergoes no chemical reaction and is in its final form when purchased. There is no need to evacuate the building during installation. • FOAMULAR cannot be in contact with hot surfaces such as chimneys or heat sources over 165 degrees F.
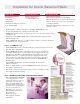
FOAMULAR Installation Guidelines ® Personal Protective Equipment Requirements The use of personal protective equipment in a construction area is very important to your safety Eye Protection (Required) Hard Hat (Recommended) NIOSH Standard N95 Respirator (Required During Insulation Installation) Cut Resistant Gloves (Recommended) Safety Shoes/Boots (Recommended) Other Precautions CUTS — SURVEY THE WORK AREA FOR EXPOSED NAILS AND TRUSS CONNECTOR PLATES THAT COULD CAUSE A CUT.
Installation for Above Foundation Exterior Walls Basic Tools: Special Equipment: • Tape Measure • Pneumatic cap nail gun • Ensure that the framing is clean and dry. • Utility Knife • BOSTITCH N66BC-1 Cap Nailer or equivalent • Check that framing provides a flat, level surface. Repair or replace any warped or damaged framing. ® • Straightedge Site Preparations: • Remove obstacles to the work area, including all potential trip hazards.
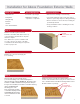
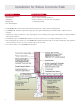
Installation for Above Foundation Exterior Walls Step 5: Fasten insulating sheathing to the wall frame using 1" diameter cap nails at a length sufficient to penetrate the framing a minimum of ¾". Cap nails must be spaced no more than 6" on center on the perimeter and 12" on center mid-board at intermediate framing members sheathed with FOAMULAR . As shown, the FOAMULAR board length extends below the base of the wall by an amount sufficient to cover the floor rim joist when the wall is erected.
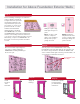
Installation for Above Foundation Exterior Walls Step 11: Step 12: Apply self-adhered jamb flashing. Install drip cap (if applicable); install self-adhered head flashing. Step 14: Step 13: Tape (FlashSealR Foam Flashing Tape) top edge of head flashing. Interior view of bevelled sill backdam and sill flashing. Step 15: Step 16: Interior view of window installed. Air seal window around entire perimeter from interior with non-expanding foam.
Installation for Exterior Foundation Walls Basic Tools: Site Preparations: • Tape Measure • Ensure that the substrate is clean and dry. • Utility Knife • Remedy all protrusions or surfaces that are not flat. • Straightedge • Remove obstacles to the work area, including all potential trip hazards. • Caulk Gun (for adhesive) • Verify that ladders and/or scaffolding are in safe, working condition. • Foundation walls must be sealed prior to installation of FOAMULAR Boards.
Installation for Interior Basement Walls Basic Tools: Special Equipment: Site Preparations: • Tape Measure • Hammer drill/power screwdriver (Option 2) • Ensure that the substrate is clean and dry. • Utility Knife • Remedy all protrusions or surfaces that are not flat. • Straightedge • Remove obstacles to the work area, including all potential trip hazards. • Caulk Gun (for adhesive - Option 1) • Verify that ladders and/or scaffolding are in safe, working condition.
Installation for Below Concrete Slab Basic Tools: Site Preparations: • Tape Measure • Ensure gravel fill is tamped and level. • Utility Knife • Remove obstacles to the work area, including all potential trip hazards. • Straightedge • 4"-6" Serrated Knife • Install FOAMULAR Insulation after gravel fill has been built up to grade, and thoroughly tamped. ® • Lay FOAMULAR Insulation in place with edges pressed together and butting the foundation wall or adjacent vertical insulation.
Notes 11
OWENS CORNING INSULATING SYSTEMS, LLC ONE OWENS CORNING PARKWAY TOLEDO, OHIO, USA 43659 1-800-438-7465 (1- 800 - GET- PINK ) www.owenscorning.com ® Pub No. 10022623. Printed in U.S. A . Januar y 2018. THE PINK PANTHER™ & © 1964– 2018 Metro-Goldwyn-Mayer Studios Inc. All Rights Reser ved. The color PINK is a registered trademark of Owens Corning. © 2018 Owens Corning. All Rights Reserved. Velcro is a registered trademark of Velcro Industries B.V.