
Installation Instructions


9
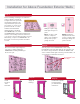
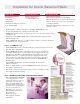
Installation for Interior Basement Walls
• Repair any leaks or flashing details prior to installing FOAMULAR
®
Boards.
• Air seal sill board and joints in band joist area using caulk.
• FOAMULAR
®
Boards seams do not require tape. Be sure to air seal the band joist area
including the sill.
• Verify thickness of FOAMULAR
®
Boards or additional insulation required to meet
minimum Energy Code.
• NOTE: FOAMULAR
®
Boards in a conditioned space must be covered by a 15-minute
thermal barrier, such as gypsum board.
Option 1 (FOAMULAR
®
150)
• Install FOAMULAR
®
Boards oriented vertically from top of basement floor to the sill
plate with edges tightly butted.
• Secure FOAMULAR
®
Boards to foundation walls with construction adhesive
compatible with polystyrene or foamed plastics as noted by its manufacturer
(LOCTITE
®
PL
®
300 VOC Foamboard Adhesive, Liquid Nails
®
Projects and
Foamboard Adhesive, or equivalent alternative) by applying 3/16" bead of
adhesive with lines 6-12" apart (follow adhesive manufacturers' application
instructions). If compatible, sealer may also be used to hold FOAMULAR
®
Boards in place.
• Apply FOAMULAR
®
Boards to foundation wall within 15 minutes after
adhesive is applied.
• Frame out studded wall in contact with FOAMULAR
®
Boards, anchoring to
floor and floor framing above.
• Kraft faced or unfaced cavity insulation can be used in the framing (optional).
• Attach gypsum drywall to framing.
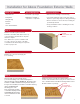
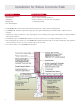
Option 2 (FOAMULAR
®
INSULPINK
®
FOAM INSULATION BOARD)
• Attach FOAMULAR
®
INSULPINK
®
to masonry wall using concrete
fasteners through 1" x 3" wood
furring strips set in the side
laps of the INSULPINK
®
Foam
Insulation Board. Fasteners must
be minimum 2.5" penetrating the
concrete a minimum of 1".
• Start with a 4" to 6" piece of
INSULPINK
®
Foam Insulation
Board with full
thickness in corner.
• Attach gypsum drywall to
furring strips.
Basic Tools:
• Tape Measure
• Utility Knife
• Straightedge
• Caulk Gun (for adhesive - Option 1)
• 4"-6" Serrated Knife
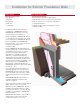
Site Preparations:
• Ensure that the substrate is clean and dry.
• Remedy all protrusions or surfaces that are not flat.
• Remove obstacles to the work area, including all
potential trip hazards.
• Verify that ladders and/or scaffolding are in safe,
working condition.
Special Equipment:
• Hammer drill/power
screwdriver (Option 2)