
Specification Sheet

© 2021 Owl Labs. Confidential.
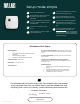
Setup made simple
Unbox your Whiteboard Owl.
Place Whiteboard Tags in the top left
and bottom right corner of the
whiteboard.
Mount your Whiteboard Owl to the wall
or tripod 7-16 feet (2-5 meters) from
the whiteboard.
Connect your Whiteboard Owl to
power.
Open the Meeting Owl app to register
your Whiteboard Owl.
Activate your Whiteboard Owl monthly
subscription through the Nest.
Pair your Whiteboard Owl with your
Meeting Owl in the Meeting Owl app.
Once you start a meeting, engage the
Whiteboard Owl by turning over a
magnetic tag, or by turning it on in the
app.
To access whiteboard content, open
share.owllabs.com and enter the
passphrase that appears on the Meeting
Owl Stage view. From there, whiteboard
content can be viewed and downloaded
during the meeting.
1
2
3
4
5
6
7
8
9
“
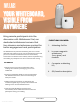
Whiteboard Owl Specs
The Whiteboard Owl works really well! The students who are remote
have reported that they are finally able to see the whiteboard and
anything that I write on it clearly. I would definitely recommend this
to other Owl users.
Anna Brown, Teacher
Learn More
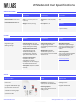
Over-the-air software updates are automatically pushed to your
Whiteboard Owl overnight when the Meeting Owl Pro is connected
to WiFi
For best content visibility, use black, green, red, or blue markers
with a chisel tip
Integrates with virtually all video conferencing platforms,
including Zoom, Google Hangouts, Slack, GoToMeeting, Microsoft
Teams, and more
Whiteboard Capture
● Download high-res whiteboard snapshots during the
meeting
● Whiteboard snapshots are taken every 30 seconds
● Compatible with all commonly used web browsers
● Accessible from tablet or computer
Mounting options
● Wall mount with drywall screws and anchors
(included)
● Adhesive strips (included)
● Mounted on tripod (tripod not included)
Camera resolution: 4208 x 3120
Dimensions: 5” H x 5.25” W x 2” D
Connectivity: WiFi