
Installation Guide

Curve
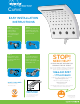
EASY INSTALLATION
INSTRUCTIONS
WHAT’S INCLUDED
+
Rain Shower Head
+
Plumber’s Tape
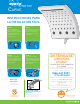
HOW TO SWITCH
SPRAY SETTINGS
The easy spray selector allows
you to click with ease to your
desired spray setting.
STEP 3
Wrap plumber’s tape
clockwise 3 or 4 turns
around threaded end of
shower arm.
STEP 1
Remove your existing
shower head. To
remove, turn the
existing shower head
in a counterclockwise
direction.
STEP 4
In a clockwise direction,
screw your new shower
head onto the taped
portion of the shower arm.
Hand tighten only.
STEP 2
Remove any remnants of
old plumber’s tape and
flush out shower pipe for
5 to 10 seconds.
For use with automatic
compensating valves
rated at 5.678 L/min
(1.5 gpm) or less.
STOP!
NEED HELP?
PLEASE DO NOT RETURN THIS
PRODUCT TO THE STORE.
If you need installation assistance, replacement
parts or have questions regarding our warranty
please contact customer service at
1.866.440.9257
or 1.775.420.5600
Support is also available via email at
support@oxygenics.com
Be sure to visit our website at
www.oxygenics.com
Business Hours:
Monday-Thursday 7:00 am to 5:00 pm PST
Friday 7:00 am to 4:30 pm PST