
Product Manual


EN pg.5
Crane Pre-Installation
Check for damage during shipment. Do not install or use a damaged product. Be sure to maintain
records of product information and contact your OZ Lifting Products LLC® dealer with any problems
that arise. Refer to applicable codes and regulations before installing equipment. Contact a qualied
professional to obtain structure and foundation specications for product mounting.
Before installing, select a location where the crane is:
• Visible throughout its entire operation.
• Free of trafc and any possible operational interference.
• Positioned so the operator is clear of both the load and the path of the wire rope.
• Accessible for maintenance.
• Attached to a strong, level foundation that can properly support it under all conditions.
• Removed from any corrosive, ammable, explosive, or potentially damaging materials.
Installing the Base
NOTE: The accompanying bases for the STEEL DAVIT CRANE by OZ Lifting Products LLC
®
are
sold separately through OZ Lifting Products LLC® dealers. They are necessary for proper operation
of this product.
The base must be securely fastened to the foundation using 1/2-inch coarse thread fasteners of at
least grade 5. A torque of 80 ft/lb should be used for grade 5 fasteners without lubrication.
Assure that mounting surface is located directly above a strong, level, solid foundation that supports
the crane under all circumstances.
Non-standard products that have been altered from the original design may require alternative
fastening requirements. Contact your OZ Lifting Products LLC® dealer for more information.
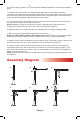
Assembling the Crane
Pre-Assembly
Please refer to the Assembly Diagram on pg. 7 before assembling the crane.
Inspect the crane to assure there are no missing or damaged parts. Do not discard the crane’s
shipping containers as they can be reused if the crane needs to be repackaged. Contact your
OZ Lifting Products LLC
®
dealer if any problems arise.
Assure that all components, including the pin that the load sheave rides on, are properly lubricated
before assembling. Refer to Cleaning & Lubricating the Crane on pg. 8.
During assembly, perform an inspection according to the procedures found on pg. 10. Document and
resolve any issues. This will provide a comparison for later inspections.
Assembly
NOTE: Fasteners should not be over-tightened during assembly as this may strip the threads and
lead to damage. For the purpose of assembly, four clevis pins, marked 1-3, are included. The two pins
marked #2 are identical. Both are necessary for assembly.