
Instruction Manual


I
NSTRUCTIONS AND PARTS LIST AEC-8/31/2011
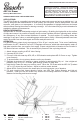
AEC Air Eraser
Steel Tip W/Carbide Insert
OPERATING INSTRUCTIONS & REPLACEMENT PARTS
WARNING: Read instructions for proper care in
handling and operation. Always wear a Respirator
a
nd Goggles when using the AEC Air Eraser. Use
in Well Ventilated Area to remove dust. Always read
and follow Cautions and Warnings on abrasive
m
aterial being sprayed. Secure airhose to Airbrush
with V-62 Wrench for safety and to prevent air leaks.
Maximum Air Pressure 6 5 P.S.I.
APPLICATIONS:
The AEC Air Eraser is a versatile instrument that can erase color errors and act as an etching tool. It is
used by hobbyists and manufacturers to clean jewelry and fine parts, remove discoloration, rust and
corrosion, etch glass or cut monograms. It is used by lithographers to highlight half-tones and erase
defects without marring the surface or leaving a smudge. It is used extensively by model railroaders for
weathering railcars and accessories.
DENTAL INFORMATION:
Indispensable in occlusal relationship analysis of gold casting. By dulling the high polish on the surface
of inlays and crowns it is possible to identify minute occlusal contacts with their opposing teeth, without
the discrepancy of any inter-occlusal thickness of material. The dull surface of a casting shows the
markings of any tape, carbon or articulating paper with superior fidelity. When adjustments have been
made, the surface can be dulled again and further analysis carried out.
OPERATION:
For general erasing, clean dry air at pressures of 30 to 45 p.s.i. may be used. To be sure of satisfactory
performance, the MT - Moisture Trap or R-75 Regulator will remove, within their rated capacity, water, oil
and other impurities from your source of air supply. Expect a slight trickle of abrasive to flow out after H-
155 Button has been released. This is caused by air pressure in the cup being relieved.
1. Attach airhose coupling to AE-63 Valve Casing.
2. Unscrew AE-23 Cover.
3. Fill cup 3/4 full with clean dry AEX, AE, or SSO abrasive and replace AE-23 Cover on cup. Tighten
cover securely.
4. To prevent leaks, do not get any abrasive on the cup threads.
5. Regulate air pressure for erasing on paper surfaces to approximately 30 p.s.i. Use a higher air
pressure of 45 to 65 p.s.i. for metal, gold castings, plastic or glass work.
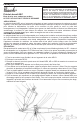
6. Hold the Air Eraser the way you would a pencil. Move the Air Eraser with the AEC-34 Tip about
1/8" to 1/2" above the work surface. Adjust to achieve results desired.
7. Adjust AE-24 Control Screw to the lowest point to avoid excessive use of abrasive.
8. For work requiring fast, heavy abrasive cutting, use AEX Fast Cutting Abrasive and high air
pressure. Hold tip of the Air Eraser very close to the working surface to cut faster. Hold at a
distance for blending and broad coverage.
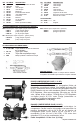
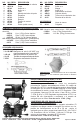
NO. PART NO. DESCRIPTION
1. AE-66 Shell Assembly
2. AEC-34 Tip with Carbide Insert
3. AE-43 “O” Ring
4. AE-6 “O” Ring
5. AE-38 Cup
6. AE-20 Powder Tube Assembly
7. AE-31 Gasket