
Instruction Manual

INSTRUCTIONS AND PARTS LIST VLSTPRO-8/31/2011
Supersedes Instructions & Parts List VLSTPRO-5/3/2011
WARNING: Spray materials may be harmful if inhaled or
allowed to come into contact with the skin or eyes. Consult
the product label and Material Safety Data Sheet supplied
for the spray material. Follow all safety precautions.
CAUTION: Well Ventilated Area Required to remove
fumes, dust or overspray. Secure airhose to Airbrush with V-
62 Wrench for safety and to prevent air leaks.
M a x i m u m A i r P r e s s u r e 7 5 P . S . I .
Printed in the U.S.A.
Paasche Airbrush Company
4311 North Normandy Avenue
Chicago, IL 60634-1395
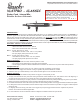
VLSTPRO - CLASSIC
Siphon Feed - Internal Mix -
Double Action Air brush
INTRODUCTION:
With modifications we learned from the professional artists that use the VL, we created the ultimate painting machine! The VLSTPRO is a
significant upgrade to the classic ‘VL’ with features that airbrushers of all levels will appreciate. The new head
lets you clean any accumu-
lation of paint off the tip and needle with a quick pinch of the fingers. The trigger guide
has been lengthened for increased paint flow at
maximum draw, and the cut-away handle
allows quick pullback to blow out clogs. A threaded bottle connector locks onto the bottle stem for
worry free one-handed painting and the bottle will not fall off once fastened properly. And inside, it’s still the same great ‘VL’ that professionals
have trusted for decades. Available in size #3 off the shelf with size #1 and #5 components available for your assembly.
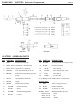
PTFE Packings.
Head Sizes - Patterns - Fluid Thickness
Size 1 - Tip size .022 inches or .55mm
- Used for fine detail. Pencil Line to 1'' patterns
- Paint must be thinned further than 3 & 5 heads
Size 3 -Tip size .029 inches or .73mm
-Less detail than the size 1 head. 1/32'' to 1-1/2'' patterns
-Can spray slightly thicker paint than size 1 head
Size 5 -Tip Size .042 inches or 1.06mm
- Less detail than the size 3 head. 1/16'' to 2'' patterns
- Can spray slightly thicker paint than size 3 head
Working Pressures:
• Operating pressures 20-55 PSI; Maximum pressure 75 PSI
• 20-30 PSI is best for detail spraying w/ properly thinned materials
• Use the higher pressures for thicker material where fine detail is not critical or thin the paint to allow lower pressures.
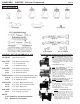
Equipment Set-up:
The Airbrush is held in the same manner as a pen, with the index finger comfortably over the Trigger.
1. Attach airhose to air supply and to airbrush. If using a regulator, set pressure between 20 -30 PSI.
2. Attach the color cup or bottle assembly to color socket and then tighten lock nut to bottle with wrench.
Airbrush Operation:
1. Press down on Trigger to release air and pull back on Trigger to control quantity of color.
2. To spray a fine line without heavy ends, start moving the airbrush without release of color. Then start the color at the beginning of
line and stop the color at the end, but continue the motion of the airbrush after the color has stopped.
3. Practice this movement until you can spray a fine line or a broad pattern without heavy buildup at the beginning or end of your strokes.
4. Speed of movement controls density of color and fading effects at beginning and end of strokes.
5. For detail hold the airbrush close to the surface, push down for air and slowly pull back on the Trigger to release a small amount of paint.
6. For background work and broad effects, hold the airbrush away from the work surface and pull back on Trigger to release required
amount of color.
7. For stippling remove the aircap, push down on the Trigger and pump the Trigger forward and back. Adjust the air pressure
between 15 and 50 PSI for desired stipple effect.
8. For more instruction see the “22 Airbrush Lessons for Beginners” booklet enclosed with your airbrush.
Phone: 773-867-9191 • Fax: 773-867-9198
Website: www.paascheairbrush.com
E-Mail: info@paascheairbrush.com