
Instructions / Assembly


INSTRUCTIONS AND PARTS LIST H AIRBRUSH 8/31/2016
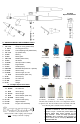
H Model Airbrush
Single Action–External Mix–Siphon Feed
Added Bottle Connection
Instruction Manual & Replacment Parts
OPERATING INSTRUCTIONS:
Approximate Working Pressures:
• 20lbs.orLess:Stippleandgranulatedeffects,pressurewillvarywithviscosityofuid.
• 20 to 30 lbs.: Medium consistency water colors, inks & dyes.
• 30 lbs. or More:Heavyuids,acrylics,reducedlacquers,varnishes,paintsorceramicglaze.
Sizes:
• H-1(.45mm)HeadandHC-1-3Aircapforlightuids.
• H-3(.64mm)HeadandHC-1-3Aircapformediumuids.
• H-5(1.06mm)HeadandHC-5Aircapforheavieruids.
1. Attach hose to air supply and allow air to blow a few seconds. Shut off before attaching to Airbrush.
This procedure will remove dirt from airline and hose.
Caution: Hold rmly and point away from face.
2. Attach hose coupling to the airbrush.
3.AttachColorCuporBottletoHN-1-3,or5Needlebyexertingarmtwistingmotiontottaperedtube
securely into tapered Needle inlet.
4. Fill Color Cup or Bottle 1/2 to 3/4 full. Use eyedropper or brush for adding small amounts of color to metal
color cup. When using Color Bottle, vent hole must be kept open.
5.ToSpray,holdAirbrushlikeapencilcomfortablybetweenthumbandforengerusingmiddlenger
asaguideandsupport.Likewriting,holdforengereasilyonH-155FingerButtonandPresstoopen
air valve.
6.Regulatevolumeofcolorandsizeofspraybyrotating HT-1, 3 or 5 Tip clockwise to increase and
counterclockwisetodecreaseowofcolor.
7. Stipple Adjustment: Reducing the airline pressure is the easiest method used when creating a
stippledeffectwiththeairbrush.Pressurecanbereducedbyusinganyofthefollowingitems:3A
Needle Valve installed on the H-128A Valve Casing of the Airbrush or by using the R-75 Air Regulator
and reducing the pressure.
8.Toadjustforheavieruids,turntipwideopen,loosensetscrew,slideneedlebacktoobtainbetter
ow.
CARE AND CLEANING:
1.Pouranyremainingcolorbackintoitsoriginalcontainer.
2. Wipe Color Cup or Bottle clean, using cloth moistened with proper solvent.
3.Hold Airbrush atadownward angle and putafew drops ofsolventthrough Color Adjusting Part
Assembly.ToushouttheremainingcolorintheHColorAdjustingPartAssembly,applypressure
to the H-155 Finger Button.
4. ApplyatinydabofVaselinetotheHColorAdjustingPartandHC-Aircapthreadseverytwoorthree
monthstopreventcolorbuildupandconsequentfreezingoftheColorAdjustingPartAssemblyand
Aircap.
HOW TO OPEN CLOGGED FLUID PASSAGES:
1. Agitate color in Bottle AssemblybyplacingngermomentarilyoverHC-Aircapwhileairispassing
throughtheAirbrush.Thiswillblowcolorbackintobottlethusopeningcloggeduidpassages.Do
not do this with a cup as color may blow out of cup.
2.Should H-1, 3 or 5 Color Adjusting Part Assembly become clogged, loosen H-153 Set Screw,
unscrew HT-1, 3 or 5 Tip from HN Needle, gently pull back through ball-shaped support and remove
Tip.
3.CleanPartscarefully,usingnothingharderthanawoodentoothpick.
4. To reassemble, reverse this procedure, making sure the shoulder of the Needle seats up against ball-shaped
support.
5. If the needle and tip are completely clogged, soak in a closed bottle of proper solvent until clean.
INTRODUCTION:
Paasche® model H Airbrush features machined Brass Body
andNickelSilver ColorPart,simplicity ofdesignand ease
in operation. The air and color feeds are independent and
adjustabletogiveaxedline,shadeorstippleeffect.