
User Manual


Installation
17063 Ver 1.6 DRAFT B 3 Easikey Readers
2. Installation
2.1 Mullion Reader - Installation
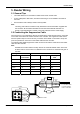
84
10
3
60
38
12
12
4
A
B
This reader comes in two parts, the reader itself (A) with 4 terminals and the backplate (B). The
backplate has a 3mm rubber spacer at the rear.
2.1.1 Fixing the Reader
1. The cable from the controller should be routed through the aperture in the backplate. Leave
enough cable exposed to allow easy wiring of the reader (at least 20mm).
Note
There is limited room between the reader and backplate. You should ensure there is a
void large enough behind the backplate to accommodate any excess on the suppression
cable.
2. Fix the backplate to a flat surface using the No.6 screws provided - or a fixing suitable for
the material to which the reader is being mounted. The two holes are 60mm apart. Use the
top (round) hole first, and the lower (oval) hole to ensure the reader is straight.
3. Ensure that the reader cable is not connected to the controller. Wire the reader to the cable
as described in the documentation supplied with the controller.
4. Push the reader, with the green LED to the top, onto the backplate, the fixing tabs on each
side should snap into place.
5. 5. Place label on front of reader.
2.2 Removing the Reader
The reader can be removed from the backplate by placing a small flat-bladed screwdriver into
the apertures on each side of the backplate. Take care not to damage the reader or backplate.