
User Manual


3
INSTALLATION INSTRUCTIONS
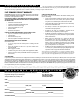
STEP 2: ATTACH RAIL BRACKET & RAILS TO THE CANISTER
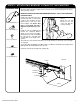
Open the rail box along the length of the box; lift rails out to avoid scratching the rail surface
on the package staples.
REMOVE PROTECTIVE PAPER ON UNDERSIDE OF RAILS. THIS IS FOR PACKAGING
PURPOSES ONLY.
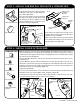
Find the two rear rail bracket’s and
four of the #8–32 X ½” countersunk
screws in the hardware kit and
attach them to each of the rails
at the tailgate end. (Notice that
there is a Left hand side and a
Right hand side bracket) (Figure
2a)
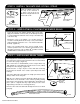
Install the rails by anglling them
around the attached blanket
guides on the canister, threading
the blanket in the rails, and sliding
the rails into the rail grips that
are attached on the inside of the
canister.
Then slide the rails forward, towards the truck cab making sure that both of the rail grips
are engaged.
Secure the rail by installing the hardware (Bolt, Lock Washer, Flat Washer) through the Rail
Grip Attachment and predrilled hole in the rail.
Complete for both left and right rails. (Figure 2b)
HARDWARE USED:
REAR RAIL BRACKET x 2
#8-32 x1/2” SCREWS x 4
FIG. 2a
Attach the rear rail
bracket to the end
of the rails with the
screws provided.
FIG. 2b
Left Rail
Rail Grip
Forward
Blanket
Guide
1/4-20 x 3/4” BOLT x 2
1/4” FLAT WASHER x 2
1/4” LOCK WASHER x 2
Rail Grip
Attachment
Canister
Thread Blanket in Rail her
e
Rail Grip
Flat Washer
Lock Washer
Rail Bolt