AeGIS 8000PLUS Series Management Software Version 3.0 PACH AND COMPANY www.pach-co.com 946 Calle Amanecer, Ste.
TABLE OF CONTENTS LIMITATIONS OF LIABILITY CHAPTER 1. GETTING STARTED --------------------------------------------------- 1 1.1. Inroduction ------------------------------------------------------------------------------------ 1 1.2. Software Descriptions and Specifications -------------------------------------------- 1 1.3. System Requirements --------------------------------------------------------------------- 1 CHAPTER 2. SOFTWARE -------------------------------------------------------------- 2 2.1.
LIMITATIONS OF LIABILITY This manual is subject to change without notice. Pach and Company is not liable for any errors that might occur from use of this document, nor is it any commitment to update the information herein implied. Pach and Company does not assume any liability for any damages, which may arise in installation or use of the AeGIS 8000PP Management Software. Pach and Company does not assume liability for any incompatibility between the AeGIS 8000P Management Software and users devices.
Chapter 1 GETTING STARTED 1.1 Introduction Pach & Company thanks and congratulates you on the purchase of the most user friendly Telephone Entry Management Software in the market today. It is assumed you have at least an entry level knowledge in Windows Operating System. The manual is designed to guide you through the proper use and the administration of your database. It is written base on Windows XP operating systems. It is important for you to read and follow the manual completely. IF YOU HAVE VERSION 1.
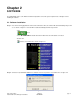
Chapter 2 SOFTWARE The AeGIS 8000P Series come with the Software Compact Disc. Check the system requirements on Chapter 1 before installing the software. 2.1. Software Installation Step 1 Close all the running applications and insert the CD into the drive, the software will start automatically and you will see as shown on figure 2.1. If the CD will not start automatically, follow the steps below: • Click then • Select MY COMPUTER the double click the CD drive where the CD software is inserted.
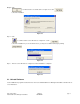
Step 3 Click to continue then the screen will show as on figure 2.3 or click to abort the installation. Figure 2.3 Step 4 Click to continue and the screen will show as on figure 2.4. or click to abort the installation. If you are an advanced user, you may select a different directory by clicking Figure 2.4 Step 5 Then the screen will show as on figure 2.5 and the installation is completed. Figure 2.5 2.1.
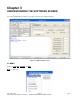
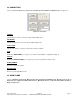
Chapter 3 UNDERSTANDING THE SOFTWARE SCREEN You must be familiar with the software screen (figure 3.1) before proceeding to Chapter 4. Figure 3.1.1 Main Software Screen 3.1 MENU Consists of FILE, EDIT, SETTING, and HELP . FILE (see figure 3.2) Figure 3.1.
New Tenant Database: To create a new tenant database. You can select 2, 3 or 4 digit directory code. The system’s default setting is 3-digit. Open Tenant File: Open the existing tenant’s file. Save Parameter: Not applicable. Open Parameter: Not applicable. Save Received File: Save received file to text file (*.TXT). You must use Notepad to open the file. Print Received File: Print received file to a printer. Close: Close the software program. EDIT (see figure 3.3) Figure 3.1.
3.2 CONNECTION Consists of Connect, Disconnect, Select Port, Send, Receive, Phone Number and Master Code. See figure 3.2.1 Figure 3.2.1 Connection CONNECT Click this button to make a connection with the AeGIS 8000P Series. DISCONNECT Click this to disconnect a connection with the AeGIS 8000P Series. SELECT PORT Click the radio button to select the port where the modem is installed. SEND Enabled the SEND FRAME (see section 3.3) to send the tenant database, configuration setting, etc.
Figure 3.3.1 Send Frame DATABASE Click this button to send the database to the system. CLEAR TENANT Enter the directory belong to the tenant you want to delete at the system in the text box then click the CLEAR TENANT button. Note: Clearing the directory will not automatically delete the directory on your software database. You have to open your database file and delete it. MESSAGE Type the welcome message in the text box then click MESSAGE button.
DOOR 2 OPEN TIME The length of time relay 2 will turn On to hold the door 2 to unlock. Enter 04-99 then press [Enter] or click the button. MANUAL UNLOCK DOOR 1 Manual timer from 01 - 98 hours to unlock door 1. Enter the number of hours and press [Enter] or click the button. MANUAL UNLOCK DOOR 2 Manual timer from 01 - 98 hours to unlock door 2. Enter the number of hours and press [Enter] or click the button. TALK TIME Enter the talk time 010 to 180 seconds and press [Enter] or click the button.
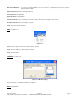
3.5 STATUS Consists of Status Bar, Comm Number, Send Record, Setting and Time as shown on figure 3.5.1. Figure 3.5.1 STATUS BAR The Status Bar will change to Status: Receiving when the software is connected with the system. If you send the database to the system the Status: Receiving will change to Status Bar. COMM NUMBER The software Port selection. SEND RECORD The number of tenant send to the system. SETTING The computer port setting. TIME Current time.
Chapter 4 SETTING THE MODEM Internal or external Hayes Compatible modem can be used with the software. Some modems may be incompatible with the software. Recommended modem brand is ZOOM, SUPRAMAX or 1200 Hayes Compatible. Pach and and Company will not responsible for any incompatibility problem, including the ones that we recommended. Follow the steps below to set your modem. Step 1 Install the modem if you haven’t installed it. Locate the COMM PORT where the modem is installed.
Step 5 Enter the Modem Comm Setting listed below, you may have to try every single one to find the compatible one. If you can’t find the compatible Modem Comm Setting, refer to your modem manual or install ZOOM modem. Modem Comm Setting: 1) 2) 3) 4) 5) 6) 7) 8) 9) 10) 11) AT&F S37=5 (Lucent Win Modem, Zoom and other brands) AT&FN0&Q0B0E1V1M1S37=5S9=4&D2&C1&S1 (1200BPS Hayes Modem) AT&F+MR=1;+MS=V22 AT&F S37=5S9=4+MS=V22 AT S37=2 AT +MS=1 AT&F1 AT +MS=B212 (Conexant v.
Chapter 5 CREATING A DATABASE A tenant database consists of the following information: • • • • • Directory Code (2, 3 or 4 digits) Tenant name (16 characters) Telephone number (11-digit) Access code (4-digit) Door selection (door 1, door 2 or both) To create tenant’s database, the AeGIS 8000P Series do not have to be connected. Step 1 Click {File} menu, then you will see figure 5.1. Figure 5.1 Step 2 Select {New Tenant Database}, then you will see figure 5.2 Figure 5.
Step 3 Select 2, 3 or 4-Digit Directory, then you will see figure 5.3 (example in this manual is for 3-digit directory). The directory code is a unique number assigned to each tenant, for example apartment number. The number of directory digit on the database must be match as the AeGIS 8000P Series. The AeGIS 8000P Series directory digit default setting is 3-digit. See Programming Manual Function Code 09 to set the directory digit. Figure 5.3.
Step 6 Click [Save As] (if the first time to save the database) or [Save] (if saving the existing database) then you will see figure 5.5. Figure 5.5 Step 7 Type the File name and select the folder where you want to save the database, then click [Save]. The Database will be saved under the TNT extension. Note: If you are saving the existing database, select the same Filename.
Chapter 6 UPDATING THE EXISTING DATABASE Updating an existing database divided into two categories: MODIFYING (name, phone number, access code and door number, DO NOT MODIFY DIRECTORY NUMBER, YOU MUST USE ADDING), ADDING tenant(s). 6.1. Modifying a Tenant(s) Step 1 Click {File Menu} as shown on figure 6.1. Figure 6.1 Step 2 Select {Open Tenant File} see figure 6.1 then you will see figure 6.2. Figure 6.
Step 3 Open the test.TNT file as shown on figure 6.2 by double clicking it (as an example on figure 6.2, the database file name is test.TNT and saved in my document folder, your file may be saved in different folder). You will see figure 6.3. Figure 6.3 Step 4 Modify a telephone number for name Testing as an example, see figure 6.4. Drag the mouse on telephone number and press the backspace on your keyboard, you will see figure 6.4. Figure 6.4 Step 5 Enter new telephone number and you will see figure 6.5.
Figure 6.5 Step 6 Repeat step 5 if you need to modify another tenant name, phone number, access code and door number, otherwise go to step 7. Step 7 Save the database by clicking [Save], and you will see figure 6.6. Figure 6.6 Step 8 You may save the file with same or different file name. You may also save the file in different folder and you will see figure 6.7. The example is to save the database using the same file name (test.TNT) in My Documents folder. Step 9 Double click the file name.
Figure 6.7 6.2. Adding a Tenant(s) Step 1 Click {File Menu} as shown on figure 6.1. Step 2 Select {Open Tenant File} see figure 5.1 then you will see figure 6.2. Step 3 Open the test.TNT file as shown on figure 6.2 by double clicking it (as an example on figure 6.2, the database file name is test.TNT and saved in my document folder, your file may be saved in different folder). You will see figure 6.3. Step 4 Click the mouse in TenantDIR text box and input new tenant information, and you will see figure 6.
Step 5 Click [Enter], then you will see figure 6.9. Figure 6.9 Step 6 Repeat step 4 to add more tenant or proceed to step 7. Step 7 Click [Save] or [Save As] to save the file. You may save the file using the existing file name or a new file name.
Chapter 7 SENDING THE DATABASE Step 1 Enter the system’s Phone Number and Master Code as shown on figure 7.1. Figure 7.1 Step 2 Click [Connect] to make a connection to the system the click [Master Code], see figure 7.2. See Chapter 3 to set up your modem in more detail. Figure 7.
Step 3 Click [Send] the SEND FRAME will be activated as shown on figure 7.3. Figure 7.3 Step 4 Click [DATABASE] as shown on figure 6.3 and you will see figure 6.4. Figure 7.4 Step 5 Select the file name, for example test.TNT as shown on figure 6.4. and double click it or click [Open], you will see figure 7.5. .....Please Wait ......... Check the number of SEND RECORD under the program screen, the number of Send Record must be matched with the number of tenant’s name programmed.
Figure 7.5 Step 6 Click [Disconnect].
Chapter 8 RECEIVING THE DATABASE 8.1 RECEIVING THE TENANT DATABASE FROM THE SYSTEM Step 1 Click [Connect] to make a connection with the system. Step 2 Click [RECEIVE], and you will see figure 8.1, the RECEIVE FRAME will be activated. Figure 8.1 Step 3 Click [Tenants] and you will see figure 8.2. Figure 8.
Step 3 You may do the following: 1. Type the File Name for the tenant database to be saved. You may select a different folder, then click [Open] and you will see figure 8.3. Click [Please Close the LOG File After Receiving] after receiving. 2. Or you can click [Cancel] for not saving the database and you will see tenant information scrolling on the main screen as shown on figure 8.4. Figure 8.3 Figure 8.
8.2 UPDATING RECEIVED TENANT DATABASE. Updating the received tenant database is the same as Chapter 6, if the tenant directory is set to 3-digit. If the tenant directory is set to 2-digit or 3-digit you must follow the procedure below. You must follow this section to update the received tenant database if the tenant directory is set to 2-digit or 4-digit. Refer to Chapter 6 if tenant directory is set to 3-digit. Step 1 Click {File} Menu as shown on figure 8.2.1 Figure 8.2.
Step 3 Select the file name, as an example select the file name Pach.TNT with 4-digit directory code as shown on figure 8.2.3. Figure 8.2.3 Step 4 Double click Pach.TNT and you will see figure 8.2.4. Figure 8.2.4 Step 5 Drag your mouse to highlight all the tenant information as shown on figure 8.2.4 as shown on figure 8.2.4, then do a right click and you will see figure 8.2.5.
Figure 8.2.5 Figure 8.2.
Chapter 9 DELETING A TENANT(S) VIA SOFTWARE Deleting a tenant via software must be done in two places: 1. Deleting a tenant at the AeGIS 8000P Series memory (EEPROM). 2. Deleting a tenant at the software database file. Step 1 Connect to the system. Step 2 Enter the directory code belong to the tenant you want to delete as shown on figure 9.1.1. The example uses 3-digit tenant directory code and the directory code is 001. If you want to delete all tenant database in the AegIS system enter 0000. Figure 9.1.
Step 5 Open the existing database file as shown on figure 9.1.3. Figure 9.1.3 Step 6 Select test.TNT as an example as shown on figure 9.1.4. Figure 9.1.4 Step 7 As an example drag your mouse and highlight TNTDIR 001 as shown on figure 9.1.5.
Figure 9.1.5 Step 8 Then press backspace to delete as shown on figure 9.1.6. You may delete multiple tenant but do not forget to delete at the AeGIS system. Figure 9.1.6 Step 9 Click [Save] to save the data as shown on figure 9.1.6 or [Quit] to cancel. Step 10 Click [Quit] to close the window.
Chapter 10 EVENT RECORDING The building manager can track the system activities via remote software. The AeGIS 8000P Series have 600 events recording buffer. If the buffer is full, the first activities will be deleted or we also call FIRST IN FIRST OUT BUFFER (FIFO).