INSTALLATION GUIDE Grandview Pull Down Kitchen Faucet With Soap Dispenser PB-K04
RECOMMENDED TOOLS AND MATERIALS ¨ ¨ ¨ ¨ ¨ ¨ ¨ Silicone Sealant Adjustable Wrench Tape Measure Basin Wrench Phillips Screwdriver Pencil Masking Tape BEFORE YOU BEGIN There are a variety of things to do before installing any new plumbing system into your home or residence.
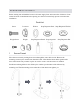
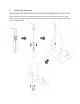
INSTALLATION OF THE FAUCET Before starting turn off both the hot and cold water supply lines and remove the old faucet. Clean around all areas of attachment before placing new faucet on sink to help prevent corrosion after installation. Parts List Screw Weight Screw 1 Lock-nut Weight Washer Soap Dispenser Base Soap Dispenser Washer Soap Dispenser Bottle Soap dispenser Soap Dispenser Nut Secure Faucet Place faucet on sink by feeding hoses down through the center hole in sink.
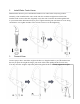
2 Install Water Control Lever Determine the direction you would like the handle to face when in the off (down) position. Generally, when installed in the center of the sink, this would be straight forward and when installed in the corner of the sink, diagonally across the sink. Center the faucet through the hole in your sink and then hold faucet body in place. Tighten mounting nut until faucet is secure being careful not to over tighten and then screw in lock-nut screws for final tightening.
4 Connect Supplies Connect hot water supply to longer of the two flexible supply hoses and cold water supply to shorter of these hoses. Flexible supply hoses are complete with 3/8” compression fittings for your convenience. With all pipe attachments plumbers tape can be utilized to help reduce the risk of leaking. 5 Flush Lines Pull the sprayer out to partially expose the hose. Position the hose in the sink. Tie or tape the hose to the sink to prevent it from sliding back into the faucet.
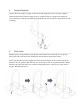
Install Soap Dispenser Unscrew plastic bottle and pull out pump assembly. Install base through sink or countertop with silicone sealant and secure from underneath with metal washer and lock nut. Fill plastic bottle with non-abrasive liquid soap from the top and insert pump nozzle and plastic pump to finish. Do not use plumbers putty.
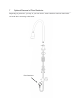
Optional Removal of Flow Restrictor Depending on preference, you may, at your own choice, remove the flow restrictor found at the end of the hose connecting to the faucet.
Limited Lifetime Warranty Pacific Bay products have been manufactured under the highest standards of quality and workmanship. Pacific Bay warrants to the original purchaser for as long as the original purchaser owns their home that this faucet will be leak- and drip-free during normal use and that all parts and finishes of this faucet will be free from defects in material and manufacturing workmanship.