
Installation Guide

TOOLS NEEDED
• 4’ level (digital best) • Tape Measure
• 90 degree steel square • Rubber mallet
• Screw Driver • Caulking gun
• Ink marking pen or chalk • 25’ kite string
• Dummy door handle for inoperative door panel
• Screw gun, 3/32” drill bit &3/8” drill bit
MATERIALS NEEDED
• #10x2 1/4” wood (drywall) screws – 16 (silver in color)
• Caulking: clear siliconized acrylic caulking (50 year best)
• Wood shims (1 pack of at least 30 pcs)
BEFORE INSTALLING
1. Check
overhang to
ensure adequate
protection from
weather elements (figure
1). Your new wood door is
a piece of furniture and
should be treated as such.
2. Check new door for any
defects PRIOR to installation!
Double check desired door swing. Exterior
doors swing to inside. Left hand active doors will have
the left door panel operate if looking at the door from
the outside. Right hand active doors will have the right
door panel operate.
3. Remove old door and frame (interior casing and
exterior trim must be removed).
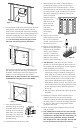
4. Check Rough Opening Framing-
The rough opening for your door should be minimum
1/2” larger than door frame width on each side and
1/2” taller than door frame height.
Check to make sure your opening is plumb and square
(level front to back vertically and level header as well
as side to side) (figure 2). If one side of the wall
opening leans out and other side leans in, the door
will be twisted and not work properly if not
addressed. This issue should be addressed prior to
install of door.
INSTALLING YOUR NEW PACIFIC CREST DOOR
1. Remove door slabs from
frame by removing 4
shipping screws from head
jamb (figure 3) and either
removal of the hinges
themselves or the hinge
pins. DO NOT drag the
door on floor right side up
as the bottom sweep on
the door will be damaged.
Door should be set upside
down to avoid this issue.
2. If exterior trim has been installed (brickmold), make
sure to handle with care as to not damage the finish. In
step 5, apply caulking bead behind the brickmold prior
to placing
the door
frame in the
opening.
The frame
can be
placed in
the opening
for a “dry
fit” (figure
4) to ensure
the brickmold trim fits between inside
the siding. Siding may need trimming for proper fit.
3. Remove weatherstrip from jambs,
both sides and head (figure 5).
4. Drill 4 -3/32” holes in each side
jamb under weatherstrip as shown
in figure 5. Holes should be a
minimum of 4“ from corners
(figure 6). 4 shipping holes in head
jamb can be used for installation
(weatherstrip has been shipped
loose).
5. Put a generous bead of
caulk along the outside
edge of the subfloor and
another 1/2” in from the
first (figure 7). Be sure the
caulking bead creates a
seal between the door sill
and the subfloor to
prevent any water
infiltration.
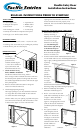
Double Entry Door
Installation Instructions
READ ALL INSTRUCTIONS PRIOR TO STARTING!
- continued -
HEADER
is wall straight? (check top, middle, bottom)
diagonals should be equal
is opening front, side and oor level & square?
Figure 2
rev. 8-27-14
Figure 5
weatherstrip
hole
placement
4”
brickmold
dry t
to ensure
proper
t
Figure 4
Figure 6
drill holes
minimum
4” from
corners
4”
4”
4”
4”
Figure 3
remove 4 shipping screws
Figure 1