
Installation Guide

6. From the outside, tilt the entire door frame into the center
of the opening. Frame should be installed with one
center screw in each side jamb only before reinstalling
the door panels. This will allow final adjustment prior to
installation of remaining screws. Note if walls are not
vertical, exterior brickmold trim may not touch in all
areas. Do NOT attempt to flush trim against exterior
wall as this will result in poor door performance.
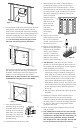
Check wall twist by taping a piece of the string across
both diagonals (figure 9). The strings should touch in
the middle. If the strings do not touch, adjust the side
jambs in or out accordingly at the top or bottom.
Double Doors are NOT covered for ANY warp if frame
is TWISTED (kite string does not touch in middle).
7. Once door frame has been
adjusted so strings are touching in
the middle, replace two of the
top hinge screws on both door
panels with 2 1/4” silver head
screws (figure 10). Screw must
penetrate actual stud to ensure
door does not sag.
8. Install both doors back into door jamb.
9. With both doors shut, install wood shims behind
predrilled holes making sure all areas have equal
spacing between door and frame (figure 11). Frame
should also be flush with the door from top to bottom.
The interior of doors panels should be flush with each
other before installing any additional screws. If the
panels are not flush,
adjust the bottom or
top of each side
jamb to line up the
panels. Once all
shims are in place
with proper
alignment, install
all remaining
screws.
10. Make sure door sweep is
contacting the sill evenly. The
sill cap can be adjusted if
needed. A clockwise turn raises
the sill cap (figure 12).
12. Remove sill cap and place 4
additional screws through the
composite of the sill into the
subfloor. If the subfloor is
concrete, a construction
adhesive should be used in
addition to the caulking
previously mentioned in step 5.
13. Flush Bolt Holes - Flush bolt holes have not been
predrilled. To ensure the tightest fit, this step will now
be completed with the doors panels in final alignment
and all installation screws in place.
• With inactive door open, slide top flush bolt open,
exposing the closing rod. With ink marking pen or
chalk, apply ink (or chalk) to end of rod. Slide bolt
back into closed position. Close inactive door panel
back into desired position in the frame (flush with
edge of jamb). Slide flush bolt open, marking the
head jamb for drill hole position. The position of the
3/8” flush bolt hole has now been marked and ready
to drill. Repeat procedure to mark hole position in
the sill cap.
• Drill 3/8” holes in the head jamb and sill cap for the
flush bolts.
14. Installation is complete. Exterior (if brickmold not
installed) and interior trim can now be attached.
Additional caulking should be placed between the trim
the siding or brick as well as the front edge of the door
sill. Stucco or other exterior siding finishes should
overlap the door frame.
15. Failure to follow proper installation instructions will
void the warranty.
16. Note: NEVER pressure wash your entry door. The high
pressure water can actually damage the wood. As well,
wood doors have floating panels (not sealed so they can
continue to move with climate changes) and double
door astragals are not 100% water tight. The result will
be water penetration to the interior of your home.
rev. 8-27-14
Figure 10
Figure 11
Figure 12
up
down
Figure 8
shims
between
hinge
jamb
and stud
ensure door is plumb & square
check
corners
Figure 9
strings
should
touch in the
middle
wood
shims
Figure 7
OUTSIDE
1/2”
apart
OUTSIDE
2-1/4”
screws
stud