
Operation Manual

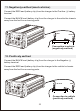


The chassis earthing lug should be connected to an earting point which will be
depending on where the battery charger is installed. In a vehicle, connect the
chassis ground lug to the chassis of the vehicle. In a boat, connect to the boat's
grounding systems. In a fixed location, connect to earth.
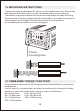
STEP 3 CONNECT TO 110V/220-240V AC MAINS POWER
page 15.
page 14
Connect the battery charger to the 110V/220-240V AC mains powered socket
and turn on the mains power.
STEP 4 CHARGING
During the charge process, the CHARGING and FULLY CHARGED LED will
flash various patterns. This is normal and indicates the various charge stages.
Refer to "How can I know what stage the battery charger is in" in the FAQ
section,
When the FULLY CHARGED LED remains on, this is known as the float stage
and the charger can be left connected to the battery without over charging.
If the POWER LED is flashing, there is fault; refer to "Fault Codes" explanation
on of this manual.
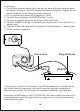
STEP 5 DISCONNECTION
Ensure the 110V/220-240V AC mains switch is turned off and the charger is
disconnected from the 110V/220-240V AC mains power.
Battery out of vehicle
Remove the BLACK lead (battery clip) from the battery.
Remove the RED lead (battery clip) from battery.
Battery in vehicle
Remove the chassis connection.
Remove the battery terminal connection.
12
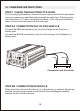
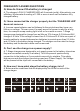
OUTP UT
12V DC
INPU T
AC
7-STAGE AUTOMATIC CHARGING
P/No.: MBC 1210
INPUT: 220-240V AC, 50/60Hz, 307W
OUTPUT: 12V DC, 10,000mA
FUSE: T3.15A, 250V AC
FAN
CHAS SIS
GND
ON
OFF
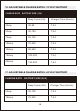
13. CHASSIS EARTHING