
User Manual

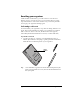


Table Of Contents
- Handbook for the Palm III™ Organizer
- Contents
- About This Book
- Chapter 1
- Introduction to Your Palm III™ Organizer
- Getting to know your Palm III organizer
- Installing the batteries
- Tapping and typing
- Customizing your organizer
- Introduction to Your Palm III™ Organizer
- Chapter 2
- Entering Data in Your Palm III™ Organizer
- Using Graffiti writing to enter data
- Using the onscreen keyboard
- Using your computer keyboard
- Importing data
- Entering Data in Your Palm III™ Organizer
- Chapter 3
- Chapter 4
- Using Your Basic Applications
- Overview of basic applications
- Common tasks
- Application-specific tasks
- Date Book
- Address Book
- To Do List
- Memo Pad
- Calculator
- Expense
- To create an Expense item:
- Changing the date of an Expense item
- Entering receipt details
- Customizing the Currency pick list
- Defining a custom currency symbol
- Show Options
- Transferring your data to Microsoft Excel
- Creating or printing an expense report
- Using expense report templates
- Expense menus
- Record menu
- Options menu
- Using Your Basic Applications
- Chapter 5
- Communicating Using Your Organizer
- Managing desktop E-Mail away from your desk
- In Mail, you can do the following:
- Setting up Mail on the desktop
- Synchronizing Mail with your E-Mail application
- Opening the Mail application on your organizer
- Viewing e-mail items
- Creating e-mail items
- Looking up an address
- Adding details to e-mail items
- Storing e-mail to be sent later
- Editing unsent e-mail
- Draft e-mail
- Filing e-mail
- Deleting e-mail
- Removing e-mail from the Deleted folder
- Purging deleted e-mail
- Message List options
- HotSync options
- Creating special filters
- Truncating e-mail items
- Mail menus
- Beaming information
- Managing desktop E-Mail away from your desk
- Communicating Using Your Organizer
- Chapter 6
- Advanced HotSync® Operations
- Selecting HotSync setup options
- Customizing HotSync application settings
- Conducting a HotSync operation via modem
- Conducting a HotSync operation via a network
- Using File Link
- Creating a user profile
- Advanced HotSync® Operations
- Chapter 7
- Setting Preferences for Your Organizer
- In the Preferences screens, you can do the following:
- Viewing preferences
- Buttons preferences
- Digitizer preferences
- Formats preferences
- General preferences
- Modem preferences
- Network preferences and TCP/IP software
- Selecting a service
- Entering a user name
- Entering a password
- Adding telephone settings
- Connecting to your service
- Creating additional service templates
- Adding detailed information to a service template
- Creating a login script
- Deleting a service template
- Network preferences menu commands
- TCP/IP troubleshooting
- Owner preferences
- ShortCuts preferences
- Setting Preferences for Your Organizer
- Appendix A
- Appendix B
- Appendix C
- Appendix D
- Warranty and Other Product Information
- Index
