
Handbook


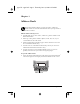


Table Of Contents
- Applications Handbook for the Palm III™ Organizer
- Copyright
- Disclaimer and Limitation of Liability
- 3.5" Software Diskettes Available
- Getting Started With Address Book Entries
- Working With Address Book Entries
- Address Book Menu Commands
- Using the Calculator Screen
- Calculator Menu Commands
- Scheduling an Event
- Rescheduling an Event
- Setting an Alarm for an Event
- Scheduling Repeating Events
- Marking a Private Event
- Deleting an Event
- Changing the Date Book View
- Date Book Menu Commands
- Creating an Expense Item
- Entering Receipt Details
- Show Options
- Transferring Your Data to Microsoft Excel
- Expense Menu Commands
- The HotSync Process and the HotSync Manager
- Performing a HotSync Operation for the First Time
- Conducting a Local HotSync Operation
- Selecting HotSync Setup Options
- Customizing HotSync Application Settings
- Conducting a HotSync Operation via Modem
- Conducting HotSync Operation via a Network
- Creating a User Profile
- Using File Link
- Setting Up Mail on the Desktop
- Synchronizing Mail with your E-Mail Application
- Opening Mail on your Palm III organizer
- Viewing Messages
- Creating Messages
- Looking Up an Address
- Adding Message Details
- Sending Messages
- Editing an Unsent Message
- Draft Messages
- Filing a Message
- Deleting Messages
- Message List Options
- HotSync Options
- Creating Special Filters
- Defining Filter Strings
- High-Priority Messages
- Truncating Messages
- Mail Menu Commands
- Working With Memos
- Arranging Memos
- Marking a Private Memo
- Deleting a Memo
- Memo Pad Menu Commands
- Buttons Preferences
- Digitizer Preferences
- Formats Preferences
- General Preferences
- Modem Preferences
- Network Preferences and Palm TCP/IP Software
- Selecting a Service
- Entering a User Name
- Entering a Password
- Adding Telephone Settings
- Connecting to your Service
- Creating Additional Service Templates
- Adding Detailed Information to a Service Template
- Creating a Login Script
- Deleting a Service Template
- Network Preferences Menu Commands
- TCP/IP Troubleshooting
- Owner Preferences
- ShortCuts Preferences
- Assigning a Password
- Hiding Private Entries
- Showing Private Entries
- Locking Your Palm III Organizer
- Changing or Deleting a Password
- Recovering from a Forgotten Password
- Opening the To Do List
- Working With To Do Items
- To Do Item Details
- Deleting a To Do Item
- To Do Show Options
- To Do List Menu Commands
- About Mapping Tables
- Customizing Existing Sample Templates
- Determining the Layout of the Expense Report
- Analyzing Your Custom Expense Report
- Programming the Mapping Table
- Using Applications Other Than Microsoft Excel
- Expense File Details
- Use of ^char
- Carriage Return and Line Feed
- Literal Characters
- A
- B
- C
- D
- E
- F
- G
- H
- I
- K
- L
- M
- N
- O
- P
- R
- S
- T
- U
- V
- W

Chapter 1 Page 3
Note: Your Palm III organizer automatically capitalizes the first
letter of each field (except numeric and e-mail fields). You
do not have to use the Graffiti
®
capital stroke to capitalize
the first letter of the name.
4. Use the Next Field Graffiti stroke to move to the First Name field.
Note: You can also move to any field by tapping it directly.
5. Enter the person's first name in the First Name field.
6. Repeat steps 4 and 5 to enter the other information that you want
to include in this Address Book entry.
7. Tap the arrows to move to the next page of information.
8. After you finish entering information, tap the Done button to
return to the Address List screen.
Tip: You can create an Address Book entry that always appears at
the top of the list by beginning the Last name (or Company
name) field with a blank space. For example, you might create
an " If Found Call" entry that contains your name and phone
number in case you lose your Palm III organizer.
Next Field
Tap Done
apps.bk : apps.fm5 Page 3 Thursday, June 4, 1998 12:54 PM