
User's Guide

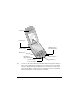

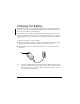
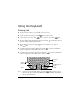
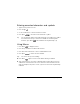
Table Of Contents
- Getting to Know Your Treo™
- Turning Your Treo On and Off
- The Backlight, Display, and LED
- Charging the Battery
- Using the Keyboard
- Using Your Phone
- Getting to know the PhoneBook screen
- Making a call from the Speed Dial, Contacts or Call History views
- Making a call from the Dial Pad view
- Receiving calls
- Working with active calls
- Adjusting call volume
- Ending a call
- Adding a contact
- Viewing or changing contact information
- Deleting a contact
- Defining speed dial buttons
- Using a headset
- Date Book Plus
- Blazer Web Browser
- SMS Messages
- Accessing Other Applications
- Preferences and Other Settings
- Synchronizing Data with Your Computer
- Beaming Information
- Resetting Your Communicator
- Using the Electronic User Guide
- Troubleshooting
- My communicator will not turn on.
- I have trouble synchronizing with my computer (performing a HotSync operation)
- I can’t open the electronic User Guide.
- When I turn on wireless mode, I get a message that my SIM card is missing.
- My Treo will not connect to the Internet using Blazer or my e-mail application
- FCC Statement

Getting to Know Your Treo™ Page 1
Getting to Know Your Treo™
Congratulations on the purchase of your new Handspring Treo™ communicator. Here’s
how to get up and running quickly:
Tip: If you’re upgrading from another Palm OS
®
handheld, see page 30 for upgrade
instructions.
■ Locate your SIM (Subscriber Identity Module) card which contains your account
information. If a SIM card did not come with your Treo, your wireless service provider
will give you one when you subscribe to their service.
■ Insert your SIM card into your Treo and set it up for wireless communications by
following the steps on the Treo Start Here card.
■ Run the Welcome application on your communicator to learn how to use the keyboard.
■ Use this
Quick Reference Guide
to learn how to perform basic tasks.
■ Check the electronic
User Guide
in the Handspring folder on your computer to learn
more about using your communicator.
Tip: To learn more about the ringer switch settings, see page 26.
Stylus
IR port
Power button
LED
Ringer switch
Antenna