PalmPilot™ Handbook ®
Copyright Copyright © 1997 3Com Corporation or its subsidiaries. All rights reserved. 3Com, the 3Com logo, and Graffiti are registered trademarks and HotSync, PalmPilot, Palm OS and the PalmPilot logo are trademarks of 3Com Corporation or its subsidiaries. All other brands and product names may be trademarks or registered trademarks of their respective holders.
Contents Chapter 1 — The PalmPilot™ Connected Organizer and its Controls...... 1 Front Panel Buttons and Controls .............................................................1 PalmPilot Stylus........................................................................................... 3 Back Panel Doors, Buttons and Connections........................................... 4 Battery Installation ......................................................................................5 About the Backlight Feature .
Chapter 4 — Address Book............................................................................65 Activating the Address Book ....................................................................65 Creating an Address Book Entry............................................................. 66 Working with Address Book Entries ...................................................... 69 Address Book Entry Details.....................................................................
Chapter 9 — Installing PalmPilot™ Desktop Software.......................... 131 About PalmPilot Desktop........................................................................131 System Requirements .............................................................................132 Software Installation ................................................................................132 Chapter 10 — HotSync™ Technology.........................................................
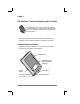
Chapter 1 The PalmPilot™ Connected Organizer and its Controls Congratulations on your purchase of the PalmPilot connected organizer. This handbook describes how to use your PalmPilot organizer and the applications that come with it. This chapter explains the physical buttons and controls of your PalmPilot, how to install the batteries, and safety and care tips.
■ PalmPilot screen. The PalmPilot screen displays the information stored in your PalmPilot, and is touch-sensitive to respond to the stylus. The PalmPilot screen also displays controls and settings that you use with your applications. ■ Graffiti® handwriting recognition software writing area. The Graffiti handwriting recognition software writing area is the area where you write pen strokes of the Graffiti alphabet.
Note: If your PalmPilot is currently turned off, pressing any of the application buttons will activate PalmPilot, and immediately display the corresponding application. ■ Contrast control. The contrast control is used to adjust the appearance of the PalmPilot screen for the clearest screen display. Depending on the lighting conditions or temperature of the environment where you use the PalmPilot, you may need to adjust the setting of the contrast control.
Back Panel Doors, Buttons and Connections Memory door Reset button Battery door Serial port ■ Memory door. The memory door covers the memory circuitry of your PalmPilot. The memory door may be removed to allow the installation of memory expansion units available from your dealer (or 3Com). However, you will never have to remove or replace the memory door in the normal use of your PalmPilot. ■ Reset button.
Battery Installation To use the PalmPilot, you must install two (2) AAA alkaline batteries. The batteries fit behind the battery door on the back of your PalmPilot. To install the batteries in your PalmPilot, 1. Remove the battery door from the rear of PalmPilot. Push on the thumb recess on the battery door, as shown in the following diagram: Push on thumb recess 2. While pushing the thumb recess, slide the battery door out and away from PalmPilot. 3.
Important: Do not force the battery door. When the batteries are correctly installed, the battery door will slide smoothly into place. If you feel resistance when replacing the battery door, make sure the door is correctly aligned with the slots on the back of your PalmPilot, and that the batteries are firmly seated in the battery compartment.
The remainder of this chapter contains general information about PalmPilot and the PalmPilot Cradle. Safety Tips Your PalmPilot is designed to be rugged and reliable, and will provide years of trouble-free service. However, you should observe the following general tips when using your PalmPilot: ■ Take care not to scratch the screen of your PalmPilot. When working with PalmPilot, use the supplied stylus, or plastictipped pens intended for use with a touch-sensitive screen.
■ Under normal conditions, PalmPilot organizer’s batteries will provide several months of normal use. Battery life can be conserved by minimizing the use of the backlight feature, and changing the Auto-Off setting that automatically turns the PalmPilot off after a period of inactivity (refer to Chapter 2: Working with the PalmPilot™ Connected Organizer). ■ If the batteries become low in the course of normal use, an alert will appear on the PalmPilot screen, describing the low battery condition.
reset your PalmPilot. Refer to the section entitled “Resetting the PalmPilot™ Connected Organizer” in Chapter 12: Reference for information about how to use the reset button. After you reset the PalmPilot, perform a HotSync operation to restore the data from your PC.
Chapter 2 Working with the PalmPilot™ Connected Organizer This chapter explains how to start your PalmPilot for the first time, how to make system and preferences settings, and common features that appear on PalmPilot organizer’s screen. Starting PalmPilot for the First Time To turn on your PalmPilot: 1. Press the green power button located on the front panel of your PalmPilot, as shown in the following diagram: Power button Note: The power button acts as an on/off switch for the PalmPilot.
If necessary, adjust the contrast control located on the side of the PalmPilot, so this alignment screen is clear and readable. 3. Remove the stylus from its storage silo on the side of the PalmPilot. With the tip of the stylus, tap the exact center of each target that appears on the screen. Tapping these three targets helps to align the internal circuitry of your PalmPilot with its touch-sensitive screen. 4.
Note: If the General Preferences screen does not currently appear on the screen of your PalmPilot, you may have pushed one of the application buttons on the front panel. You can restart the Preferences application at any time from the Application picker. Refer to the section entitled “PalmPilot Applications” that appears later in this chapter. Setting the Current Time The Set Time button of the General Preferences screen is used to set the current time for your PalmPilot. To set the current time: 1.
5. Tap the OK button to close the Set Time dialog and return to the General Preferences screen. At this point, the time you selected appears in the Set Time area of the General Preferences screen. Setting the Current Date The Set Date button of the General Preferences is used to set the current date for your PalmPilot. To set the current date: 1. Tap the date. The Set Date dialog appears. 2. In the Set Date dialog, tap the arrows at the top to select the current year.
To set the auto off delay: 1. Tap the “Auto-off after” setting. 2. A pick list appears, offering three options: a 1, 2 or 3 minute delay for the automatic shutoff feature. Tap to select the setting you want to use. The default setting is 2 minutes. If you find that your PalmPilot shuts itself off before you have had time to review the information on the screen, you should increase the time setting of the automatic shutoff feature. System, Alarm and Game Sounds Your PalmPilot uses a variety of sounds.
Format Preferences The Format Preferences screen is used to set the format of the dates, times, and numbers displayed by your PalmPilot. To activate the Format Preferences screen: 1. Tap the text that appears in the upper-right corner of the Preferences screen. The pick list appears, as shown in the following diagram: Tap here Tap Formats 2. Tap Formats in the pick list.
To set the country default: 1. Tap the country name. The pick list appears, as shown in the following diagram: Tap here 2. Tap to select country The pick list offers a variety of country options. Tap to select the setting you want to use. Note: Selecting a country default will define the default settings for the Time, Date, Week start day, and the numbers formats used by all applications. You may further change these default settings for your own preferences, as described in the following sections.
When selected, an example of the current date appears under the Date format selector. 3. Tap the Week starts selector, and its corresponding pick list appears. Tap to select whether you want the first day of the week to be either Sunday or Monday. This setting controls the Day, Week, and Month views in the Date Book application, and all other aspects of PalmPilot that display a calendar. 4. Tap the Numbers selector, and its corresponding pick list appears.
4. Tap the Modem pick list. The list includes modems that are compatible with the PalmPilot. Tap to select the type of modem connected to your PalmPilot. 5. Note: If the modem connected to your PalmPilot is not listed by name, choose the Hayes Basic selection. In most cases, the Hayes Basic settings will be close enough to optimal so that the PalmPilot will function correctly. 6. Tap the Speed pick list. Tap to select the maximum speed that corresponds to the modem that you selected in step #4. 7.
To activate the Owner Preferences screen: 1. Tap the text that appears in the upper-right corner of the Preferences screen. The Preferences pick list appears. 2. Tap Owner in the pick list. The Owner Preferences screen appears, as shown in the following diagram: 3. Enter the text that you want associated with your PalmPilot.
To unlock the Owner Preferences screen: 1. Tap the Unlock button. The Unlock Message dialog appears. 2. Enter the password that you defined in the Security application, and tap the OK button. Buttons Preferences The Buttons Preferences screen enables you to associate different applications with the PalmPilot organizer’s physical buttons.
If you assign a different application to a button, you can still access and use the original application by using the Application picker. Refer to the section entitled “PalmPilot Applications” that appears later in this chapter. If you want to restore all of the buttons to their factory settings, tap the Default button. Pen Preferences The Buttons Preferences screen enables you to change the assignment of the full-screen pen stroke.
The following Pen preferences settings are available: ■ Backlight. This setting will activate the backlight feature of the PalmPilot Personal and PalmPilot Professional Edition organizers. This setting can be used, instead of the power button, to turn the backlight on and off. ■ Keyboard. This is the default setting, and activates the onscreen keyboard for entering text characters. ■ Graffiti Help. This setting activates a series of screens that show the complete Graffiti penstroke character set.
means the Cradle and optional PalmPilot Modem perform their normal HotSync functions. Any changes that you make in the HotSync Buttons Preferences screen become effective immediately; you do not have to change to a different screen or application. ShortCuts and Digitizer Preferences The Preferences pick list includes the ShortCuts item. ShortCuts are abbreviations for entering text. The use of ShortCuts is explained in Chapter 8: Additional Features.
To access the Application picker: Tap the Applications button on the PalmPilot screen. The Application picker appears, as shown in the following diagram: Note: Different models of the PalmPilot may have different applications included. You may install additional applications as described in Chapter 11: Installing Applications on your PalmPilot™ Connected Organizer. The Application picker also shows the current time, and the condition of the batteries in your PalmPilot.
Using the Stylus to Write Text Your PalmPilot includes Graffiti handwriting software as the primary system for entering text and numbers. Graffiti is a system where simple strokes you write with the stylus are instantly recognized as letters or numbers. This section explains the basics of Graffiti, and how to make strokes in the Graffiti writing area of your PalmPilot. More information about Graffiti, including its convenient ShortCuts feature, appears in Chapter 8: Additional Features.
Writing Letters with Graffiti Any character you can type on a standard keyboard can be entered with Graffiti. The strokes recognized by Graffiti are designed to closely resemble those of the regular alphabet. This makes it quick and easy to learn Graffiti. Most users find they can enter text quickly and accurately with only minutes of practice.
Write letters here Division marks Write numbers here To write letters of the alphabet with Graffiti: 1. Tap on the screen to set the insertion point where you want your text to go. In this case, the insertion point is already set on a new line in the Memo Pad application. 2. Use the table on the following page to find the stroke shape for the alphabet character you want to create. For example, the stroke shown below creates the letter “n.
That’s all there is to it! When you lift the stylus from the screen, your PalmPilot recognizes your stroke immediately and prints the letter character at the insertion point on the screen. As soon as you lift the stylus from the screen, you can begin the stroke for the next character that you want to create. Note that there are two different stroke shapes available for some letters. For these letters, choose the one that’s easiest for you.
The Graffiti Alphabet Letter Letter A N C P B D E F Q R S T I V U J W L Y K M Space Carria ge Retur n Strokes O G H page 32 Strokes X Z Back Space Perio d tap twice PalmPilot Handbook
Writing Capital Letters with Graffiti You make capital letters with the same stroke shapes as the basic alphabet characters. To make capital letters, you must first “shift” to caps — just as you press the Shift key on a keyboard — and then write the character strokes. Note: Graffiti incorporates a Smart Shifting feature which will automatically capitalize the first letter when you create a new record (by tapping a New button or a blank line).
Graffiti Numbers Number Strokes 0 1 Number 5 Strokes 6 2 7 3 8 4 9 Writing Punctuation Marks with Graffiti Graffiti can create any punctuation symbol that you can enter from a standard keyboard. All punctuation marks begin with a single tap on the Graffiti writing area. When you make this tap, you activate punctuation shift and a dot appears to show it is activated. The next stroke you make with the stylus will be recognized as a punctuation mark. Punctuation Shift Symbol Period .
Question ? Slash / Exclamat ion ! Dollar $ Note: When punctuation shift is activated, you can make a symbol stroke anywhere in the Graffiti writing area (either the letters or numbers side). Additional Graffiti Punctuation You write the following punctuation marks and symbols the same way as the basic Graffiti punctuation marks. Begin with a single tap in the Graffiti writing area, and the next stroke that you make will create the punctuation mark or symbol.
• ™ ® © ‘ ’ “ ” § ˚ + _ x ÷ = ¢ ¥ £ ¿ ¡ ß µ ∫ Ø Writing Accented Characters To create accented characters, draw the stroke normally used to create the letter, followed by an accent stroke. Graffiti then adds the accent to the letter. For example, the following diagram shows the strokes required to draw an accented “e.
Additional Non-English Characters You can write the following characters in the lowercase alphabet mode without any special punctuation or shifting: ç æ Note: These non-English characters must be written in the letters (not the numbers) side of the Graffiti writing area. Tips for Remembering Graffiti Strokes The Graffiti stroke shapes are designed for speed and accuracy.
Tap here for numbers keyboard Tap here for letters keyboard 3. The Alpha on-screen keyboard resembles a computer keyboard, with Shift, Tab, Backspace and Carriage Return keys in their standard locations as shown in the following diagram: Tab Backspace Caps lock Caps shift Carriage return 4. Tap the buttons of the on-screen keyboard to generate text. 5. When you are finished, tap the Done button. The on-screen keyboard closes, and the text appears in your PalmPilot application.
on-screen keyboard drag to top Note: The full-screen pen stroke can be reassigned to perform other functions on your PalmPilot. Refer to the section entitled “Buttons Preferences” that appears earlier in this chapter. Numbers and International Characters The on-screen keyboard also includes screens for numeric and international characters.
Using Menus Menus are a special set of commands that are available in most of your PalmPilot applications (Memo Pad, Date Book, etc.). The exact set of commands that appear in the menus relate to the application that is currently running on your PalmPilot. Some of the menu commands are common to all PalmPilot applications. The common menu commands are described in this section; other menu commands are described in the chapters about each PalmPilot application. To activate the menus: 1.
The menus, and menu commands that are available depend on the application that is currently running on your PalmPilot. Also, the menus and menu selections will vary depending on which part of the application is currently on the screen. Using the Memo Pad application as an example, the menus are different for the Memo List screen and the Memo screen. Note: Most menu commands have a Graffiti command-stroke equivalent, similar to keyboard commands on a desktop computer.
been copied can be pasted into another area of the PalmPilot application, or into a different PalmPilot application. ■ Paste. The Paste command inserts text that has been cut or copied at the selected point in your PalmPilot application. The Paste command will replace any selected text. If no text has been previously cut or copied, the Paste command does nothing. ■ Select All. The Select All command selects all of the text on the current record or screen.
tap here 2. When you are through reviewing the information in the on-line tips dialog, tap the Done button. On-line tips always relate to the function that you are currently performing with your PalmPilot. Each dialog that appears has its own on-line tips that relate to that specific dialog. Using Categories Categories are used to file individual Address entries, To Do items or Memos into groups for easy review. Categories cannot be assigned to Date Book events.
3. Tap the currently assigned category (“Unfiled” for new records). The Category pick list appears, as shown in the following diagram: 4. Tap to select the category that you want to assign to the record. 5. Tap the OK button to close the Details dialog and activate your setting. The category you choose is only used for sorting and reviewing records. The category you select does not affect the actual contents of the record.
Repeat the previous procedure, and tap All in the Category pick list to restore the list of all Address Book entries. Note: When using applications with categories, pressing the application button on the PalmPilot organizer’s front panel will toggle through the available categories. Defining a New Category Your PalmPilot is supplied with two default categories: Business and Personal.
2. Tap the Edit Categories item. The Edit Categories dialog appears on the screen, as shown in the following diagram: 3. Tap the New button. Another Edit Categories dialog appears, as shown in the following diagram: 4. Enter the name of the new category, and tap the OK button to close the Edit Categories dialog. 5. Tap the OK button to close the main Edit Categories dialog. 6. Any changes you have made in the Edit Categories dialog appear in the Category pick list.
2. Tap the Edit Categories item. The Edit Categories dialog appears on the screen, as shown in the following diagram: 3. Tap to select the category that you want to rename, and then tap the Rename button. Another Edit Categories dialog appears, as shown in the following diagram: 4. Enter the new name that you want to assign to the category, and tap the OK button to close the Edit Categories dialog. 5. Tap the OK button to close the first Edit Categories dialog. 6.
you want to write, and can be up to several thousand characters long. For example, if you have scheduled an appointment in the Date Book application, you could attach a note with directions to the location of the appointment. To attach a note to an item, record, or event: 1. PalmPilot applications have a Details button, that enables you to define the characteristics of individual records. Tap the Details button to display the Details dialog. 2. With the Details dialog on the screen, tap the Note button.
7. To review or edit the contents of the note associated with an item, tap the small note icon. Private Records In PalmPilot applications you have the option of marking individual records as Private. Private records will remain visible and accessible until you change the PalmPilot Security setting to hide all Private records. To mark a record as Private: 1. PalmPilot applications have a Details button, that enables you to define the characteristics of individual records.
Chapter 3 Date Book The Date Book enables you to quickly and easily schedule appointments, or any kind of activity associated with a time and date. With the Date Book, you can: ■ Make a description of an appointment, and associate it with a specific time and date. ■ Use the Week View feature to display a chart of your appointments for an entire week. The Week View feature also makes it easy to spot any potential scheduling overlaps or conflicts.
Date Book button Note: When working with the Date Book, you can immediately change to any other application (Address Book, etc.) of your PalmPilot by pushing the front panel buttons. Any work you have done with the Date Book will be saved, and will reappear when you return. Time Display When you work with the Date Book, you can easily read the current time of day. To display the current time: 1.
To schedule an event for the current day: 1. Tap the time line that corresponds to your event, as shown in the following diagram: Tap a time line Enter event Time bar (shows duration) 2. The event time will be highlighted on the screen. A cursor appears at the beginning of the time line, representing the point where new text will appear. Use the stylus to write Graffiti® character strokes (or the onscreen keyboard) to describe your event. You can enter up to 255 characters. 3.
tap the time of an event 2. The Start Time of the event is highlighted in the Set Time dialog. Tap the columns of times that appear on the right side of the Set Time dialog, as shown in the following diagram: Start Time highlighted tap to scroll to earlier hours tap to change hours tap to change minutes tap to scroll to later hours 3. Next, tap to select the End Time box. Tap the columns of times that appear on the right side of the Set Time dialog. 4.
To schedule an untimed event: 1. In the Date Book screen, choose the date that you want for the event. 2. Tap new. The Set Time dialog appears, as shown in the following diagram: 3. Tap OK, so that no start or end times are defined for the new event. 4. Use the stylus to write Graffiti strokes for the text you want to use to describe your Event. A new untimed event will appear at the top of the Date Book screen, as shown in the following diagram: New Untimed Event No time lines selected 5.
Changing an Event to an Untimed Event If you create an event and decide later that there is no particular start or end time, you can easily change it to an untimed event. To change an event into an untimed event: 1. In the Date Book screen, tap the time of the event. The Set Time dialog appears. 2. 3. Tap the No Time button. The Start Time and End Time boxes are cleared. Tap the OK button to button to confirm your selection, and close the Set Time dialog.
■ Tap the Day, Week, or Month view buttons at the lower-left of the Date Book screen, as shown in the following diagram: Day view Month view Week view ■ ■ From any day currently displayed in the Date Book, press the Date Book button on PalmPilot organizer’s front panel to switch among the current day view, week view, and month view. Use the on-screen scroll arrows if you have more than one page of times and events.
2. The Go To Date dialog offers a variety of controls to select the year, month, and day for your events, as shown in the following diagram: tap to select previous year tap to select next year tap to select month tap to select day tap to select current date 3. Tap the controls in this dialog to select the date that you want. Use the Today button to return to the current date. Week View The Week view feature shows a chart of your events for an entire week.
the range of times that are displayed, and untimed events as shown in the following diagram: Tap for that day Tap for previous week Tap for next week Dot indicates untimed event Bar indicates event above display Bar indicates event below display 3.
settings. If you have an event before or after this time span, a bar appears at the top or bottom of the column that corresponds to the day of the event. On-screen scroll arrows appear if you have scheduled events beyond the displayed time range. You can also control the Week view with the scroll buttons on the PalmPilot organizer’s front panel. Press the up button to move to the previous week. Press the down button to move to the next week. The Go to button appears in the Week view.
Month View The Month view screen shows which days have events scheduled. Dots and lines in the Month view indicate events, repeating events, and untimed events as shown in the following diagram: Previous/next month arrows Dots on right side indicate events Dashed line indicates daily repeating event Dot below date indicates untimed event Month view button Tap any day that appears in the Month view screen to move directly to that day with the Day view screen.
Event Details The Date Book provides a variety of options that you can associate with an event. The available options appear in the Event Details dialog. To activate the Event Details dialog: 1. In the Day view of the Date Book screen, tap anywhere on the text of an event. 2. Tap the Details button. The Event Details dialog appears, as shown in the following diagram: The following sections describe the features and settings that are available in the Event Details dialog.
Date The Date setting enables you to change the date associated with the event. To change the Date setting: 1. With the Event Details dialog on the screen, tap the Date button. The Set Date dialog appears. 2. Use the Set Date dialog to assign the date associated with the event. The controls available in the Set Date dialog are the same as those for Go To Date, described earlier in this chapter. 3. Tap the date to return to the Event Details dialog.
descriptive message will appear on the screen of the PalmPilot, as shown in the following diagram: Note: You can set a silent Alarm for an untimed event. In this case, the alarm will be triggered at the specified period of minutes, hours or days before midnight (beginning) of the day of the untimed event. No audible alarm will sound for an untimed event; instead, the descriptive message will appear on the PalmPilot organizer’s screen.
tap the Repeat box 4. Tap Day, Week, Month, or Year at the top of the Change Repeat dialog. The dialog will show the options for the repeat type you selected. 5. Select a Repeat increment. In the “Every” area, enter a number that corresponds to how often you want the event to repeat. For example, if you select Month, you could enter the number “2” to have the event repeat every other month. 6. If you want to specify an ending date for the repeating event, tap the End on pick list, and tap Choose Date.
■ If you change the date of an occurrence of a repeating event (e.g. from January 14th to January 15th) and apply the change to all occurrences, the new date becomes the start date of the repeating event. The end date is adjusted accordingly to maintain the duration of the event. ■ If you change other repeat settings (e.g. time, alarm, private) of an occurrence of a repeating event, and apply the change to all occurrences, a new event is created.
use the Delete Event command. If you tap the OK button, the event is deleted from the memory of your PalmPilot. If you tap the Cancel button, the alert dialog closes and you are returned to the Date Book screen. The default setting for the Delete Event alert is to “Save archive copy on PC.” This will remove the event from the Date Book, but retain a copy of the event and transfer it to an archive file on your desktop computer the next time you perform a HotSync operation. ■ Attach Note.
■ Preferences. The Preferences command enables you to set the range of times that appear in the Date Book, and whether Alarms are automatically activated for each event. ■ Display Options. The Display Options command allows you to make settings for the appearance of the Date Book, and control which events are displayed: ■ Show Time Bars. Activates the time bars that appear in the Day View. The time bars show the duration of an event, and graphically illustrate the nature of any event conflict.
Deleting an Event There are three ways to delete an event that you have created in the Date Book application: simply delete the text of the event, use the Menu Commands (described in the Record Menu section), or use the Event Details dialog. Note: If you have deleted the text of a repeating event, all instances of that event are deleted. If you use the Menu Command or the Event Details dialog, you can delete one occurrence of the event (as an exception), or all occurrences of the event.
Chapter 4 Address Book The Address Book enables you to keep records of names, addresses, phone numbers and other information about your personal or business contacts. With the Address Book, you can: ■ Quickly look up or enter names, addresses, phone numbers and other information. ■ Enter up to five phone numbers (home, work, fax, car, etc.) or e-mail addresses that are associated with each name. ■ Define which of the phone numbers will appear in the Address List view for each Address Book entry.
Note: When working with the Address Book, you can immediately change to any other application (Date Book, etc.) of your PalmPilot by using the front panel buttons. Any work you have done with the Address Book will be saved. When working with the Address Book, the scroll buttons on the PalmPilot organizer’s front panel make it easy to navigate among your address entries. In the Address List screen, the scroll buttons move up or down an entire screen of address entries.
2. The Address Edit screen appears. A cursor is displayed at the Last Name field of your new Address Book Entry, representing the point where new text will appear. 3. Enter the text you want to write for the last name of the person in your Address Book Entry. Note: The first letter of each field is automatically capitalized (except numeric and e-mail fields). You do not have to use the Graffiti “capital” stroke to capitalize the first letter of the name. 4.
Repeat the previous procedure any time you want to create a new Address Book Entry. Tip: You can create an Address Book entry that always appears at the top of the list by beginning the Last name (or Company name) field with a blank space. For example, you might create an entry with “If Found Call” (beginning with a blank space), that contains contact information to be used in case your PalmPilot is lost.
To choose other types of phone numbers in an Address Book entry: 1. In the Address Book, display the Address Edit screen for your Address Book entry (either by creating a new Address Book entry, or editing an entry as described previously). 2. Tap the word or the black triangle that appears next to the type of Phone number that you want to specify. A pick list appears, as shown in the following diagram: tap triangle 3. In the pick list, tap to select the new phone number category that you want.
Look Up line The Look Up feature scrolls to the first entry in the list that begins with that letter. If you write an additional letter, the list will scroll to the first entry that starts with those two letters. For example, writing an “s” might scroll to “Sanders,” and writing “sm” might scroll further to “Smith.” Note: If the list is sorted by company name, the Look Up feature scrolls to the first letters of the company names. 2.
4. In the Address Category pick list, tap to select the category that you want to assign to the Address Book entry. Names or Companies Another option for the Address List view is to display your Address Book entries sorted by Company and Last Name, rather than by Last Name and First Name. To change the display of the entries in the Address List view: 1. With the Address Book application running in the Address List view, tap the Menus button. The Options menu appears at the top of the screen. 2.
To activate the Address Entry Details dialog: 1. In the Address List view, tap any Address Book entry. The Address View screen for that entry appears. 2. Tap the Edit button. The Address Edit screen appears. 3. Tap the Details button. The Address Edit Details dialog appears, as shown in the following diagram: The following sections describe the features and settings that are available in the Address Entry Details dialog.
3. Tap the OK button to confirm your selection, and close the Address Details dialog. Note: The Show in List setting that you select applies only to the individual Address Book entry, rather than to all entries. In other words, you can select the phone number to be displayed for each Address Book entry. Address Book Menu Commands The Address Book includes menu commands to make it fast and easy to perform common file and editing tasks.
■ Attach Note. The Attach Note command opens the Address Book Note dialog, where you can create a Note that will be attached to the currently selected entry. ■ Delete Note. The Delete Note command displays an alert dialog, prompting you to confirm that you really want to delete the Note attached to the entry. If you tap the OK button, the Note is deleted from the memory of your PalmPilot. If you tap the Cancel button, the alert dialog closes and you are returned to the previous screen.
■ Rename Custom Fields. Each Address Book entry contains four “custom fields” that you can rename, as shown in the following diagram: Note: Any changes you make to the names of the custom fields will appear in all of your Address Book entries. ■ About Address Book. The About Address Book command shows version (revision) information about the Address Book.
Chapter 5 To Do List The To Do List is designed as a convenient location where you can create reminders, and prioritize the things that you “have to do.” With the To Do List, you can: ■ Make a quick and convenient list of things to do. ■ Assign a priority level to each individual task. ■ Optionally assign a due date for any, or all of your To Do items. ■ Optionally assign a Category for any, or all of your To Do items. You can then view your To Do List based on Category (Business, Personal, etc.
To Do List button Note: When working with the To Do List, you can immediately change to any other application (Address Book, etc.) of your PalmPilot by using the front panel buttons. Any work you have done with the To Do List will be saved, and will reappear when you return. Working with To Do Items A To Do item is a reminder of some task that you have to complete. Your PalmPilot gives you considerable flexibility in the appearance, level of detail, and the sort order of To Do items.
3. Tap anywhere on the screen to de-select the To Do item. Repeat the previous procedure any time you want to create a new To Do item. Note: If no To Do item is currently selected, writing in the Graffiti® writing area automatically creates a new To Do item. Setting Priority Priority settings for To Do items enable you to arrange the tasks in your To Do List according to relative levels of importance. You may assign a Priority level of 1 (most important) through 5 (least important).
To check off a To Do item: ■ Tap the To Do item check box that appears at the far left of the To Do item, as shown in the following diagram: tap here To Do Item checked You can set the To Do List to either show or hide To Do items that you have checked off (completed). You can also have the To Do List record the date that you completed the To Do item. Refer to the section entitled To Do Show Options that appears later in this chapter.
Choosing a To Do Category Categories are used to file individual To Do items into groups for easy review. You can assign and edit categories by using the Categories pick list in the Details dialog (refer to Chapter 2: Working with the PalmPilot™ Connected Organizer for a complete description of categories). Setting a Due Date You can associate a due date with any To Do List item. You can also sort the items that appear in the list based on their due date. To set a Due Date for a To Do List Item: 1.
3. Tap the OK button to confirm your selection, and close the To Do Details dialog. Note: If you have the Show Due Dates option activated in the To Do Show options, you can bypass the Details dialog. Tap directly on the due date area of the To Do List to display the pick list shown in step #2 of the previous procedure. If you choose to show the due dates in the To Do List, any To Do item that has a due date (and is not checked as completed) will change to show an exclamation mark after the date passes.
■ Show Completed Items. This setting causes the To Do application to show the To Do items that you have completed. If this setting is turned off, your To Do items are removed from the list when completed (checked). You can change this setting at any time to display or hide the To Do items that you have completed. ■ Show Only Due Items. This setting causes the To Do application to show only the To Do items that are currently due, past due, or have no due date specified.
■ Delete Item. The Delete Item command displays an alert dialog, prompting you to confirm that you want to delete the current To Do item. You must first select a To Do item before it can be deleted. If you tap the OK button, the To Do item is deleted from the memory of your PalmPilot. If you tap the Cancel button, the alert dialog closes and you are returned to the To Do list. The default setting for the Delete Item alert is to “Save archive copy on PC.
Options Menu When you select the Options menu, its menu command appears on screen as shown in the following diagram: ■ Phone Lookup. The Phone Lookup command activates the Phone Lookup feature, which is described in Chapter 8: Additional Features. ■ About To Do List. The About To Do List command shows version (revision) information about the To Do List.
Chapter 6 Memo Pad The Memo Pad provides a place to take notes that are not associated with Date Book, Address Book, or To Do items. With the Memo Pad, you can: ■ Take notes, or write any kind of message on your PalmPilot™ connected organizer. ■ Drag and drop memos into popular desktop applications like Microsoft Word, when you synchronize using PalmPilot Desktop software and HotSync™ technology. ■ Assign categories for memos.
Note: When working with the Memo Pad, you can immediately change to any other application (Address Book, etc.) of your PalmPilot by using the front panel buttons. Any work you have done with the Memo Pad will be saved, and will reappear when you return. Working with Memos A memo is the screen of your PalmPilot where you enter, review, and modify the individual entries of the Memo Pad.
Each time you create a new memo, the first line of text from the memo page appears in the Memo List. This makes it easy to locate and review any of your memos. Reviewing Memos All of the memos that you create appear in the Memo List screen. To review the contents of a memo: 1. Tap the text of the memo that appears in the Memo List screen. The memo appears on the screen, as shown in the following diagram: Tap any memo to review its contents 2. You can now view or edit the text in the memo.
Tap the Font button again to revert to the normal size font in the memo. The font size that you select will be used when viewing all memos. Scroll Arrows If you create a memo that has more text than will fit on the screen, scroll arrows appear.
To activate the Memo Preferences dialog: 1. In the Memo List view, tap the Menus button, and then tap Preferences in the Options menu. The Memo Preferences dialog appears, as shown in the following diagram: Tap here 2. Tap the Sort by pick list. Choose Manual or Alphabetic (memos sorted alphabetically). 3. Tap the OK button to close the Memo Preferences dialog and activate your setting.
Choosing a Memo Category Categories are used to file individual memos items into groups for easy review. You can assign and edit categories by using the Categories pick list (in the upper-right corner of the screen), or in the Details dialog (refer to Chapter 2: Working with the PalmPilot™ Connected Organizer for a complete description of categories). Memo Pad Menu Commands The Memo Pad includes menu commands to make it fast and easy to perform common file and editing tasks.
Options Menu When you select the Options menu, its menu commands appear on screen as shown in the following diagram: ■ Go to top of page. This command causes the screen display to immediately move to the top (first) line of the memo. ■ Go to bottom of page. This command causes the screen display to immediately move to the bottom (last) line of the memo. ■ Phone Lookup. The Phone Lookup command activates the Phone Lookup feature, which is described in Chapter 8: Additional Features. ■ About Memo Pad.
3. Tap the Delete button. The Delete Memo alert appears. 4. Tap the OK button to confirm that you want to delete the currently selected memo.
Chapter 7 Expense The Expense application enables you to keep track of your expenses, and then transfer the information to a spreadsheet on your desktop computer. With the Expense application you can: ■ Record dates, type of expenses, amount spent, payment method and other details associated with any money that you spend. ■ Create categories for your expenses, such as business, personal, expenses associated with a trip, or expenses associated with a range of dates.
Activating Expense 1. Tap the Applications button on the PalmPilot screen. The Application picker appears, as shown in the following diagram: tap Expense 2. Tap the Expense icon. The Expense application starts and the Expense screen appears. Note: If the Expense icon does not appear in the Application picker, you will have to install the Expense application on your PalmPilot organizer. To install the Expense application on your PalmPilot: 1.
Menus for Windows 95 or NT 4.0 If you are using Windows 3.1x, open the PalmPilot Desktop program group, and double-click the Install Expense icon. 4. The PalmPilot Install Tool dialog appears, as shown in the following diagram: If necessary, choose the name associated with your PalmPilot in the User Name area. 5. Click the Install button. The Ready to install dialog appears, as shown in the following diagram: 6. Click the Exit button.
7. Perform a HotSync operation on your PalmPilot to install the Expense application. At this point, the Expense application is installed on your PalmPilot and appears in the Application picker. Tap the Expense icon to start the Expense application. Creating an Expense Item Expense enables you to record the date, expense type, and the amount that you spent. You can sort your expense items into categories, or add other information that you want to associate with the item. To create an expense item: 1.
tap here tap to select expense type At this point, your expense item entry is saved. You can change the expense amount or type at any time. If you do not select an expense type, the entry will not be saved. Tip: A quick way to create a new Expense item is to make sure that no expense item is selected in the Expense List, write the first letter(s) of the expense type, and then write the numerical amount of the expense item. This technique takes advantage of the Expense application’s Quickfill option.
3. Tap to select the date you want for the expense item. For more information about the features of the Date dialog, refer to the section entitled “Choosing a Date” that appears in Chapter 3: Date Book. Receipt Details The Expense application provides a variety of options that you can associate with an item. The available options appear in the Receipt Details dialog. To activate the Receipt Details dialog: 1. Tap the expense item (if it is not already selected). 2. Tap the Details button.
You may also choose Edit Categories from the pick list to change the names of the categories, or create your own new expense categories. For example, you may create a category for a range of dates, such as a week or month. You may also delete or rename the New York, Paris or other categories. Type The Type pick list displays the same expense type options that appear in the Expense List screen. You can use this pick list to change the expense type for any of your Expense items.
tap Edit currencies 2. The Select Currencies dialog includes a pick list for each of the five types of currency. Tap each pick list to choose the country whose currency you want to display. 3. Tap the OK button to close the Select Currencies dialog and activate your selections. Note: If the currency you want to use is not represented by the available list of countries, you can create your own custom country and currency symbol.
enter names here tap here The Attendees screen also includes the Lookup button. Tap this button to display the list of people’s names (and their corresponding companies) stored in PalmPilot organizer’s Address Book. The Lookup button’s function is similar to the Phone Lookup feature described in Chapter 8: Additional Features. Show Options The Expense application allows you to define the sort order and other settings that relate to your expense items.
Note: This setting only applies to expense items that have “Mileage” set as the expense type. The Mileage expense type enables you to keep track of the number of miles traveled on a certain date, or for a certain function. Show Currency This setting shows or hides the currency symbol in the expense list. Expense Menu Commands The Expense application includes menu commands to perform common file and editing tasks. This section explains the menu commands that are specific to the Expense application.
■ Purge. The Purge command is used to conserve memory on your PalmPilot by deleting expense categories that you no longer use. The Purge command displays an alert dialog, prompting you to confirm that you want to purge all the records from the selected category. Options Menu When you select the Options menu, its menu commands appear on screen as shown in the following diagram: ■ Preferences.
■ Default currency. This pick list sets the default currency symbol displayed in the Expense application. All other currencies are shown by their unique currency symbols. ■ Custom Currencies. The Custom Currencies command allows you to define additional currency symbols used by the Expense application. Note: You only need to use this command if the currency symbol you need is not available in the Currency pick list of the Receipt Details dialog (explained earlier in this chapter).
If you want your custom currency symbol to be the default for all Expense entries, choose the symbol in the Preferences dialog. If you want your custom currency symbol to only be used for particular expense items, choose the symbol in the Receipt Details dialog associated with those items. Transferring Your Data to Microsoft Excel Once you have entered expense data into the Expense application of your PalmPilot, the PalmPilot Desktop software enables you to view and print your the data with your PC.
To view your Expense data as an expense report in Microsoft Excel: 1. Perform a HotSync operation. This transfers your latest Expense data to your PC, and makes it available to PalmPilot Desktop. 2. Click the Expense button. The Microsoft Excel application automatically starts and the Expense Report configuration dialog appears, as shown in the following diagram: Click to select Categories Note: If you are using Windows 3.
5. Click the Options button. The Expense Report Options dialog appears, as shown in the following diagram: enter name and other information choose expense template 6. Enter name, department and other information as necessary for your expense report. 7. Click the Templates menu, and click to choose an expense template. Samples of the available expense templates appear in Appendix B: Expense Templates.
At this point, your expense data appears in the familiar Microsoft Excel spreadsheet form. You may enter additional information in any cell, make other changes to the formatting of the spreadsheet, save the file in any directory, and print the file in the normal manner. Expense Templates Four different expense templates are provided with PalmPilot Desktop. Choose the template that is most convenient for your needs. Illustrations of the expense templates appears in Appendix B: Expense Templates.
Printing an Expense Report PalmPilot Desktop makes it quick and easy to print your Expense data. To print your expense report: 1. In the Expense Report dialog, click to select the expense category that you want to print. The category appears highlighted. Click to select Categories You can shift+click to select multiple categories. If you want to print the expenses associated with all of your Expense categories, click the All button in the Categories area. 2.
4. Click the Print button that appears in the Microsoft Excel window to print your expense report.
Chapter 8 Additional Features Your PalmPilot™ connected organizer contains additional features that make it faster, easier and more convenient to use. Find Command The Find command is available in any PalmPilot application, and will locate any text that you specify. The text you enter for your search can be whole words, or the beginning letters of a word. The Find command automatically searches all the data stored on your PalmPilot organizer, and lists which applications contain the text.
As PalmPilot searches for the text, you can tap the Stop button at any time. You may want to do this if you have a large number of matching entries entered on your PalmPilot, and the one you want is already displayed. To continue the search, tap the Find More button. 4. Tap the text of the record that you want to review. The file or record that you selected, and its corresponding PalmPilot application appear on the screen.
2. Tap the Menus button. The menus for your application appear at the top of the screen. 3. Tap the Options menu, and tap the Phone Lookup command. The Phone Number Lookup screen appears, as shown in the following diagram: 4. From the list of phone numbers, tap to select the phone number you want to use. The phone number will appear highlighted. Note: If you have a large number of phone numbers stored in your PalmPilot, you can use the Look Up feature at the bottom of the screen.
with “Wi,” the full name for “Williams” (and the corresponding phone number) will be inserted. If you have more than one name that begins with “Wi,” the Phone Lookup screen appears. ■ The Phone Lookup feature will also work for selected text. Drag to highlight the text, and then write the Phone Lookup command stroke “/L.” The name that is found will replace the selected text. ■ These tips function in all applications that support the Phone Lookup command: the Date Book, To Do List, or Memo Pad.
Note: You may also use the stylus to tap the numbers and function buttons of the Calculator screen. Clear and Clear Entry The Clear and Clear Entry buttons are used to clear numbers from the Calculator, as described below: ■ Clear Entry. The Clear Entry (CE) button clears the last number that you entered. This button is used if you make a mistake while entering a number in the middle of a calculation.
Note that pressing the Memory Store button has no effect on the current calculation (or series of calculations); it merely places the value into memory until it is recalled. The Memory feature makes it easy to perform a series of calculations based on some specific number that can be recalled whenever you’re working with the Calculator. Memory Recall The Memory Recall button summons the value from memory, and inserts it in the current calculation.
3. When you have finished reviewing the dialog, tap the OK button to close the Recent Calculations dialog, and return to the Calculator. Memory Application The Memory application appears in the Application picker, and displays the memory available in your PalmPilot, and how the memory is currently being used. To use the Memory application: 1. Start the Application picker. 2. Tap the Memory icon.
Deleting Applications The Memory application is also used to delete applications that you have installed in your PalmPilot. To delete an application that you have installed: 1. Tap the Delete apps button. A list of the additional applications appears. 2. In the list of applications, tap to select the application that you want to delete. The application will be highlighted (in black). 3. Tap the Delete button. An alert appears, prompting you to confirm that you want to delete the application. 4.
until you set the Security application to show them. With a password set, the password is required to view private records. ■ PalmPilot Lock. You can also set the Security application to turn off and lock the PalmPilot. In this case, the PalmPilot will not operate until the correct password has been entered. To start the Security application: 1. Tap the Applications button. The Application picker appears. 2. Tap the Security icon. The Security screen appears.
Hiding Private Records You can hide the records and entries that you have marked as private. If you have assigned a password, it will be required to show records and entries you have marked as private. To hide Private records: 1. Tap the Hide button. The Hide Records dialog appears, as shown in the following diagram: tap here 2. Tap the Hide button. The Hide Records dialog closes. All records and entries marked as Private will not appear in any application on your PalmPilot.
2. Enter your password. 3. Tap the Show button. The Show Private Records dialog closes. All records and entries marked as Private will be visible in their respective PalmPilot applications. Changing or Deleting a Password Once you have defined a password for your PalmPilot, you can change or delete it at any time. You must enter the current password before it can be changed or deleted. To change or delete your password: 1. With a password assigned, tap the Assigned button.
Important: If you synchronize the data between your PalmPilot and your desktop computer before deleting a forgotten password, your private records will be restored the next time you perform a HotSync™ operation. The password will not be restored. To delete a forgotten password: 1. Tap the Forgotten Password button. If you have a password assigned, the Delete Password dialog appears. 2. Tap the Yes button to delete the password, as well as all records and entries marked “Private.
2. Tap the Turn Off & Lock Device button. If you have a password assigned, the System Lockout dialog appears, as shown in the following diagram: tap here 3. Tap the Off & Lock button. The power for your PalmPilot turns off. 4. The next time you start your PalmPilot, you will be prompted for the password. There will be no access to any of your PalmPilot organizer’s records or applications until the correct password has been entered.
Using a ShortCut Your PalmPilot includes the following pre-defined Graffiti ShortCuts: Entry ShortC ut Entry Time stamp ts dts Lunch Meeting me Date stamp Date / time stamp ds Breakfas t Dinner ShortC ut br lu di To use a ShortCut, 1. Start any PalmPilot application, and tap to define an insertion point. 2. Draw the ShortCut stroke. ShortC ut Graffiti responds with the ShortCut symbol at the insertion point to show that it is in ShortCut mode. 3.
If you want to cancel a Short Cut as you are entering one, you should use the backspace stroke: Backspa ce Creating a ShortCut You can create a ShortCut for any words, letters or numbers. To create a ShortCut: 1. Tap the Applications button. The Application picker appears. 2. Tap the Prefs icon. The Preferences screen appears. 3. Tap the text that appears in the upper right corner of the Preferences screen. The pick list appears. 4. Tap ShortCuts. The ShortCuts Preferences screen appears. 5.
Tip: You may want to add a space (space character) after the last word in your ShortCut text. This way, the ShortCut text will automatically be followed by a space. 8. Tap the OK button to close the ShortCut Entry dialog and define your ShortCut. At this point the ShortCut is defined, and appears in the list of ShortCuts. All ShortCuts are available in any of your PalmPilot applications, and are backed up on your desktop computer when you perform a HotSync.
3. Tap the Yes button to delete your ShortCut. Menu Commands Menu commands for your PalmPilot applications have Graffiti “command stroke” equivalents, similar to command keys on desktop computers. Each command shows its corresponding command letter on the right side of the menu, as shown in the following diagram: Menu commands Command letters With the command stroke and the corresponding command letter, you can immediately activate the menu command without having to access the menu.
3. Write the letter character that activates the menu command you want to use. Note: The Command mode is active for approximately two seconds. You must immediately write the letter character to activate the menu command. The menu command is invoked when you write the command letter. You do not have to tap the Menus button or access the menus when you use the Command stroke and command letters.
Chapter 9 Installing PalmPilot™ Desktop Software This chapter explains how to install the PalmPilot Desktop software on your personal computer (PC). It also explains some of the features and capabilities of the PalmPilot Desktop software. PalmPilot Desktop is supplied with comprehensive online documentation. Once you have installed the software, refer to the Help menu for complete information about how to use PalmPilot Desktop.
■ Print your PalmPilot Date Book, Address Book, To Do List and Memo Pad information on any Windows compatible printer. System Requirements To install and operate PalmPilot Desktop, you need the following minimum equipment and allocations: Minimum Requirements ■ Windows 3.1x, Windows 95 or Windows NT 4.0 ■ IBM compatible 386 PC or higher ■ 8 MB RAM (memory) minimum, 16 MB recommended ■ 10 MB available hard disk space for Windows 95 or Windows NT 4.0 (13 MB for Windows 3.
Installation Preparation To ensure a safe and uninterrupted installation of the PalmPilot Desktop software, please do the following: ■ If you have placed your PalmPilot in the Cradle, remove it during software installation. ■ Turn off background communications programs, such as WinFax or any software that polls the network or other devices, e.g. AS 400. ■ Disable or turn off virus-protection software. ■ Exit all Windows programs, including those run automatically at startup.
3. Choose Run from the Start menu. (With Windows 3.1x, choose Run from the File menu in the Program Manager.) The Run dialog box appears. 4. Enter d:Setup.exe (or x:Setup.exe, where x denotes the location of your CD-ROM drive) in the Run dialog box. 5. Click OK. 6. When the PalmPilot screen appears, click the Install button to begin the software installation. 7. A Welcome dialog appears, and prompts you to exit all Windows programs currently open before continuing with the installation.
those programs and continue. Read the warning message in the window and click the Next button. 7. Follow the remainder of the installation instructions that appear on the screen.
Chapter 10 HotSync™ Technology This chapter explains how to synchronize data between PalmPilot™ Desktop software and one or more PalmPilot connected organizers. To do so, the PalmPilot Desktop and PalmPilot are connected directly or with a modem. Two-way synchronization is achieved by use of HotSync™ technology. HotSync will: ■ Synchronize the PalmPilot records with the records on the PC Desktop and vice versa. ■ Enable a centralized computer to manage individual or multiple PalmPilot organizers.
HotSync Manager recognizes that a PalmPilot has been synchronized and doesn’t ask for a user’s name. In the procedure below, you will be asked to make connections and confirm settings for the communications port, which will allow HotSync operation via the Cradle. (During software installation, you were asked to select a communications port.) Your first HotSync must be performed locally, rather than using a modem. Fitting PalmPilot into the Cradle PalmPilot is designed to fit into the PalmPilot Cradle.
Serial port Note: If you are unsure about the exact location of the serial port on the desktop computer, refer to the user’s manual supplied with the computer. 2. Launch PalmPilot Desktop. 3. From the HotSync menu, choose Setup. When the Setup dialog appears, click the Local tab to display the settings: 4. Check the selected Serial Port and make sure it corresponds to the port number that is connected to the PalmPilot Cradle. Note: This port must not be shared with an internal modem or other device.
To use HotSync for the first time: 1. If HotSync Manager is not running, launch it. 2. If you are using PalmPilot Desktop version 1.0 (for Windows 3.1x only), make sure that Local is selected in the HotSync menu, as shown below: Version 1.0 for Windows 3.1x Version 2.0 for Windows 95 Windows NT 4.0 For PalmPilot Desktop version 2.0 (Windows 95 and Windows NT 4.0), choose Local from the HotSync Manager in the System Tray. Selecting Local tells the PalmPilot Desktop to use the Cradle for synchronization.
HotSync then performs a transfer of data for all five applications: the Date Book, Address Book, To Do List, Memo Pad and the Expense application. A HotSync Progress window appears on the PalmPilot Desktop, as shown below. A similar screen displays the HotSync progress on the PalmPilot. When the HotSync is complete, PalmPilot Desktop displays a final HotSync message.
2. From the General tab, select whether you want HotSync to: ■ Always be available (to monitor the communication port for PalmPilot synchronization requests), or ■ Available only when the PalmPilot Desktop is operating, or ■ Run manually, which means you have to start the HotSync Manager yourself. If you’re not sure which of these options to use, use the Always available (default) setting. 3. Click OK. The Setup dialog closes.
To customize HotSync operations: 1. Choose Custom from the HotSync menu. The Custom dialog appears, as shown in the following diagram: 2. At the top of the Custom dialog, choose the appropriate user name from the list. 3. Highlight an application, and click Change. The Change HotSync Action dialog appears, as shown below: 4. Make selections to set in which direction you want HotSync to write data.
6. Repeat steps #2 through #4 to change conduit behavior for other applications, or for a different user name. 7. Click OK. The Change HotSync Action dialog closes. User Profile You can use HotSync to load data into a PalmPilot — without having that data associated with a user name. This makes it possible to pre-configure a number of PalmPilot organizers with specific information (such as a company phone list) before they are distributed to their actual users.
4. Assign a name for the Profile, and click the OK button. Repeat steps #3 and #4 for each Profile that you want to create. 5. Click the OK button to close the Profiles dialog and return to PalmPilot Desktop. The name that you specified in step #5 appears in the User drop-down list of the PalmPilot Desktop toolbar, as shown in the following diagram: 6. Choose the Profile from the User drop-down list, and create the data for the Profile (e.g. company phone list, etc.).
Conducting a HotSync via Modem HotSync enables you to synchronize the PalmPilot when you are away from your PC by using a modem HotSync operation. Note: You must conduct a local HotSync using the PalmPilot organizer’s Cradle connected to the serial (COM) port of your PC before attempting a modem HotSync operation. To perform a HotSync operation via modem, the PalmPilot, PalmPilot Desktop, and both modems must be configured properly.
4. Enter the telephone number to access the modem connected to your computer. 5. If you need a prefix, such as “9,” to access an outside line, tap the Dial Prefix check box. Enter any needed dial prefix. You may also enter a comma in the field to introduce a “pause” in the dialing sequence. (Uncheck the outside-line prefix box when calling outside an office phone system.) 6.
Conduit Setup The Conduit Setup feature only applies if you are conducting a modem HotSync, running PalmPilot Desktop v2.0, and HotSync Manager 2.0 (with a modem connected to the PalmPilot). It is designed to minimize the data synchronization time required to complete the HotSync operation. The Conduit Setup dialog enables you to define which files and/or applications are synchronized during a modem HotSync operation. To change the settings in the Conduit Setup for a modem HotSync: 1.
PalmPilot Desktop Configuration 1. Choose Setup from the HotSync menu of PalmPilot Desktop v2.0. (For PalmPilot v1.0, choose Options from the Tools menu.) 2. Click the Modem tab. There are four settings to make. The modem Setup dialog is shown below: 3. Choose the communications port for the modem. If you are unsure, look at the back of the PC, and then, using the dropdown list, choose the corresponding number for the port to which the modem is connected. 4. Choose a Speed.
Performing HotSync via a Modem: 1. On PalmPilot Desktop, confirm that: ■ Modem is connected and turned on, and ■ HotSync Manager is running, and ■ Modem is selected from the HotSync menu, and ■ No communications application is running on a COM port. Note: Make sure the PC is disconnected from all online services, such as America Online (AOL), CompuServe, or the like. This helps to avoid conflicts with the COM port. 2.
Chapter 11 Installing Applications on your PalmPilot ™ Connected Organizer Your PalmPilot is supplied with the Date Book, Address Book, To Do List, Memo Pad, Expense and Calculator applications installed and ready to use. You can also install additional applications on your PalmPilot, such as games and other PalmPilot compatible software. The PalmPilot Install Tool application is designed to make it quick and easy to install software on your PalmPilot during a HotSync™ operation.
3. Click the Browse button to locate the application that you want to install on your PalmPilot. For example, to install a game on your PalmPilot, you would click the Browse button, navigate to the Games folder in the PalmPilot Desktop folder, and select the game file that you want. 4. Click the Install button. The Ready to Install dialog appears, as shown in the following diagram: 5. Click the Exit button. Or, click the Install Another File button to return to step #3 and install another application.
Chapter 12 Reference This chapter includes troubleshooting information, explanations of possible error messages, and how to reset your PalmPilot™ connected organizer. This chapter also includes information about how to reach 3Com in case you need assistance with your PalmPilot. Important: For other troubleshooting tips not included in this handbook, refer to either the readme.txt file or the HelpNotes file located in the PalmPilot Desktop directory.
■ Make sure batteries are installed properly. ■ Replace the batteries. If PalmPilot still does not operate, try a soft reset (refer to the following section: Resetting the PalmPilot™ Connected Organizer). Low battery warning after replacing the batteries: ■ The battery warning message may appear immediately after replacing the batteries.
Organizer for information about how to write Graffiti character strokes. ■ Make the Graffiti® character strokes in the Graffiti writing area — not on the display part of the screen. ■ Make sure you are making the strokes for letters in the lefthand side, and the strokes for numbers in the right-hand side of the Graffiti writing area. ■ Make sure that Graffiti is not shifted into extended or punctuation modes.
Security Troubleshooting The following are troubleshooting tips for PalmPilot organizer’s security system. The features of the security system are accessed and controlled with the Security application, and are described in Chapter 8: Additional Features. I forgot the password, but still have access to PalmPilot: ■ You can use the Security application to delete the password. If you do this, all private records will be deleted from your PalmPilot.
PalmPilot™ Connected Organizer for information about how to use the settings in the Preferences application. Records seem to be missing in various applications: ■ Check the Categories pick list (upper right corner of the screen). Choose “All” to display all of the records for the application. ■ Check the Security application and make sure that the Private Records setting is set to “Show” private records.
Removing PalmPilot Desktop Software An application program is provided for the removal of the PalmPilot Desktop software. To remove the PalmPilot Desktop software: ■ Open the PalmPilot Desktop program group, and double-click on the Uninstall PalmPilot Desktop icon. Follow the directions that appear on the screen. Resetting the PalmPilot™ Connected Organizer A reset button can be activated through a hole in the back panel of your PalmPilot.
Use any of the buttons or onscreen controls to continue using your PalmPilot. Hard Reset A hard reset also tells PalmPilot to start over again. With a hard reset, all records and entries stored in your PalmPilot are erased. Therefore, never perform a hard reset unless a soft reset does not solve your problem. Note that any data previously synchronized with your desktop computer will be restored at the next HotSync. To perform a hard reset: 1.
HelpNotes files are also copied to the PalmPilot Desktop directory when you install the PalmPilot Desktop software on your PC. HotSync help is also available in the online Help of the PalmPilot Desktop software. For further assistance, please visit our web site where PalmPilot HelpNotes are posted: http://www.palmpilot.com. Before requesting e-mail or phone support, experiment a bit to reproduce and isolate the problem.
Accessories and Disk Fulfillment To order 3.
United Kingdom 220 Wharfdale Rd. Winnersh, Wokingham Berkshire RG41 5TP - UK +44 01189 228 0 +44 01189 696 666 FAX 0800 22 52 52 Infoline United States 1565 Charleston Rd.
Appendix B: Expense Templates This appendix provides illustrations of the four expense templates that are provided with PalmPilot™ Desktop software. You may use or modify any of these templates when creating expense reports with data from the Expense application.
Sample 2 page 168 PalmPilot Handbook
Sample 3 Appendixes page 169
Sample 4 Appendix C: Creating a Custom Expense Report This section explains how to modify existing Expense application templates, and how to create your own custom expense report templates for use with the Expense application. Note: This section assumes that you are an experienced Microsoft Excel user, or are experienced with a similar spreadsheet application.
About Mapping Tables Before creating or modifying an Expense template, it’s important to understand the function of PalmPilot ™ Desktop’s Expense application. In simple terms, the Expense application is designed to move Expense data from your PalmPilot™ connected organizer into a Microsoft Excel spreadsheet. Each Expense item stored in the PalmPilot represents a group of related data.
Customizing Existing Sample Templates Four sample Expense Report templates are provided with PalmPilot Desktop. If the layout of one (or more) of these templates are appropriate for your reporting needs, you can easily customize the templates with your company name and other information. To customize a sample Expense Report template: 1. In the folder (subdirectory) that contains the PalmPilot Desktop application, open the folder named “templates.” (If using Windows 3.
to “Munchies” — and then all items entered on the PalmPilot as “Snack” will be mapped to the cell(s) labeled “Munchies.” Important: Do not insert rows or columns in the sample template. Doing so will change the way your Expense data is mapped to the template and cause errors. If you want to move the cells to a different location, add or delete rows or columns of cells, you will have to make changes to the Maptable.xls file. 4. Choose Save As from the File menu. The Save As dialog appears. 5.
Determining the Layout of the Expense Report This section describes the layout considerations for the Expense Report, and explains the terms used for creating the report. Labels There are two kinds of labels that you need to define for your report: day/date, or expense type. Each kind of label can either be a Fixed or Variable label. A Fixed label means that the label always appears as a header at the beginning of a row or column. If a label is not Fixed, it is variable.
mapping, you create corresponding additional lines to the mapping table file named Maptable.xls. The procedure for this is explained in later sections of this Appendix. If a section contains cells for prepaid (company paid) expenses, you will need to create an additional line in the mapping table for “prepaid.” This will count as an additional section in the mapping table.
■ Place a copy of your custom Expense Report in the folder named “template” (in the PalmPilot Desktop directory). Change the file name so it has the file extension .xlt (which defines it as a Microsoft Excel Template). Make a note of the exact file name so it can be defined in the mapping table file. Programming the Mapping Table Once you have analyzed the components of your custom Expense Report, you can program the mapping table to fill the report with data from the PalmPilot.
Select rows here All rows associated with Template are selected (highlighted) 4. Choose Copy from the Edit menu. 5. Scroll down to a blank area of the Maptable.xls file (below the rows used for SAMPLE4.XLT), and click on a row number to select a blank row. 6. Choose Paste from the Edit menu. A copy of the rows you selected in step #3 is pasted into the Maptable.xls file. 7. Name the table.
You may add or delete rows as necessary so that the total number of rows corresponds to the number of Sections in your custom Expense Report. To clear all of the existing settings in a row, click to select the row and press Ctrl-Delete. Name each row to correspond to a Section of your custom Expense Report. 9. Determine the Label settings.
The # of Rows represents the total number of rows in the Section, excluding any header or total rows. In other words, this includes only the number of rows in the Section where PalmPilot data will be placed. The # of Columns represents the total number of columns in the Section, excluding any header or total columns. In other words, this includes only the number of columns in the Section where PalmPilot data will be placed.
If the Section will present the data in a list format, enter the word YES. Otherwise, enter the word NO. The following diagram shows data presented in a list format: Only if your section is in list format: In the Expense Type cell, enter the number of the row or column where the expense description will be placed. Expense amounts can be entered in several different columns or rows if required by your template. Expense type labels must all appear in the same column. 13.
15. Marking a Section for prepaid expenses (yellow column). If a row in the map table is for prepaid (company paid) expenses, type a YES in the cell on that Section’s row. Type NO in all the cells of this column that do not pertain to prepaid expenses. 16. Repeat steps #9 through #15 for each Section that you have defined for your custom Expense Report. 17. Mapping Expense Report Options dialog (magenta section).
■ Trips. Shows the number of Expense application categories, and lists each one followed by an “end” statement. ■ Currency. Shows how many currencies were used for the Expense data, and lists the countries that correspond to that currency. ■ Trip. Shows the number of expenses by category, and lists the expenses for each category. ■ Expenses. Shows the total number of expenses, and lists them chronologically.
3Com End User Software License Agreement YOU SHOULD CAREFULLY READ THE FOLLOWING TERMS AND CONDITIONS BEFORE USING THIS PRODUCT. IT CONTAINS SOFTWARE, THE USE OF WHICH IS LICENSED BY PALM COMPUTING, INC., A SUBSIDIARY OF 3COM CORPORATION (COLLECTIVELY, Ò3COMÓ), TO ITS CUSTOMERS FOR THEIR USE ONLY AS SET FORTH BELOW. IF YOU DO NOT AGREE TO THE TERMS AND CONDITIONS OF THIS AGREEMENT, DO NOT USE THE SOFTWARE. USING ANY PART OF THE SOFTWARE INDICATES THAT YOU ACCEPT THESE TERMS.
Modification, reverse engineering, reverse compiling, or disassembly of the Software is expressly prohibited. However, if you are a European Community (“EC”) resident, information necessary to achieve interoperability of the Software with other programs within the meaning of the EC Directive on the Legal Protection of Computer Programs is available to you from 3Com upon written request.
All warranties and limitations of liability applicable to the Software are as stated on the Limited Warranty Card or in the product manual accompanying the Software. Such warranties and limitations of liability are incorporated herein in their entirety by this reference.
Limited Warranty Palm Computing, Inc., a subsidiary of 3Com Corporation (collectively, “3Com”), warrants to the original purchaser (“Customer”) that this product will be free from defects in workmanship and materials, under normal use, for one year from the date of original purchase from 3Com or its authorized retailer.
OBTAINING WARRANTY SERVICE: Customer must contact 3Com’s Palm Computing, Inc. Technical Support or Customer Service within the applicable warranty period to obtain warranty service authorization. Dated proof of original purchase will be required. 3Com is not responsible for Customer products or parts received without warranty service authorization.
repair or modify, or any other cause beyond the range of the intended use, or by accident, fire, lightning, or other hazards or acts of God. This warranty does not cover physical damage to the surface of the product, including cracks or scratches on the LCD touchscreen. This warranty does not apply when the malfunction results from the use of this product in conjunction with accessories, other products, or ancillary or peripheral equipment and 3Com determines that there is no fault with the product itself.
FCC Statement This device complies with part 15 of the FCC rules. Operation is subject to the following two conditions: (1) This device may not cause harmful interference, and (2) this device must accept any interference received, including interference that may cause undesired operation. Note: This equipment has been tested and found to comply with the limits for a Class B digital device, pursuant to Part 15 of the FCC rules.
Canadian RFI Statement This Class B digital apparatus meets all requirements of the Canadian Interference-Causing Equipment Regulations. Cet appareil numérique de la classe B respecte toutes les exigences du Réglement sur le matériel brouilleur du Canada.
Index A Address Book activating 65 address entry details 71 categories 70 creating entry 66 deleting entries 75 editing entry 68 list by company 70 lookup entries 69 menu commands 72 phone numbers 68 Alarm setting 57 Alarm Sounds 13 Applications address book 65 buttons 2 calculator 116 date book 45 deleting from PalmPilot 119 expense 95 finding text 113 installing 149 memo pad 87 memory 118 Index menus 35 record categories 38 security 120 starting 23 to do list 77 Attendees 102 Auto-Off Delay 12 B Bac
menu commands 118 recent calculations 118 using screen 116 Capital Letters 29 Categories 38 address book entries 70 defining new 40 expense 100 memos 91 merging 42 renaming 42 using in lists 39 Command Stroke 128 Contrast Control 3 Copy command 37 Currency 101 choosing default 105 defining custom 105 Cut command 37 setting 12 to do item 80 Date Book activating 45 alarm 57 choosing date 50 deleting events 63 event conflicts 54 event date 57 event details 56 event duration 47, 56 event start time 47, 56 go t
changing to untimed 50 choosing date 57 conflicts 54 date book scheduling 46 deleting 63 details 56 in week view 53 repeat 58 setting alarm 57 start and duration 47 untimed 48 Expense activating 96 attendees 102 creating item 98 custom currency 105 custom report 164 default currency 105 details 100 item currency 101 item date 99 menu commands 104 payment method 101 printing reports 111 Index Quickfill 105 receipt details 100 show options 103 templates 160 type 101 vendor 102 viewing data 107 F FCC State
accent characters 32 alphabet 28 capital letters 29 command 37 concepts 25 editing shortcut 127 navigation strokes 129 numbers 29 online help 37 punctuation marks 30 shortcuts 124 symbols 31 tips 27, 33 writing area 2 writing characters 26 Graffiti Help pen stroke 21 H Hard Reset procedure 156 reset button 4 Help on-line tips 38 HotSync page 194 communications port 137 conduit setup 146 customizing 141 HotSync Manager 135 local HotSync 135 local speed 137 modem speed 147 options 139 user profile 142 via
M Memo arranging in list 90 creating new 88 deleting 93 font size 89 reviewing memos 89 scrolling in 90 Memo Pad activating 87 arranging memos 90 creating memo 88 deleting memos 93 menu commands 91 Memory application 118 calculator 117 purge date book 61, 104 purge to do list 84 Menus activating 35 address book specific 72 calculator specific 118 choosing 36 command equivalents 127 Index date book specific 60 edit menu 36 expense specific 104 memo pad specific 91 to do list specific 83 Modem HotSync 144
O On-Line Tips 38 On-Screen Keyboard 33 menu command 37 screen options 34 Owner Preferences 17 P PalmPilot application buttons 2 applications 22 assigning password 120 backlight 2, 6 battery door 4 battery installation 5 changing password 122 common data 142 contrast control 3 controls 1 forgotten password 123 HotSync cable 136 page 196 PalmPilot, cont’d HotSync via modem 144 install tool 149 installing applications 149 locking with password 123 memory door 4 menus 35 on-line tips 38 on-screen keyboard
troubleshooting 151 warranty 176 writing text 24 writing tips 27 PalmPilot Desktop customizing HotSync 140 features 131 HotSync conduit setup 146 HotSync options 139 install tool 149 obtaining 3.
assigning password 120 hiding records 121 showing records 122 Private Records 44 Profiles 142 Punctuation Marks writing 30 Purge date book events 61, 104 to do items 84 Q Quickfill 105 R Records attaching notes 43 categories in lists 39 choosing categories 38 hiding private 120 private 44 Repeat Event 58 Reset Button 4, 156 S Scroll Buttons 2 page 198 Search for text 113 phone lookup 114 Security 120 assigning password 120 changing password 122 forgotten password 123 hiding records 121 locking PalmP
Software Installation 132 Starting Applications 23 Stylus 3 System Requirements 132 System Sounds 13 T Technical Support 157 Templates expense report 107 for expense report 160 Text Entry accent characters 32 capital letters 29 Graffiti ShortCuts 124 numbers 29 on-screen keyboard 33 punctuation marks 30 symbols 31 with PalmPilot 24 writing tips 27 Index Time alarm setting 57 format 15 setting 11 setting event 47, 56 Tips 38 To Do List activating 77 checking off item 79 completed items 82 completion date
V Vendor 102 W Week date book view 52 Writing accent characters 32 capital letters 29 Graffiti ShortCuts 124 numbers 29 on-screen keyboard 33 punctuation marks 30 symbols 31 text with PalmPilot 24 tips 27 page 200 PalmPilot Handbook