
GPRS 1.1
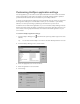
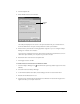
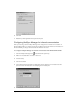
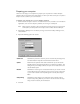
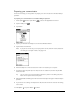
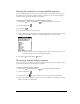
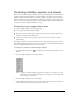
Table Of Contents
- Treo™ 270 Communicator User Guide
- GPRS 1.1, Windows Edition
- Contents
- Introduction to Your Treo™ 270 Communicator
- Entering Data in Your Communicator
- Managing Your Applications
- Applications Overview
- Common Tasks
- Application-Specific Tasks
- PhoneBook
- To change the PhoneBook view, do one of the following:
- Using the Speed Dial view
- Using the Dial Pad view
- Using the Contacts view
- Using the Active Call view
- Forwarding calls
- Other ways to make a call
- Using the Call History list
- Barring Calls
- PhoneBook menus
- Date Book Plus
- Working in Day View
- Scheduling an event
- Rescheduling an event
- Setting an alarm for an event
- Scheduling repeating or continuous events
- Changing the Date Book Plus view
- Working in Week View
- Working in Week View with Text
- Working in Month View
- Working in Year View
- Working in List View
- Spotting event conflicts
- Working with floating events
- Working with To Do items
- Using the Daily Journal
- Using templates
- Date Book Plus menus
- Blazer
- SMS Messaging
- To Do List
- Memo Pad
- CityTime
- Calculator
- Expense
- SIM Book
- SIM Services
- PhoneBook
- Setting Preferences for Your Communicator
- In the Preferences screens, you can do the following:
- Viewing Preferences
- Buttons Preferences
- Buttons 2 Preferences
- Connection Preferences
- Digitizer Preferences
- Formats Preferences
- General Preferences
- Network Preferences
- Selecting a predefined service template
- Connecting to your service
- Creating additional service templates
- Configuring GPRS settings
- Configuring dial-in, ISDN, infrared, and USB/serial settings
- Entering Advanced dial-in, ISDN, infrared, and USB/serial settings
- Deleting a service template
- Network Preferences menu commands
- TCP/IP troubleshooting
- Owner Preferences
- Ringer Preferences
- ShortCuts Preferences
- Advanced HotSync® Operations
- Selecting HotSync setup options
- Customizing HotSync application settings
- IR HotSync operations
- Conducting a wireless HotSync operation
- Conducting a HotSync operation via a network
- Using File Link
- Creating a user profile
- Maintaining Your Communicator
- Troubleshooting Tips
- Creating a Custom Expense Report
- Non-ASCII Characters for Login Scripts
- Advanced Call Forwarding Options
- Other Product Information
- Index

Chapter 8 Page 207
Preparing your computer
There are a few steps you must perform to prepare your computer for a wireless HotSync
operation. Be sure to perform these steps before you leave your office so that your computer is
ready to receive a call from your communicator.
To prepare your computer for a wireless HotSync operation:
1. Confirm that the computer modem is connected and turned on, and that no communications
applications, such as fax or telephony software, are running on a COM port.
Note: Make sure the computer is disconnected from all online services, such as America
Online (AOL) and CompuServe. This helps to avoid conflicts with the COM port.
2. Start HotSync Manager if it is not already running, and from the HotSync Manager menu,
choose
Modem.
3. Adjust the following options as needed.
4. Click OK.
Serial Port Identifies the port for the modem. If you are unsure of the port assignment,
look at the Modem Properties in the Windows Control Panel.
Speed Determines the speed at which data is transferred. Try the As Fast As
Possible rate first, and adjust downward if you experience problems. This
setting allows your desktop software and your communicator to find and
use the fastest speed.
Modem Identifies the modem type or manufacturer. Refer to your modem manual
or face plate for its type or settings. If you’re not sure of your modem type
or your modem doesn’t match any that appear in the list, select Hayes
Basic.
Setup String Identifies the setup string for your particular modem. Not all modems
require a setup string. Refer to your modem manual and enter the setup
string if recommended by the manufacturer.